Blog

Beef and Ginger Stir-Fry

Jump to Recipe

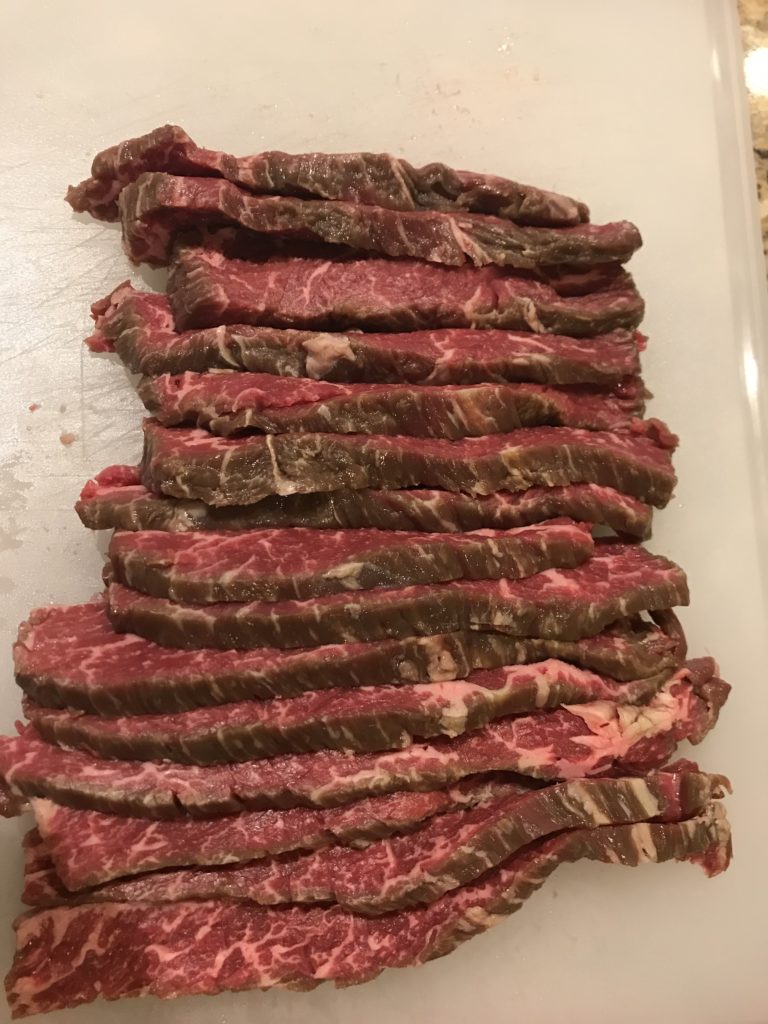
I made this seemingly simple meal a few weeks ago, but mixed up the beef packages so instead of using one pound of skirt steak, I used two pounds of flank steak meant for the Bulgogi. The good news is that my Bulgogi turned out amazing with just one pound of skirt steak. I’ll never use flank steak for that recipe. The bad news is that my stir-fry turned into stir-steamed. The taste was good, but the color and texture was not what the recipe promised. A few nights ago, I made it again, but this time with the correct amount and type of steak. I expected amazing results. Well, let’s just say this blog is a personal one where I show my wins and my losses. Sometimes you think you end up with loss, but sometimes a loss is just something new, something you didn’t expect, and not a loss at all.

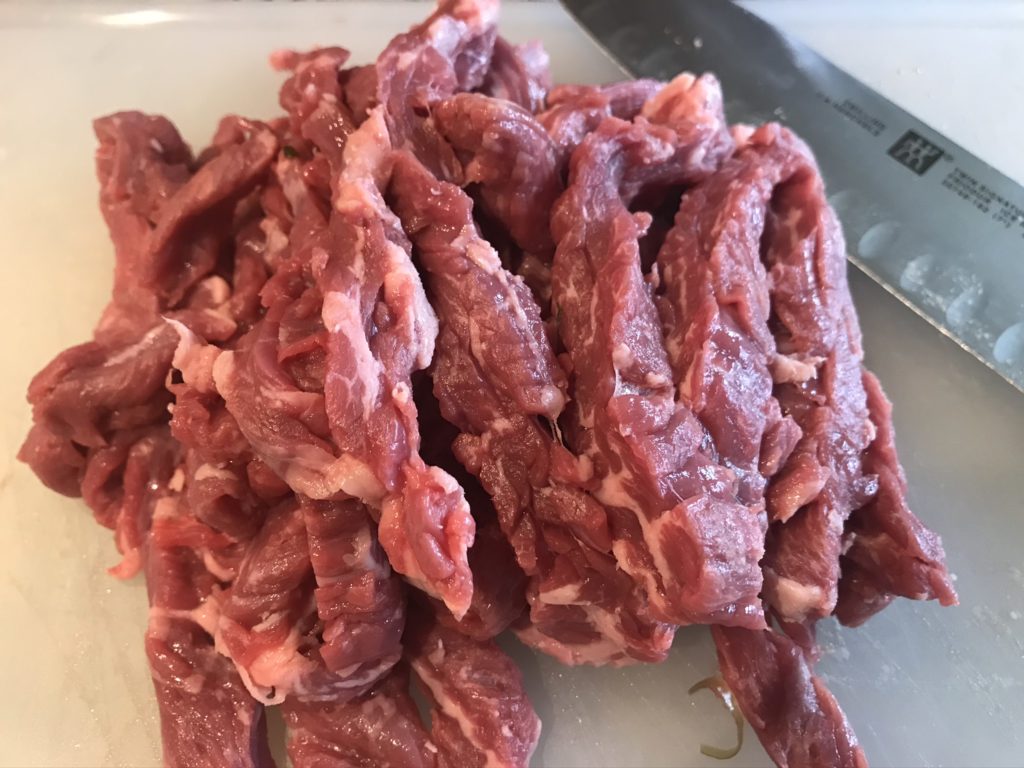
First, slice up your ingredients. Pat your meat dry and slice against the grain.

Beef and Ginger Stir-Fry

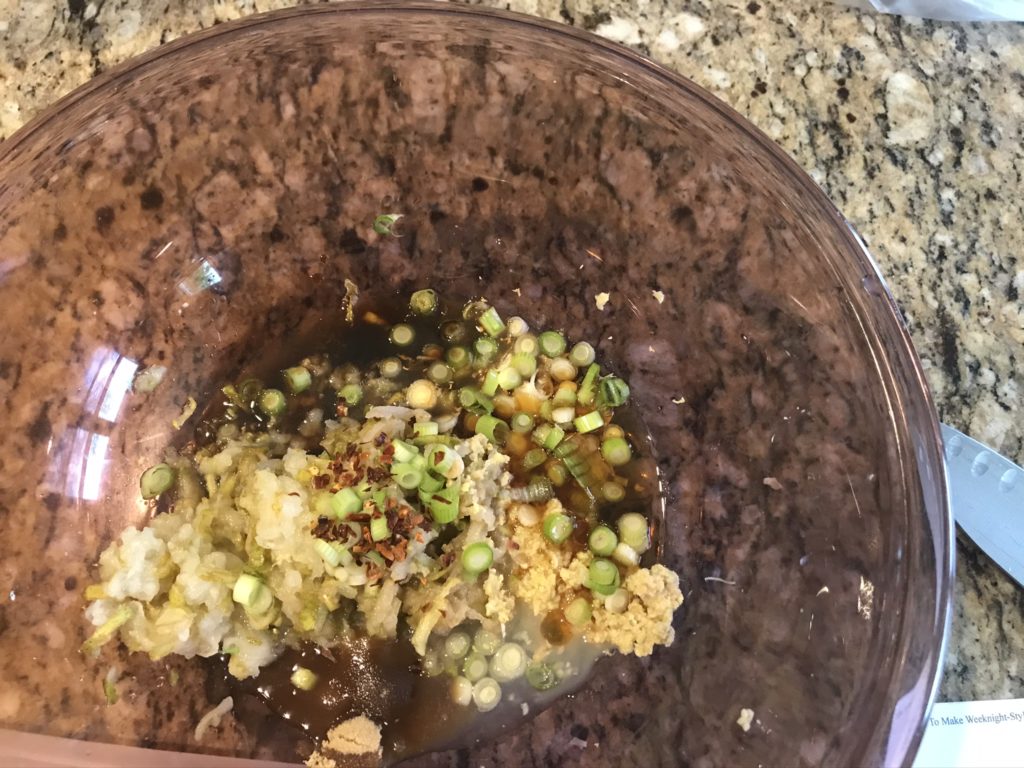
Now that you’ve sliced the meat, combine sugar, sesame oil, soy sauce, and salt to create a marinade. Let the steak sit in that for 20 minutes.

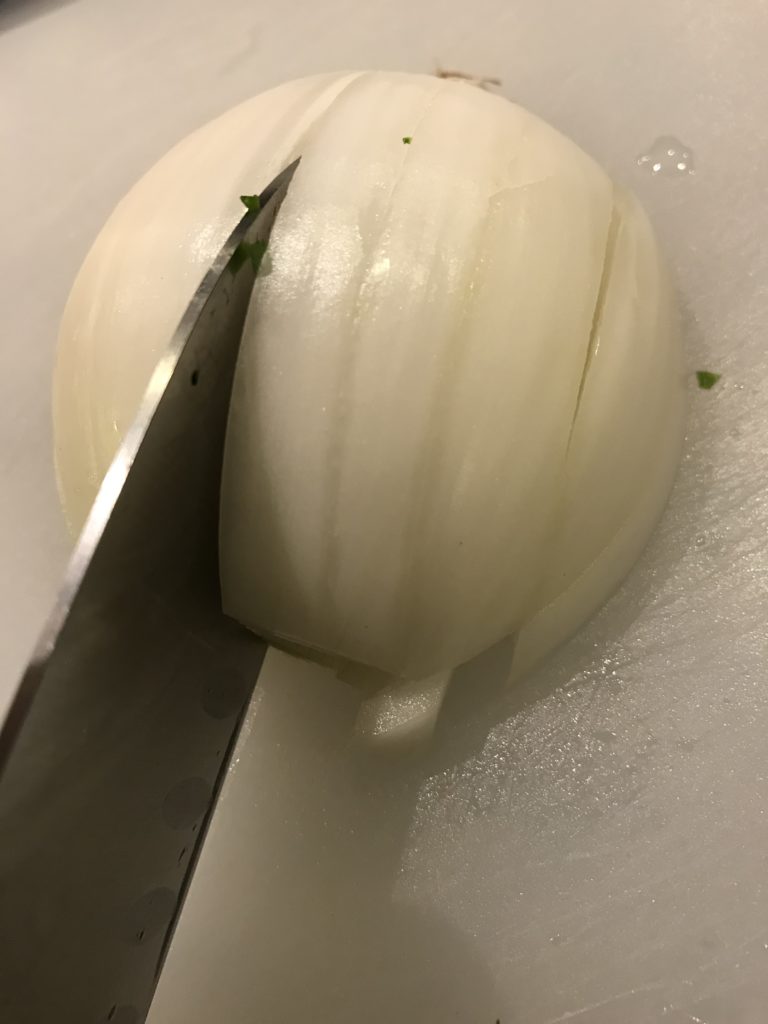
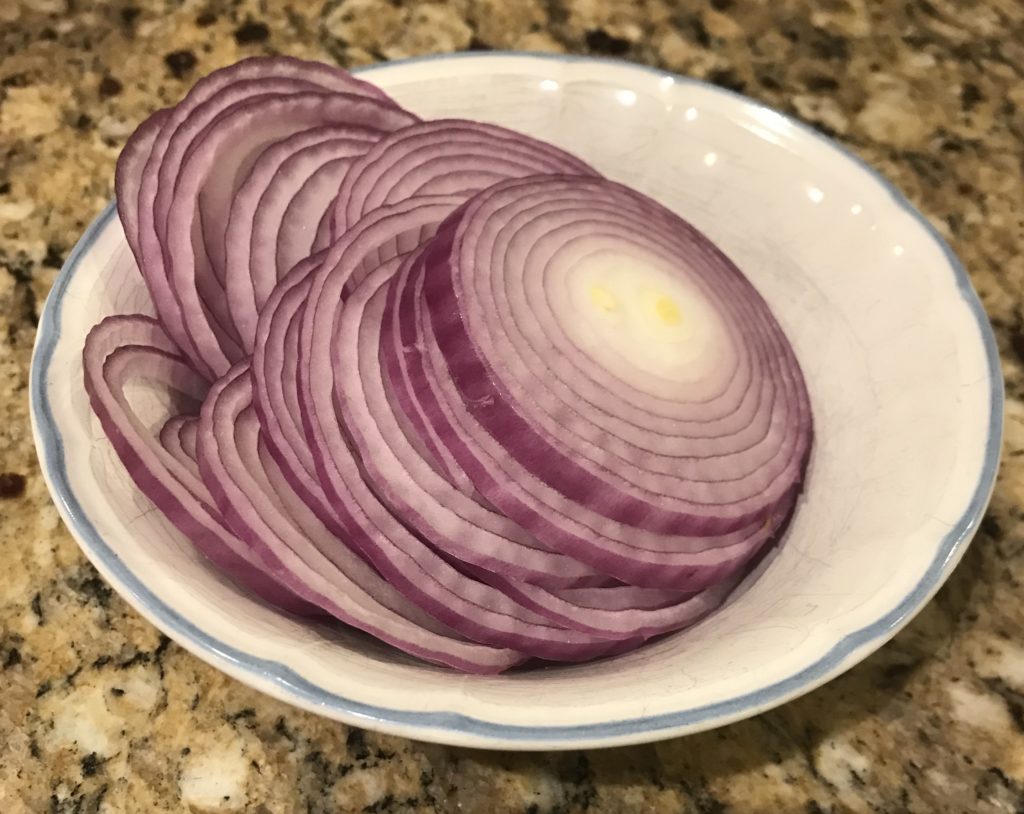
Meanwhile, slice up a red onion into rings using a very sharp knife. If you use a dull knife, the onion might slip and that’s how you cut yourself. If you are still a bit nervous because your knife isn’t all that sharp or you just don’t like the idea of slicing a rolling object (I get that!), cut the onion in half and cut the onion in half slices, flat side down. For me, I was brave, but mainly because I just had my butcher sharpen my knives. BTW, if you need to sharpen your knives and you don’t know how, check to see if your supermarket’s butcher will do it for you for free or a small fee. It’s completely worth it.

And before I forget, be sure you are holding that onion with a clawed grip, knuckles slightly out. Your knuckles will prevent the sharp blade from reaching your fingers.

Beef and Ginger Stir-Fry

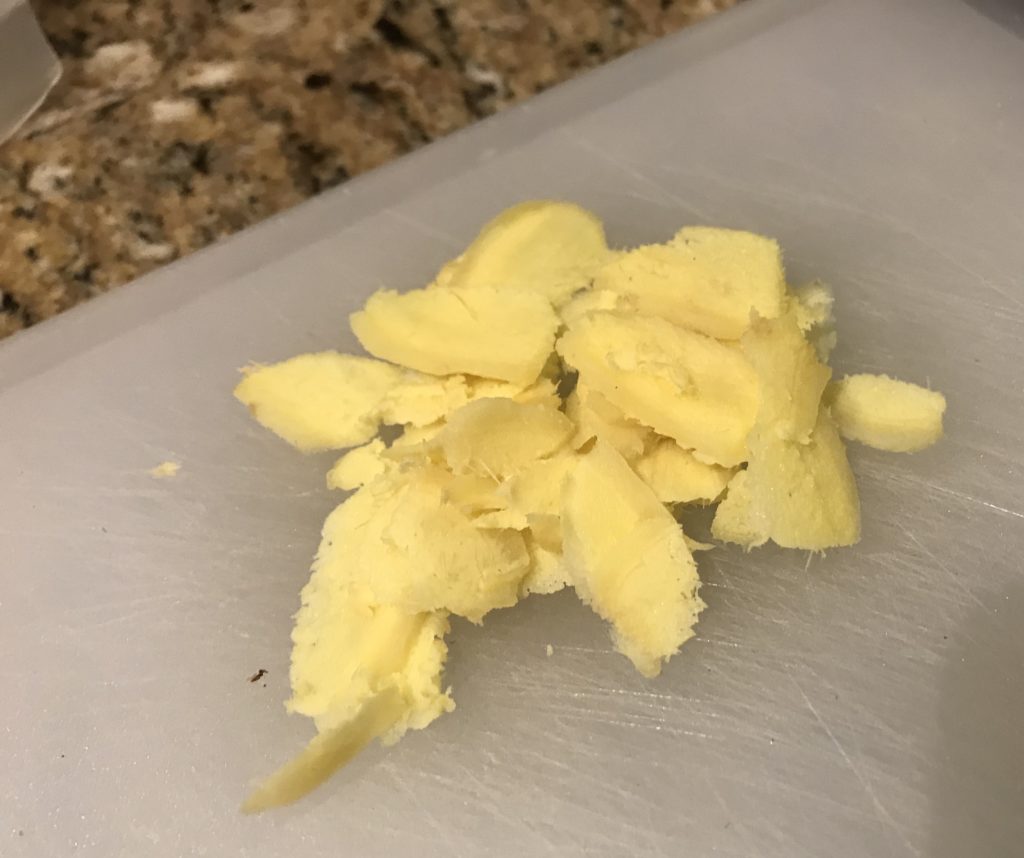
Finally, I peeled and sliced some ginger. If you ever wondered how to peel ginger, I learned a cool trick. No need for a vegetable peeler or knife. Use the edge of a spoon and scrape the peel off. It’s as simple as that!

To thinly slice the ginger, I pulled out my trusty mandolin because I wanted very thin slices that I knew I wasn’t skilled enough to do with a knife, no mater how sharp it is. Be sure to use the guard so you don’t slice your fingers. Ouch. If you don’t have a mandolin, consider buying one. I use mine all the time to slice carrots, cucumbers, onions, potatoes, and pretty much any veggie that you want thinly sliced. The alternative is to use your knife and slice as thinly as possible. It’s not the end of the world.

Beef and Ginger Stir-Fry

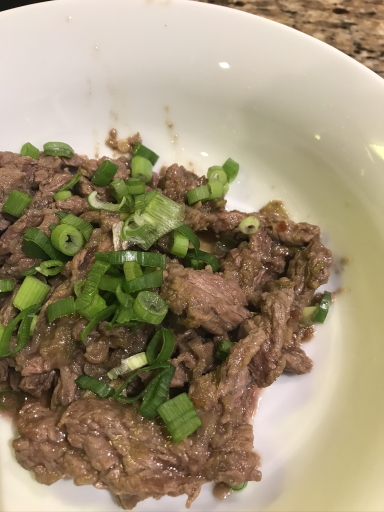
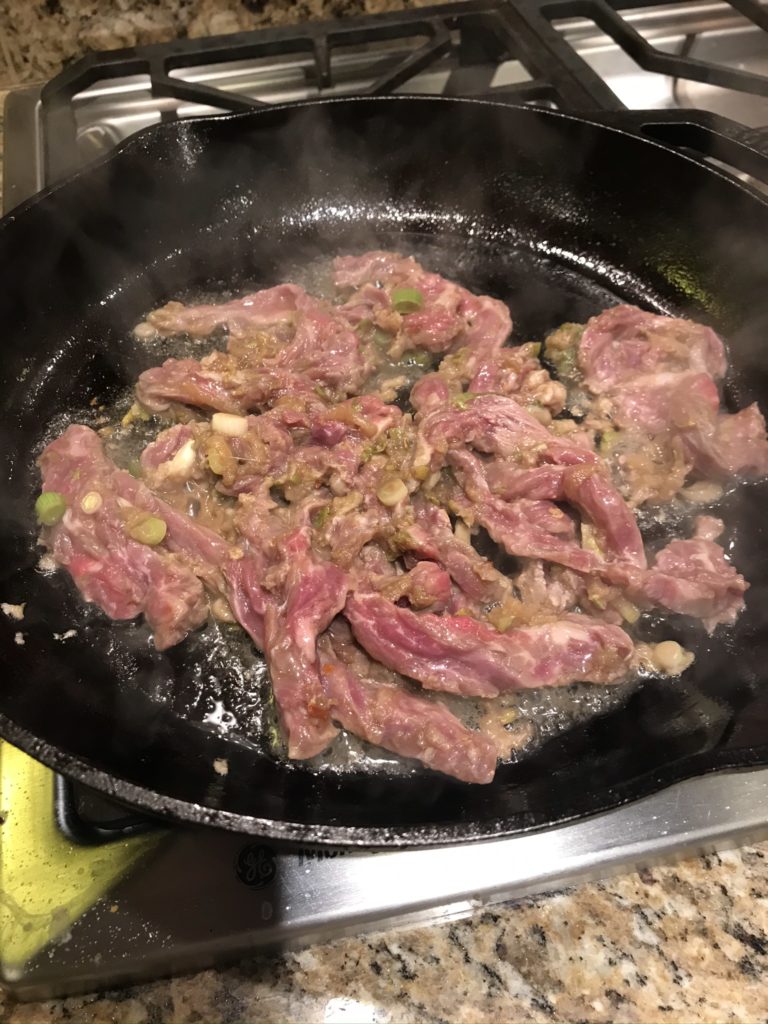
Heat a tablespoon of vegetable oil in a large skillet until it’s so hot that the soil is shimmering and there are wisps of smoke. I swear I did this, but apparently it was still not hot enough. When I added the meat to the hot pan, the temperature of my pan shot down and the meat steamed instead of browned. ARGH. I think I should have used a cast iron pan instead of a skillet. It probably wouldn’t have hurt turning up the heat to counter balance the temperature change. As I was standing there, swearing to myself, wishing for a do-over, I realized I could continue to make a trucker blush with my language or just go with it. I chose the latter. There’s no point of crying over spilled milk. Or steamed steak.

After a couple minutes, add your onion, ginger, lots of pepper, and a little water.

Beef and Ginger Stir-Fry

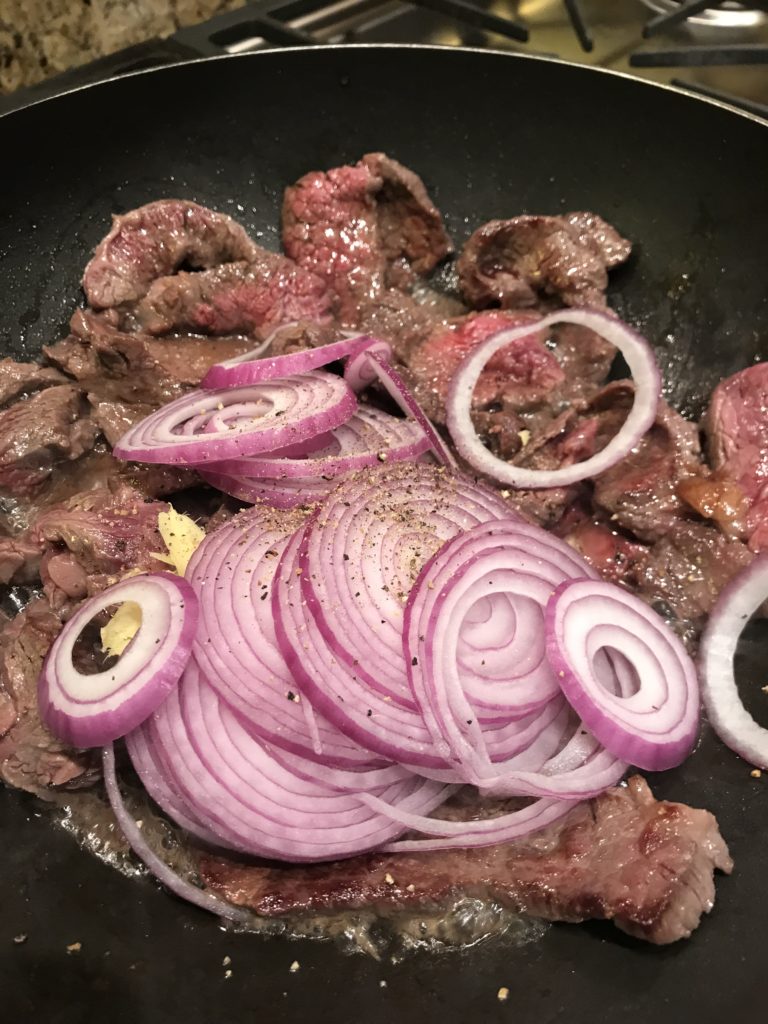
Cook, stirring often, until the onion is barely tender and the ginger is soft.

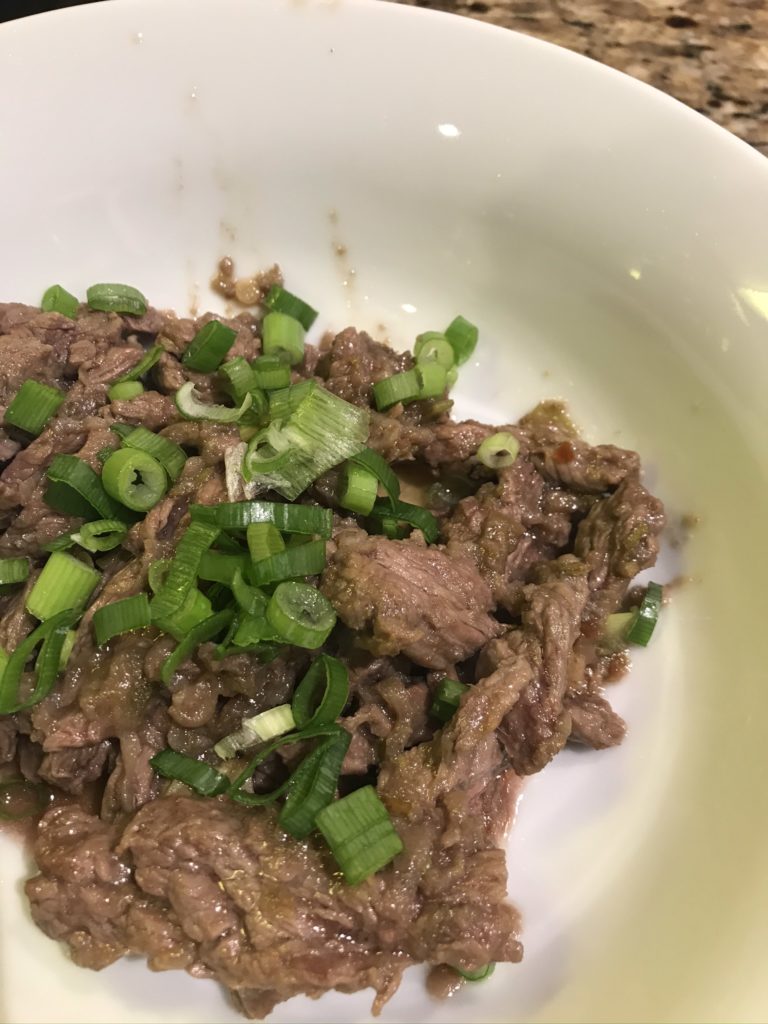
Now the secret ingredients. Call me crazy, but I would have never thought to add BUTTER to the pan. Really. Move over 90s, this is not a low-fat meal! Remove that pan from the heat, and add 3 tablespoons of butter (that’s almost a half a stick, people!), lemon juice (for acidity), and the rest of the soy sauce. Toss until the steak is coated with melted butter. Serve over rice.

Beef and Ginger Stir-Fry

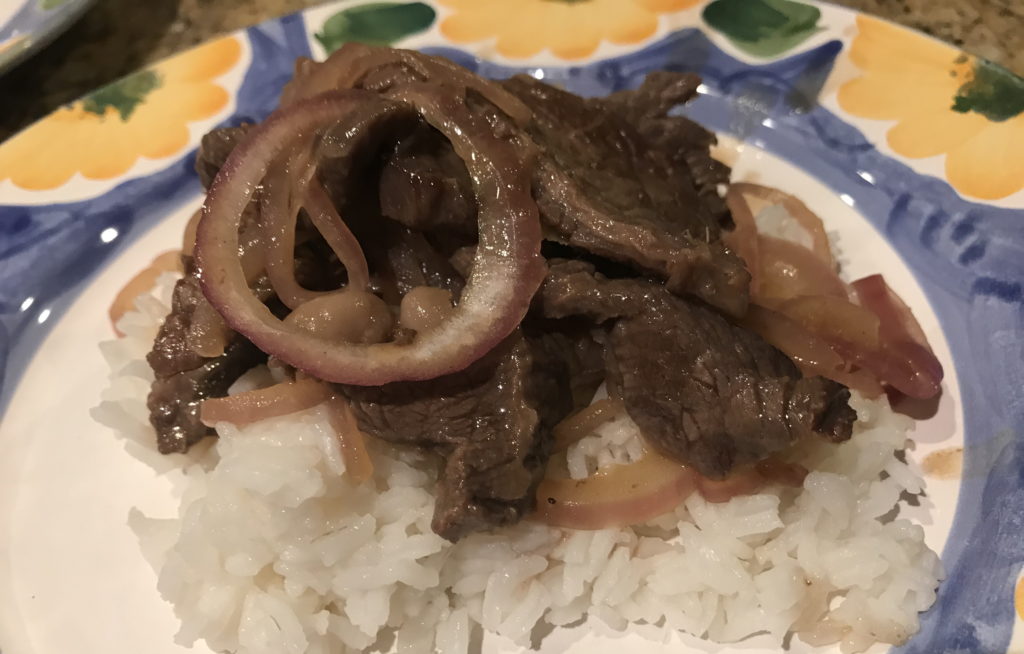
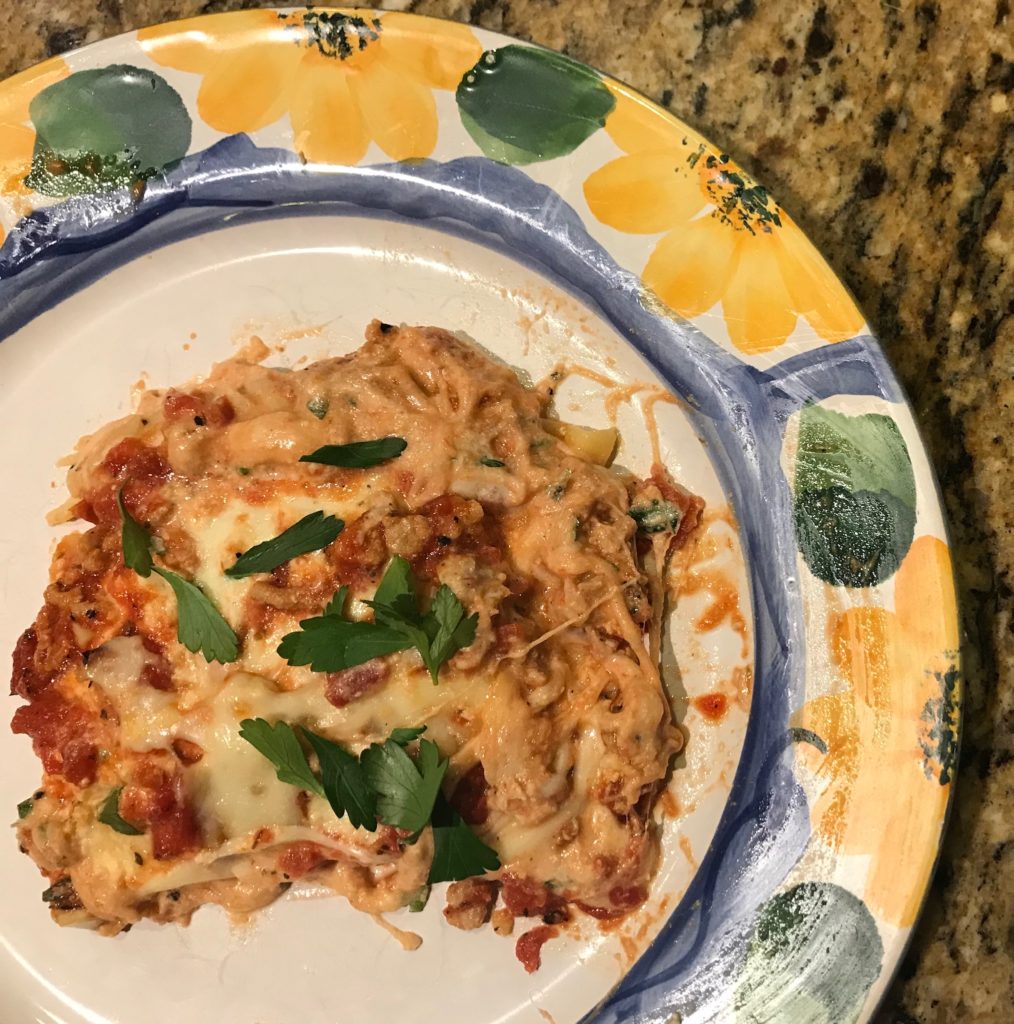
Although the beef looks nothing like the glossy picture on BA, the beef was super tender and flavorful. The onions were not caramelized, but perfectly respectable. The ginger was not seen, but definitely heard. The boys gobbled it up and asked for seconds. Maybe a loss is sometimes a win. In this case, it’s not only a win, but a new dish.

Beef and Ginger Stir-Fry

Beef and Ginger Stir-Fry

Servings 4

Ingredients
  

  • 1 pound skirt steak trimmed of fat, sliced against the grain into 1/4-inch strips, patted dry
  • 1 teaspoon sugar
  • 1 teaspoon toasted sesame oil
  • 1 teaspoon soy sauce
  • 1 teaspoon kosher salt plus more
  • 1 medium red onion sliced into 1/2-inch thick rounds
  • 3 inch ginger peeled and sliced very thinly
  • 1 tablespoon vegetable oil
  • freshly ground black pepper
  • 3 tablespoons butter cut into pieces
  • 1 tablespoon fresh lemon juice
  • 1 tablespoon soy sauce
  • cooked rice for serving

Instructions
 

  • Trim the steak of any excess fat. Slice steak into 1/4-inch strips and pat dry with a paper towel.
  • In a medium bowl, combine sugar, sesame oil, 1 tsp. soy sauce, and 1 tsp. salt. Add sliced steak strips, stir to coat, and let it sit for 20 minutes.
  • Slice onions into rounds with a sharp knife, and peel and thinly slice ginger using a manxdolin or sharp knife.
  • Place a large skillet over high heat. Pour in vegetable oil and swirl to coat bottom of pan. The oil should be shimmering and you should see some wisps of smoke. If the pan is not hot enough, the meat will steam instead of getting deeply browned.
  • Add the steak to the skillet in an even layer. It’s okay to crowd it a bit. Cook, undisturbed, until brown around the edges, about 2 minutes. Turn steak over and add onion, ginger, lots of pepper, and 1/3 cup water. Cook, tossing often, until onion is just tender and ginger is softened, about 2 minutes.
  • Remove skillet from heat and add butter, lemon juice, and remaining 1 tablespoon of soy sauce. Toss until butter is melted and coats steak. Taste and season with more salt if needed.
  • Serve over cooked rice.
Blog

Cheesy Taco Pasta

Jump to Recipe

Last week, I combined two wonderful foods: taco and soup. Today, I’m sharing a taco + pasta recipe from Delish. I’m starting to see a theme here. Maybe next week I’ll invent taco ice cream. Kidding. That sounds awful.

At first I thought this was a mac n cheese recipe with taco meat, but far from it. It’s definitely cheesy, but the main star is still the pasta sauce, which happens to have a lot of cheese in it. Better yet, it’s absolutely delicious and super easy to make. You seriously can whip this up in 30 minutes on a weeknight and everyone will love it. What’s not to love? There’s cheese. There’s taco-ness. There’s pasta. Win-win.

First, boil some pasta until al dente, and it’s really important not to overcook your pasta because you’ll cook the pasta some more in the sauce later. When you drain the pasta, be sure to save some of the pasta water too. You can use any type of pasta. The original recipe uses macaroni, but lately, I’ve been using pasta shells because it has pockets to trap the sauce inside and I like that.

Now for a little lesson on chopping an onion. If you know about this trick, skip ahead. Otherwise, this will be life changing for you. I don’t know what I used to do before other than nick my fingers and end up with unequal pieces of stuff. Unfortunately, the onion will still make you cry, but let’s just pretend they are tears of joy.

Cut off the non-root end of the onion and then peel the skin off. Next, cut it in half through the root. Flat side down, cut in half towards the root.

Cheesy Taco Pasta

Now, slice the onion lengthwise.

Cheesy Taco Pasta

Finally, cut across and admire your handiwork.

Cheesy Taco Pasta

After you’re done patting yourself on the back for you perfectly chopped onion pieces, you can apply your new trick to a jalapeño. If you want a spicier dish, include the membranes when you chop up the pepper.

Gather the rest of the ingredients and arrange them next to the stove you can dump them in the pan as you go.

Cheesy Taco Pasta

Saute the onion and jalapeño. Add your ground beef. When that’s cooked, throw in your taco seasonings. Next, add the canned tomatoes. Fire-roasted are best, but you can use any type of canned diced tomatoes. Hopefully your pasta is done by now because you need some of that reserved pasta water too.

Cheesy Taco Pasta

Drop in the grated cheese and let it melt. Stir.

Cheesy Taco Pasta

Dump the cooked pasta in.

Cheesy Taco Pasta

Stir it all up until the pasta is well coated and combined with the sauce. Dish it out, garnish with cilantro, and eat!

Cheesy Taco Pasta

As you can see, it’s not mac and cheese, but your familiar and comforting pasta and meat sauce, enhanced with a bunch of cheese and taco seasonings. It makes great leftovers, but you might not have any. Instead, you’ll breakdown, have seconds, and soon it’ll be all gone.

Cheesy Taco Pasta

Cheesy Taco Pasta

Servings 6

Ingredients
  

  • olive oil
  • 12 ounces pasta shells
  • 1/2 large white onion chopped
  • kosher salt
  • 1/2 jalepeno chopped
  • 1 pound ground beef
  • 2 tablespoons taco seasoning
  • 15 ounces diced fire-roasted canned tomatoes
  • 1 1/2 cups shredded jack cheese
  • fresh cilantro chopped, for garnish

Instructions
 

  • Boil a large pot of water. Salt the water and then add the pasta. Cook according to package directions until al dente. Drain, saving at least 1/4 cup of the pasta water. Return pasta to the pot.
  • In a large skillet over medium heat, heat olive oil. Add onion and season with salt. Cook until tender, 5 minutes.
  • Add jalapeño. Cook 2 minutes more.
  • Add ground beef and cook until no longer pink, 6 minutes. Add taco seasoning. Drain fat.
  • Add canned tomatoes and 1/4 cup reserved pasta water. Stir.
  • Add cheese. Let it melt in while stirring occasionally for about 2 minutes.
  • Add cooked pasta and toss until completely combined.
  • Garnish with cilantro and serve.
Blog

Parmesan Chicken

Jump to Recipe

I love Parmesan chicken. It’s one of my favorites, but one that I’ve never made well. I usually end up ordering it at restaurants, wishing I could replicate it at home. I think I figured out the problem. I had the wrong recipe.

The two biggest flaws: breading is soggy and doesn’t stick. Other recipes have you dip the chicken in a wash of egg or milk, roll it around in bread crumbs with Parmesan cheese, and then hope all would go well. Wrong. There’s a lot of science behind this recipe, but if followed, you’re guaranteed to make perfectly breaded, crispy chicken with cheesy goodness on the outside, and moist chicken on the inside.

First, let’s thank Ina Garten, the Barefoot Contessa, for this recipe. She makes the best food. Fancy yet comforting. Her recipes are solid and reliable. BTW, I split the recipe because it’s just the three of us, and find that reheating the leftovers isn’t that successful. You lose the crunchiness that makes it so good.

Purchase thin chicken breasts or pound them yourself to about 1/4-inch thick. I like to cover the chicken with wax paper and pound it with a mallet. The wax paper protects the chicken from tearing., but frankly, if I can find chicken already sliced thin, I buy that instead.

You’ll need three dishes to coat the chicken. One reason why the breading falls off is because most recipes skip the important flour dredge. This is a mixture of flour, salt, and pepper. I think it helps the egg wash, which you dip the chicken into after the flour, stick to the chicken, which you absolutely need for the last layer, a mixture of dry bread crumbs and cheese. Each layer builds on each other. When you are done coating your chicken, everything should stick to the chicken rather than slide off. This method is fool-proof, and I mean that in the best possible way. I would be the first to screw it up. And with other recipes, I have. Many times over.

Parmesan Chicken

When you cook it, you don’t need a super hot pan. Heat up the pan with butter and olive oil to medium-low heat. The lower heat setting helps the chicken brown nicely while not drying it out. Cook on each side for about 2-3 minutes. Carefully, try lifting a corner of the chicken. If the chicken sticks to the pan, do not flip it over! Wait another 30 seconds and try again. Be patient and gentle. When it looks like the chicken is not glued to the pan, slip the spatula under the chicken and flip it in one motion. Sometimes I use my fingers to guide and balance it to the correct side. Now would be a good time to show you a video of this. If only I had such technology. Just try to imagine it instead. If you can’t, just flip it. It’s all good.

When it’s all toasty brown on one side, it should look gorgeous like this.

Parmesan Chicken

I’m pretty proud of myself here. It’ll be this way for you too.

Meanwhile, make the lemon vinaigrette for the mixed green salad. I don’t think a salad is really necessary and found the dressing to be a bit too acidic for my taste, but my husband loved it. It does compliment the richness of the cheese, but I’m a ranch girl. I would put ranch on everything if I could.

When the chicken is golden on both sides, it’s ready. I placed the chicken over the greens, but the recipe instructs you to place the greens on the chicken. Either way. I wanted my greens a little wilted so under the chicken they went. I shredded plenty of extra Parmesan cheese on top. Like ranch, one cannot have too much cheese.

This makes a super impressive, fancy looking dinner that really didn’t take much time at all.

Parmesan Chicken
Parmesan Chicken

Parmesan Chicken

Servings 6

Ingredients
  

  • 6 boneless, skinless chicken breasts
  • 1 cup all-purpose flour
  • 1 teaspoon kosher salt
  • 1/2 teaspoon black pepper
  • 2 large eggs
  • 1 1/4 cup seasoned dry bread crumbs
  • 1/2 cup freshly shredded Parmesan cheese plus extra for serving
  • 2 tablespoon butter
  • 2 tablespoon olive oil
  • salad greens for 6 washed and spun dry

Lemon Vinaigrette

  • 1/4 cup freshly squeezed lemon juice
  • 1/2 cup olive oil
  • 1/2 teaspoon kosher salt
  • 1/4 teaspoon black pepper

Instructions
 

  • Using a meat mallet, pound the chicken breasts until they are 1/4 inch thick.
  • Combine the flour, salt, and pepper on a dinner plate. On a second plate, beat the eggs with 1 tablespoon of water. On a third plate, combine the bread crumbs and 1/2 cup grated Parmesan cheese. Coat the chicken breasts on both sides with the flour mixture, then dip both sides into the egg mixture, and dredge both sides in the bread-crumb mixture, pressing lightly.
  • Heat 1 tablespoon of butter and 1 tablespoon of olive oil in a large sauté pan. Cook 3 chicken breasts on medium-low heat for 2 to 3 minutes on each side, until cooked through and golden. Remove from pan and set aside, covered to keep them warm. Add more butter and oil to the pan, and cook the rest of the chicken breasts.
  • Make the vinaigrette in a small bowl by whisking together the juice, olive oil, salt, and pepper. Toss the salad greens with vinaigrette.
  • To serve, place a mound of salad on each plate and then place a chicken breasts on each salad. Shredded additional Parmesan cheese on top.
Blog

Taco Soup

Jump to Recipe

You know I love a good taco (mmmm…carnitas), but I also love a good soup, especially when it’s cold outside. So what happens when you can’t decide between two radically different meals? You combine them, of course! Meet taco soup!

The beauty of this recipe is that you just dump a bunch of cans into a slow cooker, let it do its thing all day, and then you eat loads of taco goodness. If you don’t have 6-8 hours to slow cook this soup, you can also simmer it in a pot on the stove for about an hour.

The original recipe comes from Paula Deen. I’ve made it so many times, but I’ve made a couple substitutions and clarifications. I’ll explain along the way.

First, in the slow cooker (if you have a saute setting) or in a pan, brown some ground turkey and chopped onions with some salt and pepper. The original recipe did not call for the salt and pepper, but I think it’s important to season your meat or it could taste bland. This recipe also calls for beef, but turkey is so much better. The beef overpowered the other ingredients and made it too meaty, if that’s possible. But this is just my opinion. Feel free to use any type of ground meat.

Next you’ll be doing some labor intensive can opening. About 9 cans worth. I’m not kidding. This recipe has a ton of ingredients, but isn’t that better than chopping 9 different ingredients? Seriously, the can is your friend.

Taco Soup

After opening all these cans, add the browned meat to a large slow cooker and then start dumping each can in. Be sure to drain the olives and corn, but not the beans. You’ll need that for the liquid, which is something the original recipe doesn’t mention. Learn from my mistakes. This is soup, not some sort of defiant bean chili that would make every Texan cry. You’ll also add packets of ranch dressing mix and taco seasoning. Ranch?! Yes! Trust me. As with bacon, everything is better with ranch. This soup is no exception.

Taco Soup

This is a pretty mild soup so if you need something with more kick, don’t use mild canned tomatoes with chiles. Buy the hot stuff. If that’s not spicy enough, add a few dashes of your favorite hot sauce, a couple pinches of red pepper flakes, or a couple chopped up jalapenos. Sliced pickled jalapenos would be good too.

Mix it all together and slow cook on low for at least 6 hours (or simmer for an hour). When it’s ready, mix it up again and ladle it into soup bowls. Garnish with your favorite taco toppings or even top with some corn or tortilla chips.

This soup is so satisfying on a cold winter evening or even in the middle of summer when you want a taco but you’ve run out of tortillas (but you happen to have 9 cans of stuff…okay, a stretch of the imagination, but work with me here!). It’s so delicious that you’ll even forget to take pictures of it served. Like I did.

Taco Soup

This recipe makes a lot of soup. Freeze leftovers or refrigerate to enjoy throughout the week.

Taco Soup

Taco Soup

Servings 16

Ingredients
  

  • 2 pounds turkey
  • 2 cups onions diced
  • salt and pepper
  • 2 15.5 ounce canned pinto beans undrained
  • 15.5 ounces canned kidney beans undrained
  • 15.25 ounces whole canned corn drained
  • 14.5 ounces canned Mexican-style stewed tomatoes
  • 14.5 ounces canned diced tomatoes
  • 14.5 ounces canned tomatoes with chiles hot or mild
  • 9 ounces canned diced green chiles
  • 6.5 ounces canned black olives sliced and drained
  • 1 package taco seasoning mix
  • 1 package ranch salad dressing mix
  • taco toppings see recipe

Instructions
 

  • Brown the ground turkey and onions on the saute setting of a slow cooker or in a skillet. Season with salt and pepper to taste.
  • If needed, transfer the browned turkey and onions to a large slow cooker or a stockpot.
  • Drain the corn and olives. Do not drain the rest of the cans. Add the beans, corn (drained), tomatoes, green chiles, olives, taco seasoning, and ranch dressing mix.
  • Cook in a slow cooker on low for 6 to 8 hours or simmer over low heat for about 1 hour in a pot on the stove.
  • To serve, ladle soup into bowls. Top with corn or tortilla chips, sour cream, cheese, green onions and/or jalapenos.
Blog

Bulgogi

Jump to Recipe

I’ve always been interested with how food intersects with culture. I like to connect with other cultures that are not my own to experience other places. Partly it satisfies my interest to travel. Partly it feels like I’ll making up for a lack of culture. You see, I’m embedded in the nondescript culture of California. I know that someone far away imagines we’re the land of sunshine, fresh produce, and wine, and maybe we are, but when you’ve only grown up with this, you don’t know anything else and you take it for granted. It’s mundane and not so exciting or unique. What you don’t have is more interesting. The grass is greener on the other side.

Not to get all deep on you guys, but sometimes you just have to go outside of the box and make something you’re completely unfamiliar (and maybe even uncomfortable) with to learn from the experiences you’ve never had. This has lead me to trying new Asian dishes lately. Today, I share with you bulgogi, which is a South Korean dish I can barely pronounce, but absolutely love. This recipe is probably not authentic, but it’s fast and delicious, and it exposes me to a bit to Korean culture.

This “weekend-style” bulgogi recipe comes from the Kitchn. Naturally, I changed it, but more by accident than anything. I’ll get to that in a minute.

First, the marinade. Unlike most marinades I’ve made, this owe uses shredded pears with the juices to tenderize the meat. Who would have thought?! Combined with ginger, garlic, onions, soy sauce, brown sugar, sesame oil, and red pepper flakes, it screams Asian flavors. I almost wish there was a candle for it because it smelled that good.

Bulgogi

Next, slice up a steak in thin strips.

Bulgogi

This is where I went off course. Instead of grabbing the 2-pound package of flank steak from the back of my fridge, I accidentally pulled out the 1-pound package of skirt steak. Doh! A steak is a steak, but not exactly. It turns out that skirt steak has a super meaty taste (more so than flank steak) and holds up to marinades better than flank steak. Cool! Sounds like I chose the wrong meat wisely! Fortunately, it’s perfectly acceptable to use other cuts of beef (such as rib-eye) in bulgogi, or even chicken or pork.

After adding the meat, I had a lot of marinade going on and no idea why. What a weird recipe. No, I was just missing a pound without realizing it. Sort of wasteful, but no harm to the beef.

Marinate for at least 30 minutes or up to 8 hours. After that, it’s time to cook it up. But where are the veggies? Green onions count, right? This is a meat-lovers dish although you can add green peppers if you like. I used a cast iron pan, hoping to get a good sear. Bulgogi is typically grilled, but it was cold outside. Probably 60 F. Welcome to California culture.

Bulgogi

When it’s done, garnish with sliced green onions and serve over rice, if you wish. I had mine plain. The meat wasn’t as seared as I had hoped for, but the steak was so incredibly tender that it practically melted in my mouth. I might need to start marinating everything in pears.

Bulgogi
Bulgogi

Bulgogi

Servings 4

Ingredients
  

  • 2 large pears grated
  • 2 inches fresh ginger grated
  • 3 cloves garlic grated
  • 4 green onions thinly sliced, white and green parts separated
  • 2 tablespoons soy sauce
  • 1 tablespoon packed light brown sugar
  • 1 tablespoon sesame oil
  • pinch red pepper flakes
  • 1-2 pounds skirt steak
  • 1-2 tablespoon vegetable oil
  • cooked rice optional

Instructions
 

  • Grate the pears on the large holes of a box grater into a large bowl. Make sure to collect the juices along with the peel and flesh of the pear. Grate ginger and garlic on the small holes of the grater into the same bowl.
  • In the same bowl, add the white parts of the green onions, soy sauce, brown sugar, sesame oil, and red pepper flakes. Stir to combine.
  • Slice the steak into thin pieces across the grain of the meat. Add to the marinade and toss to coat.
  • Cover the bowl and let the beef marinate for 30 minutes to 8 hours.
  • When ready to cook, heat a large, wide cast iron or other pan over medium-high heat. Add a tablespoon of the oil to the hot pan and about a pound of meat. Sear until slightly charred and cooked through, 1 to 2 minutes on each side. Transfer to a serving dish. If you are using more than a pound of meat, repeat with another tablespoon of oil and the rest of the meat.
  • Garnish with the green parts of the green onion. Serve over rice (optional).
Blog

Italian Sausage Lasagna

Jump to Recipe

Lasagna sort of seems daunting and time-consuming. There’s a lot of work involved with all those layers. Cooking the noodles, making the meat sauce, prepping the ricotta mixture…you get the idea. But the reward really is worth it. It’s so comforting and tasty. It’s a great dish to take make for parties, or take to a new parent or sick friend who needs a night off from cooking. If you’re into meal prepping, you can make a couple pans of lasagna to keep in the freezer. Lasagna is easy to pop in the oven for those nights when you don’t want to lift a finger or you have surprise guests. Why not buy a frozen lasagna instead? Because it’s just not as good as homemade. Period. And it’s way cheaper to make your own.

I found some ground pork sausage in my freezer, which I wanted to use up, so I looked for a recipe with that in mind. I found a good one on The Spruce Eats, but changed it up a little. I prefer a saucier meat sauce using fire-roasted tomatoes. I’ve had some bad experiences with dry lasagna so I’m on the school that you can’t have too much sauce. As a result, my lasagna isn’t the prettiest, but it definitely tastes good.

Grab your ingredients and get to work. Smash your garlic. Open those cans. Measure out the seasonings. Chop the parsley. Shred the cheeses. Yes, lots of prepping.

Brown the sausage and then add garlic, tomatoes, seasonings, and tomato paste. You need to let it simmer for at least 30 minutes. The longer the better, really. Tomato paste has a raw taste that needs to be cooked out for at least 30 minutes. Like tasting baking chocolate (the kind without the sugar), tasting your tomato paste is not something you want to try. Yuck. So cook it for a while to get that tomato flavor going.

While this is going on, boil your noodles al dente. Do not overcook them or you’ll end up with mushy noodles. This recipe doesn’t use no-cook noodles, but they would probably work. Just put them directly in your lasagna. For a lower carb alternative, I like using Dreamfields lasagna noodles. Although not a true low-carb pasta, they are higher in fiber and more filling. Just don’t eat half a pan of lasagna! I’ve used them before and they hold up really well. You can also use thin strips of zucchini, but is that really lasagna? Probably not.

Make your ricotta cheese mixture last. When your meat sauce and noodles are done, the fun starts! I made half the original recipe so use a 9 x 9 x 2 inch casserole dish and start with a layer of noodles. Cover the noodles with a layer of mozzarella cheese. If you’re like me, be sure to taste the cheese to ensure it’s good and not poisoned. Yes, I love cheese.

Add a layer of ricotta. Don’t get obsessive about it. Dollop spoonfuls, spread it out until the edges are touching, and call it good. It’ll all blend together anyway.

Italian Sausage Lasagna

Next a layer of meat sauce.

Italian Sausage Lasagna

Do it all over again with another layer of noodles, ricotta, and meat. Top it all with mozzarella cheese.

Italian Sausage Lasagna

Bake it in the oven until the cheese is all melty on top, about 30-40 minutes.

Italian Sausage Lasagna

Let it rest a bit so you don’t burn the rough of your mouth when you take a bite. It also helps the cheese to solidify a little, but that didn’t seem to help my case. A hunk of lasagna does not photograph well, but tastes delicious so who cares?

Italian Sausage Lasagna

Italian Sausage Lasagna

Servings 4

Ingredients
  

  • 1/2 pound Italian pork sausage
  • 1 clove garlic minced
  • 14.5 ounces fire roasted tomatoes crushed or diced
  • 1 teaspoon dried basil
  • 1/2 teaspoon dried oregano
  • 1 1/4 teaspoons kosher salt divided
  • 6 ounces tomato paste
  • 6 lasagna noodles
  • 1 1/2 cups ricotta cheese
  • 1/3 cup Parmesan cheese shredded
  • 2 tablespoons fresh parsley chopped
  • 1 large egg
  • 1/4 teaspoon pepper
  • 8 ounces mozzarella cheese shredded

Instructions
 

  • Preheat the oven to 375 F.
  • In a skillet, brown the sausage and then drain the excess fat. Add the garlic, tomatoes, basil, oregano, 3/4 teaspoon salt, and tomato paste. Simmer, uncovered, for 30 minutes. If the sauce is too thick, add a little water.
  • Meanwhile, cook the lasagna noodles al dente, according to the package directions.
  • In a bowl, combine the ricotta cheese, Parmesan cheese, parsley, eggs, 1/2 teaspoon salt, and pepper.
  • In the bottom of a 9 x 9 x 2-inch casserole dish, place one layer of the noodles.
  • Cover the noodle layer with a layer of mozzarella cheese, and then add half of the ricotta mixture over the mozzarella. Add half of the meat sauce over the ricotta cheese layer. Repeat the layers (starting with the noodles), ending with mozzarella cheese.
  • Bake for 30 to 40 minutes in the preheated oven. Remove the lasagna from the oven and allow it to rest a few minutes before serving.