I noticed that there’s a lot of fresh asparagus at the grocery story so I decided to share a recipe to take advantage of that. I know you’ll love this recipe (assuming you like chicken and asparagus!). This recipe from Creme de la Crumb is super easy because it doesn’t involve a lot of prep work. I was skeptical before making it for the first time. It uses dried herbs and I’ve always thought fresh herbs are best. Ignore that piece of advice for this recipe and carry on.
Gather your ingredients. Mince some garlic. Measure out your herbs of dried basil, oregano, and thyme (or use a short cut: Italian seasonings!) Don’t forget some onion powder. Trim the asparagus so the woody stems are gone. I usually trim an inch or so. I have no idea if I’m being wasteful or not, but it seems to work.
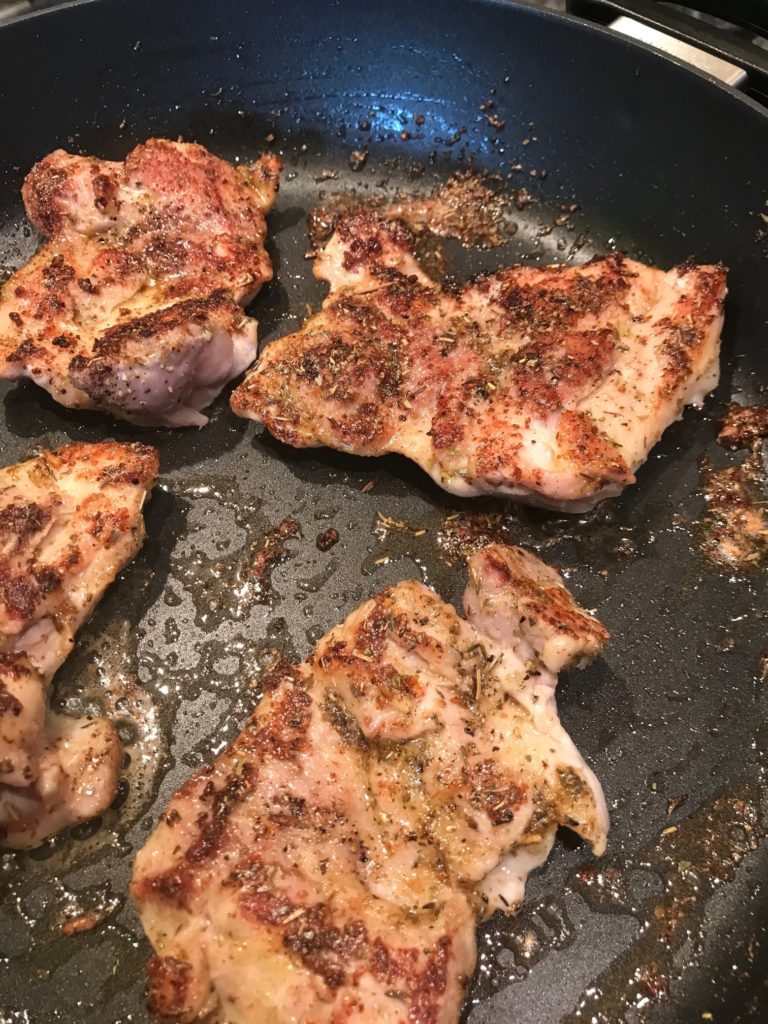
Season your chicken thighs with salt and pepper. You can also use chicken breasts, but I prefer thighs because they are cheaper and more flavorful. If you do use chicken breasts, pound them until they are an even 1/2 inch thickness.
Melt butter in a large pan. I like using a cast iron skillet, but any skillet or pan will do. After melting the butter, throw in your garlic and seasonings. Cook it for a minute or so. You want to smell the garlic.
Lower the heat and add the chicken. Cook it until it’s almost cooked through. Move the chicken over and throw in some more butter. Sorry, but this dish is not low-fat. But it is low carb. Switch diets depending on what you follow.
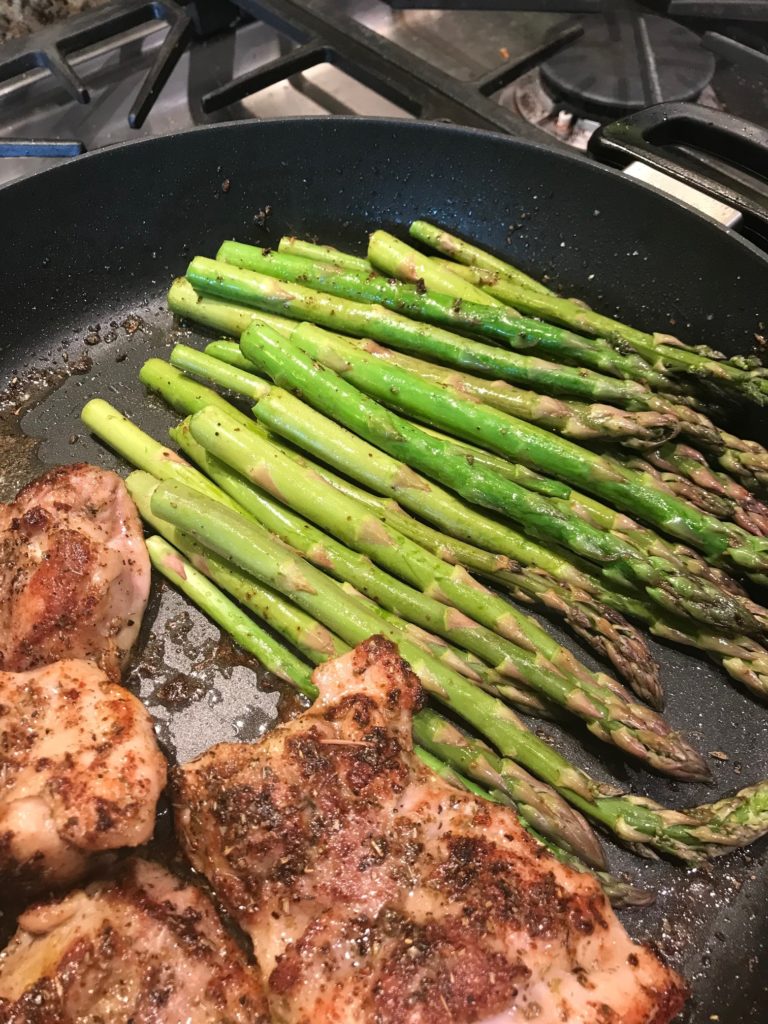
Add the asparagus sprinkled with some salt and pepper. Cook it until tender (and not a second more!) and chicken is cooked through.
And that is it. You can serve it with your favorite carb or as is. It’s fresh and delicious. The herbs create a crust on the chicken that is out of this world. They also coat the asparagus. Did I mention how easy it is to make?
Season chicken with salt and pepper on both sides. Melt 2 tablespoons butter in a skillet over medium-high heat. Stir in garlic and herbs. Cook another minute until the garlic is fragrant.
Reduce heat to medium, add chicken to pan, and cook for 6 minutes, then flip and cook another 5 minutes. Chicken should be nearly, but not completely cooked through.
Scoot the chicken over to the side and add remaining 1 tablespoon butter to the empty portion of the pan. After the butter is melted, add asparagus. Season asparagus with salt and pepper, to taste. Cook, rotating throughout, for 6 minutes until tender and chicken is completely cooked through.
Serve immediately garnished with freshly cracked black pepper.
Notes
In place of the dried basil, oregano, and thyme, use 1 1/2 teaspoons of dried Italian seasoning.
I don’t know about you, but when it’s cold and rainy (or snowy, depending on where you are), I want soup. Today I’m sharing with you one of my favorite soups, Chicken Tortilla Soup. There are a lot of recipes out there, but this is my latest favorite. It comes from a Pinch of Yum. My version is a little different, but feel free to go with the original.
First, cut up the chicken thighs into bite sized pieces, season it with salt and pepper, sear it in a pot with some heated olive oil, and set aside. The recipe doesn’t call for this, but I think it’s important. It ensures the chicken is cooked through plus that searing adds color and flavor. You can skip this and throw it in raw if you like. But let me warn you. The original recipes calls you to throw the thighs in whole, remove them, and then chop it up after cooked. Can I say what a mess this makes? My way is better. You’re welcome.
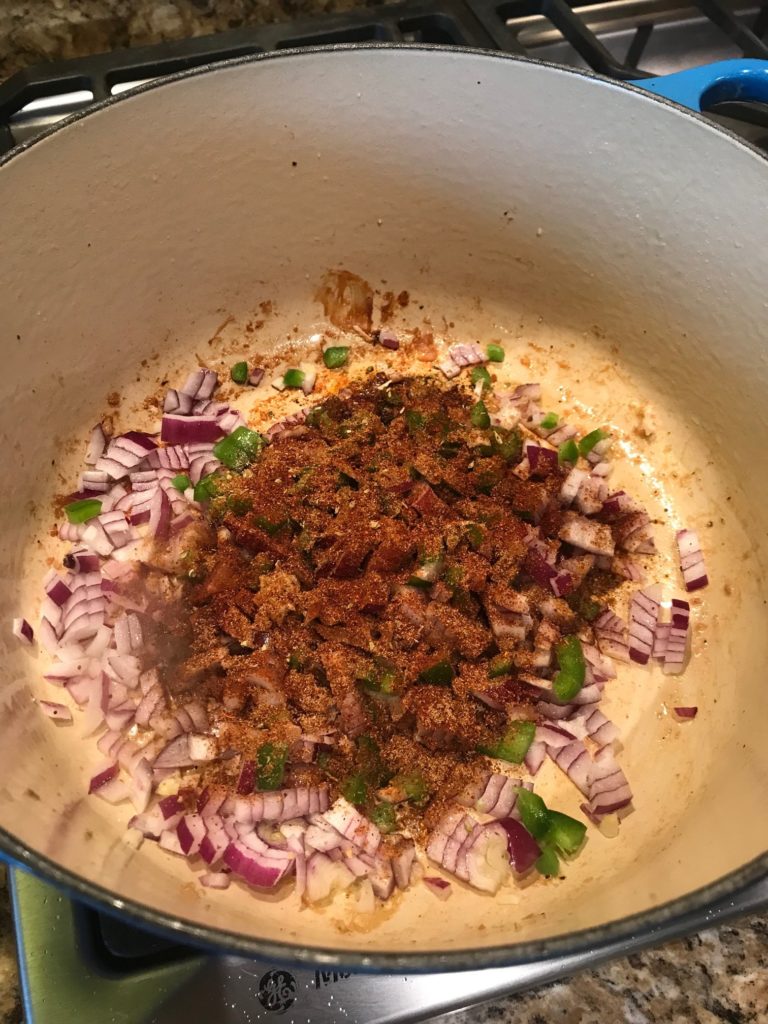
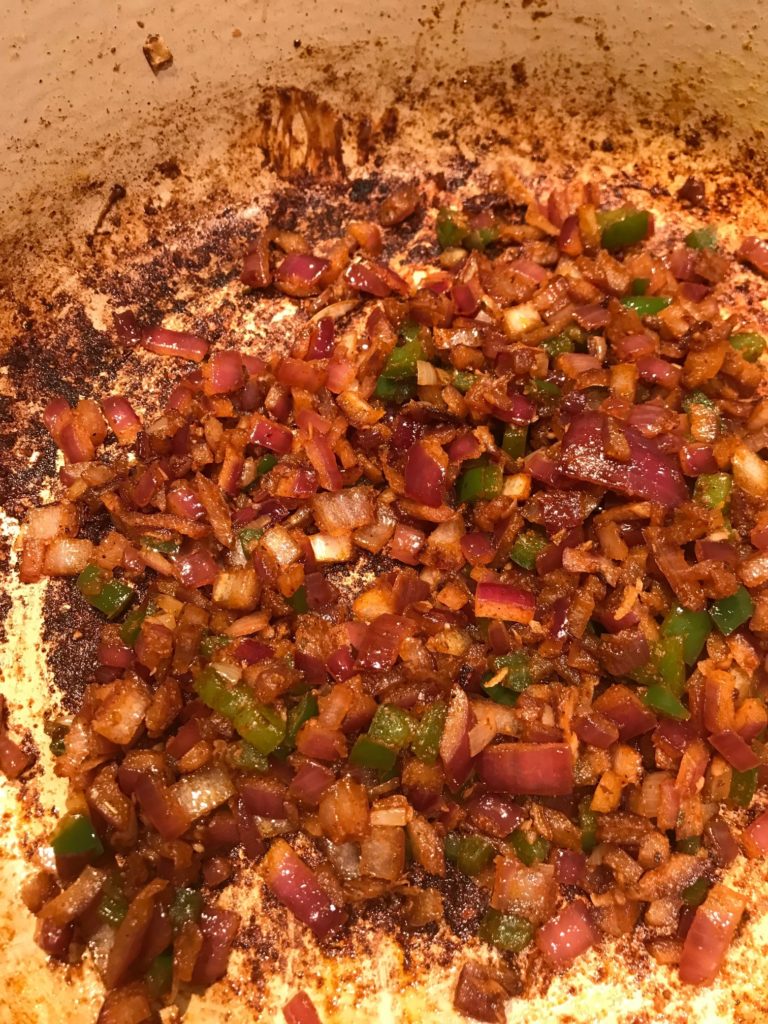
Next, saute your onions, jalapeno, and seasonings. I don’t have Mexican oregano so I used your standard oregano. Also, if you’re not into spicy foods, you’ll still be fine with this recipe. It passed the spicy test in my family and that’s a very low bar. Don’t be scared of that jalapeno. It’s really not as spicy as you think. Cumin and chili powder are mild too. They just add flavor instead of burning your tongue.
When you’re done, it should look like this:
Add the tomatoes, broth, and (cooked or not) chicken, and some salt. Bring to a boil and then simmer it for a bit, about 10-15 minutes. Add the beans and more broth if you like a soupier soup, like me. Once it’s hot, scoop it into bowls and top with all the goodies you’d usually would with tacos plus some tortilla chips. Ta-da! Dinner!
Season chicken with salt and pepper. Heat 1 tablespoon of olive oil in a Dutch oven or soup pot. Sear chicken and then set aside.
In the same pot, heat 2 tablespoons of olive oil. Add onion, garlic, jalapeno, and seasonings. Saute for about 7 minutes or until very soft and fragrant.
Add crushed tomatoes, broth, cooked chicken, and salt. Bring to a oil and then simmer for 10-15 minutes.
Add beans. Mix together and serve hot topped with tortilla chips. Add other toppings as needed.
Fall is here! In northern California, the trees are still covered in green leaves and the temperature is in the 80s, but officially it’s fall. Halloween is just around the corner. Pumpkin-spiced <fill in the blank> is everywhere. I’m loving the candy at the grocery store. It’s one of my favorite times of year. And it’s soup weather. Then again, it’s soup weather year round to me!
This recipe is REALLY easy to make, but it feels like you’ve been working on it for hours. It’s especially tasty to those who love tortellini, like my family. It comes from delish, but I’ve added a few changes.
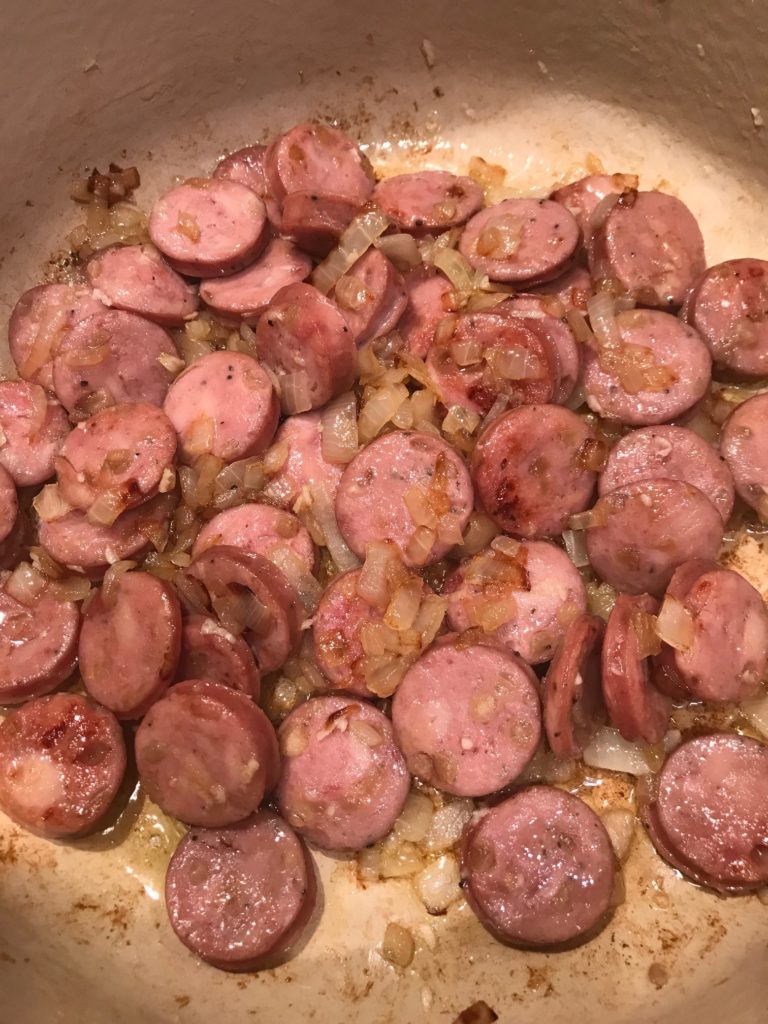
Time to prep! Chop up an onion. Slice up some cooked chicken sausages. You can really use any type of sausage you want so feel free to experiment. Mince a couple garlic cloves. Open a few cans: crushed tomatoes, chicken broth, and white beans. Having canned beans instead of dried makes this soup cook quickly. Measure out the red pepper flakes. Open packages of tortellini and spinach (see, you’ll get your veggies too!).
In a Dutch oven or large pot, heat some olive oil and start cooking! First, the onions. Then the sausage.
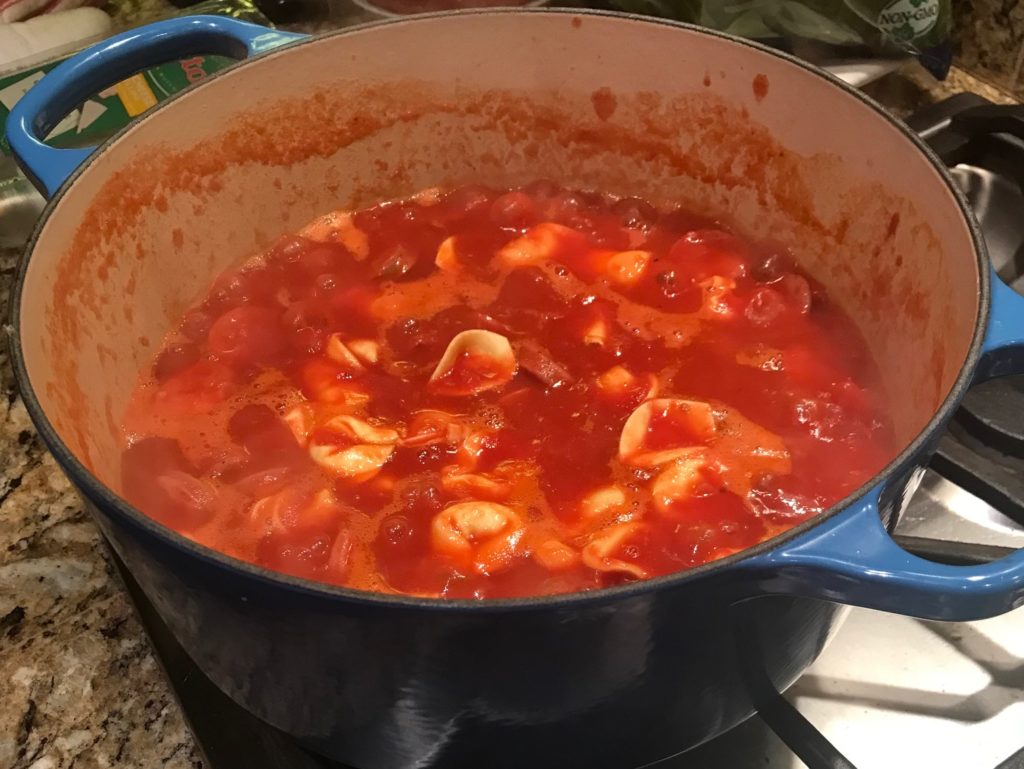
Add your garlic next and don’t let it burn. Stir in the tomatoes, broth, and red pepper flakes. Throw in some salt and pepper to your heart’s content. Are you seeing how easy this is?
Boil it and then throw in the tortellini.
Turn the heat down to medium-low and cook for about 5 minutes. The original recipe said 18-20 minutes, but that’s crazy. Your tortellini will be mush by then.
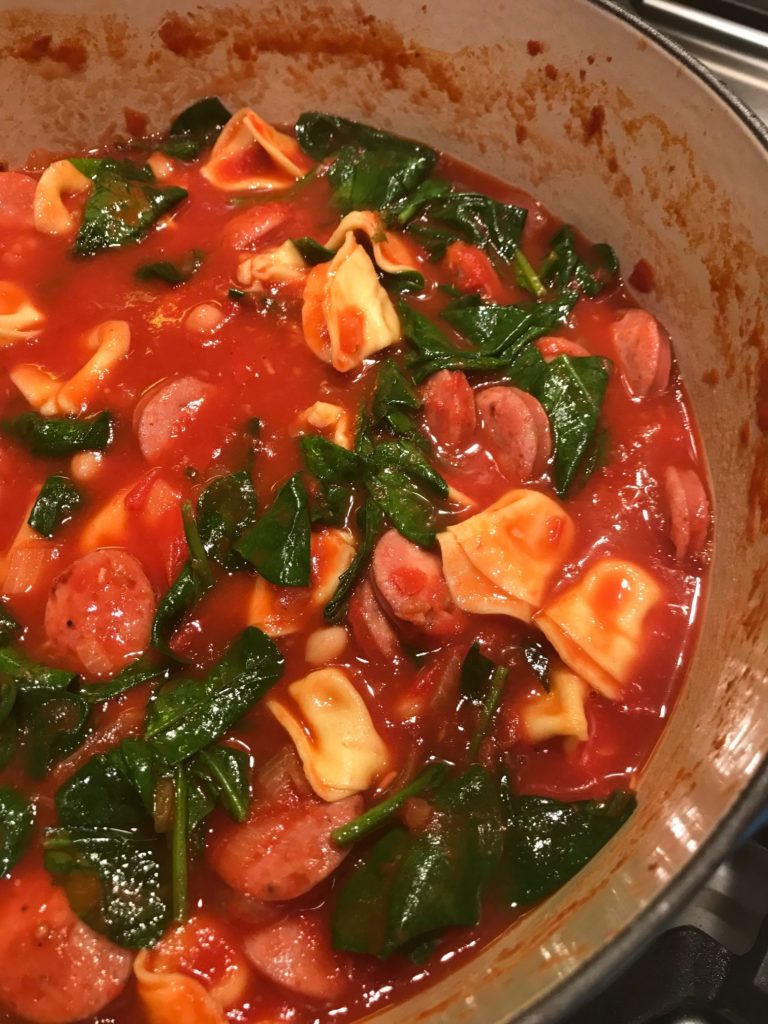
Add the beans and spinach and cook until the spinach is just wilted.
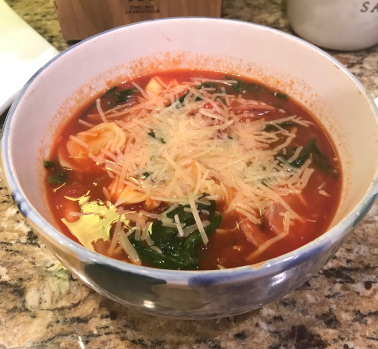
Scoop into bowls and sprinkle some Parmesan cheese on top. That’s it. Seriously.
I don’t think it can get any easier than that and it takes so much better than anything from a can. Serve with slices of warm bread and pretend you’ve worked all afternoon on dinner. The only downsize is that it doesn’t make very good leftovers so if you can’t finish it all (what?!), scoop out the tortellini and save in a separate container. Add it back in when you heat it up again. But never mind that. It’s so delicious you’ll not have any leftovers.
12ouncescooked chicken sausage linkssliced into 1/2-inch rounds
2clovesgarlicminced
28ouncescanned crushed tomatoes
4cupschicken broth
1/2teaspooncrushed red pepper flakes
9ouncerefrigerated cheese tortellini
15ouncecanned white beansdrained
5ouncesbaby spinach
freshly shredded Parmesan cheesefor serving
Method
In a Dutch oven or large pot over medium heat, heat oil. Add onion and cook, stirring, until soft, about 5 minutes. Add chicken sausage and cook until golden, about 4 minutes. Add garlic and cook until fragrant, 1 minute more. Stir in crushed tomatoes, broth, and red pepper flakes, and season generously with salt and pepper.
Bring to a boil and add tortellini. Reduce heat to medium-low and simmer until tortellini is cooked, about 5 minutes.
Stir in white beans and spinach and cook until spinach has wilted, 2 minutes more.
Cod is a versatile white fish. Tilapia is cheaper, but I like the thickness of cod better because it’s easier to work with. Cod’s not as pricey as halibut, and I must tell you, I’m watching prices these days. It’s kinda funny though. I always think of fish sticks when I think of cod. It deserves a better rep. So let’s make cod fancier.
You don’t have to do much to cod to make it taste delicious. I found this simple recipe on Foodness Gracious for this recipe. It’s pretty much perfect.
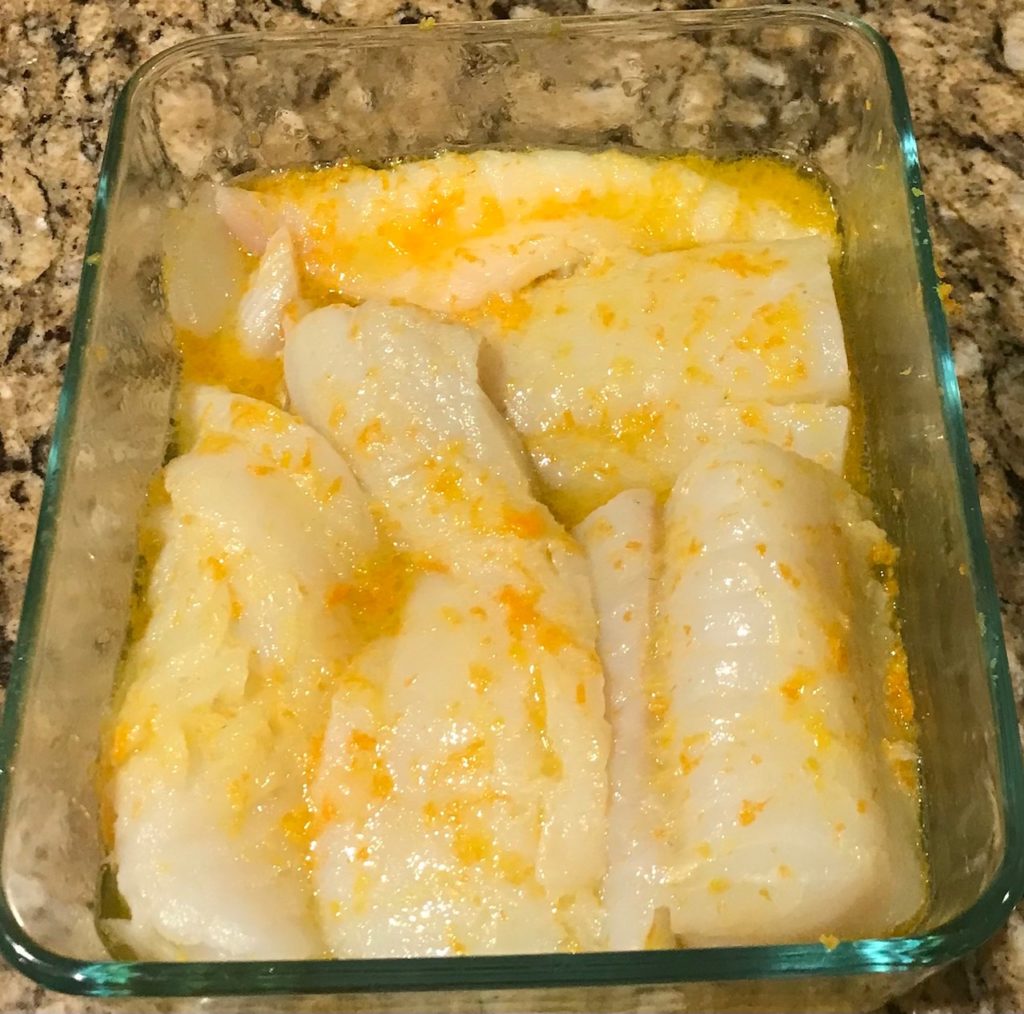
In a bowl, zest an orange and lemon. Then, squeeze the juice. I love my squeezers and highly recommend them.
Add some olive oil, mix it up, and then pour it over your fish. Let this soak up for about 30 minutes, or more, if you can stand it. I get sort of impatient with marinades.
Preheat your oven to 250F. Yes, it’s low, but it’s all good. You’ll see.
After 30 minutes, heat up an oven-proof skillet with some olive oil until it’s hot. Shake the excess marinade from your fish and place it in the pan. You’re going to be saving this marinade for a sauce. Cook each side for about 4 minutes. Season it with some salt and pepper because bland fish is no good. Leave it in the skillet and put it in the oven so it stays warm. I suppose you could skip the whole oven situation, but it’s a nice touch. No one likes cold fish. Unless it’s salmon over a delicious salad, but that’s for another day.
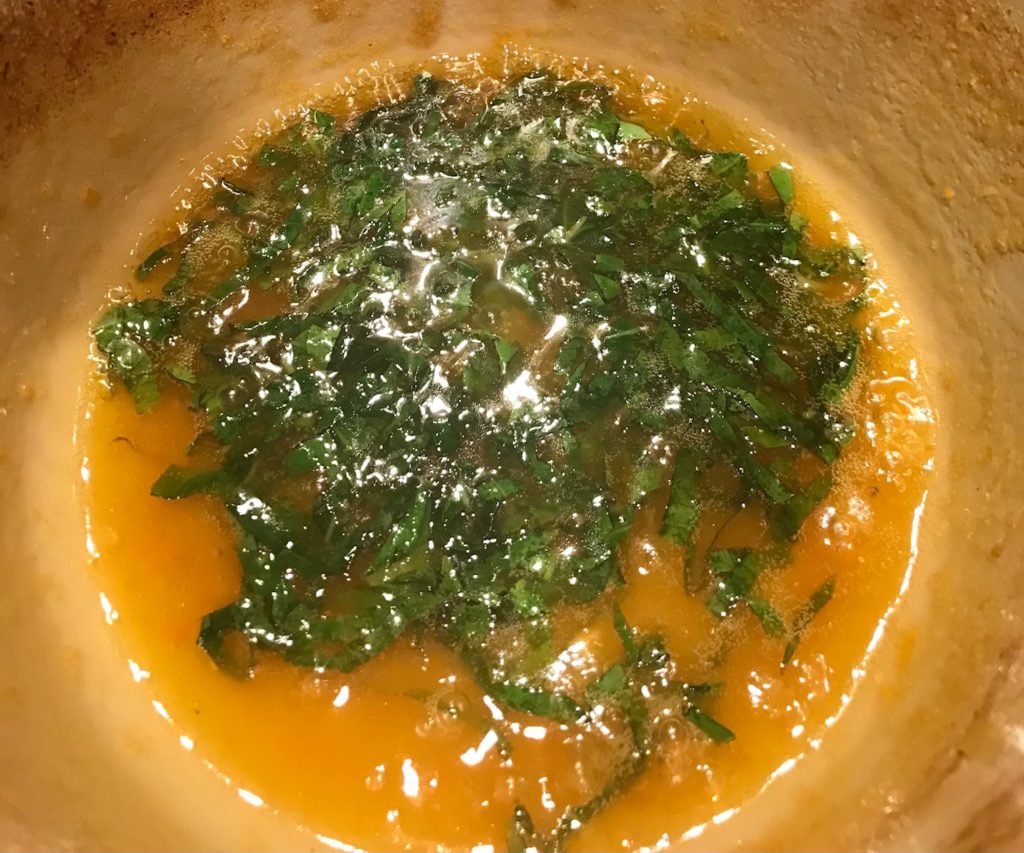
Time to make your sauce. Melt some butter with some brown sugar in a pan and throw in the marinade. Squeeze a couple more oranges and add the juice. Boil it up and be patient. It needs to thicken and I swear it will eventually. It took me about 7 minutes, which doesn’t sound like a long time, but it is if you’ve never done this before and you’re staring at it (hurry up and boil, why don’t you!). But take my advice. You basically want to coat your spoon with the sauce and call it good. When it finally does thicken, throw in some shredded basil. Taste it. Add some salt and/or pepper if it needs it.
Pull your fish out of the oven and pour the sauce over it. Garnish with some more basil and serve with your favorite starch, like bread or rice. I think I had some leftover mashed potatoes that worked quite nicely.
I’m trying to incorporate more fish into my diet and this dish is an easy way to do that. It’s fancy while being easy. It’s light for summer without being too heavy. I think you’ll really like it!
Preheat the oven to 250 degrees F. Lay the cod in a shallow pan or baking dish. Combine the zest of 1 orange and 1 lemon, juice from the orange and lemon you just zested, and 1/4 cup of olive oil. Pour over the fish. Cover and let marinate for at least 30 minutes.
In a large oven safe skillet, heat the remaining 1/4 cup olive oil until hot. Carefully shake the excess marinade from the fish, saving it, and drop the fish into the pan. Season the fish with some salt and black pepper. Cook over medium heat for about 4 minutes, and then flip and repeat on the other side. Place the fish into the oven to keep warm while you make the sauce.
In another smaller pan, melt butter, and add the brown sugar and remaining leftover marinade from the fish. Slice the remaining orange in half and squeeze the juice into the pan. Bring to a boil, whisking regularly until the sauce has thickened slightly and reduced by almost half, about 7 minutes. The sauce should coat the spoon.
Add about 1/4 cup of finely shredded basil leaves to the sauce. Taste and add salt and pepper, if necessary. Bring the fish from the oven and place on your plate. Spoon some of the thickened sauce over it. Add more basil if desired.
Who doesn’t like a quick weeknight dinner that is not only fast, but easy and tasty? Look no further! This one skips the Chinese take-out order, doesn’t take long to prep, and comes together in no time.
I found this recipe on the kitchn. I did make a few changes. There was a mistake about how much oil to use so I fixed that. I made 3 cups of rice instead of 4 so I also decreased the number of cups of broccoli from 5 to 4. I probably didn’t need to make rice/broccoli changes, but when I made the rice using my 1 cup rice to 1 1/2 cups of water ratio, it made 3 cups of rice and I wasn’t about to make more rice. Call me lazy. I don’t mind. By the way, if you have leftover rice around, use that. It turns out even better so I’ve heard.
After you make the rice, put it in the freezer to chill. You could make this the night before and chill it in the fridge, but that would require one to remember to do this. All the power to you if you plan ahead. Me? Not so much.
Next, chop up your veggies: broccoli and green onions. BTW, this is a great dish for vegetable haters. Not a zillion tiny pieces of vegetables to pick out. Mince a couple cloves of garlic. Grab your ground beef, soy sauce, sesame oil, and a couple eggs. Be sure to use sesame oil, not canola or olive. You want that nutty sesame flavor. You also need to beat your eggs.
Now you’re ready to go. See what I mean about prep work? Super simple. It takes longer to cook the rice.
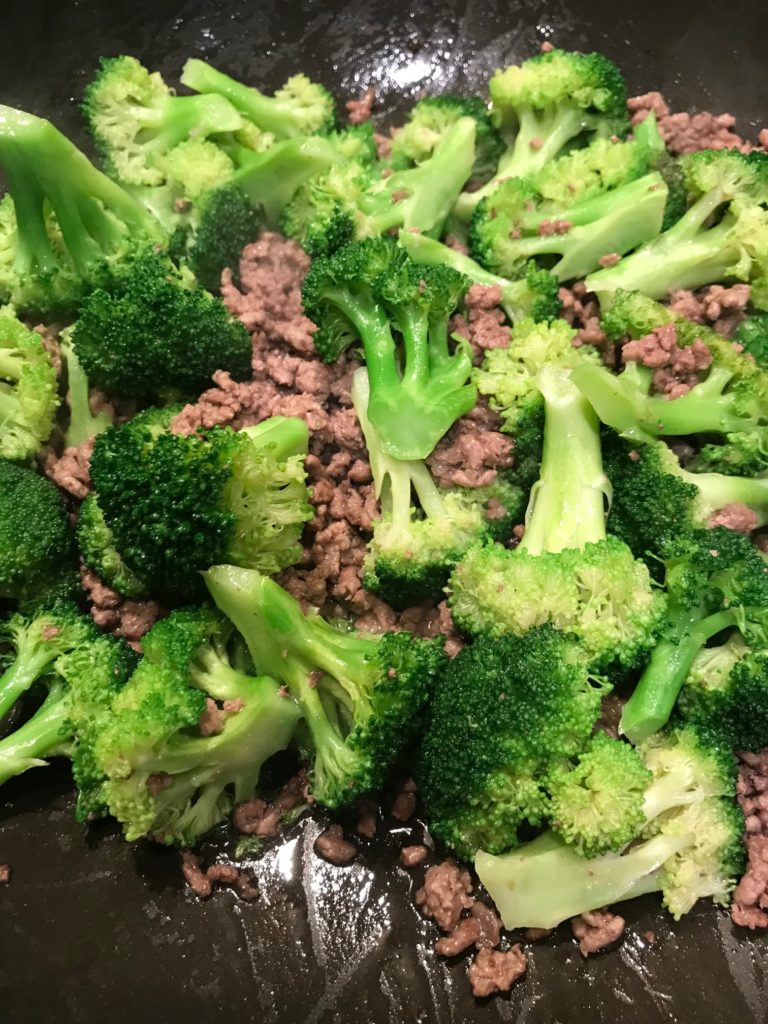
Heat up some oil in a wok or skillet, add the beef, and break it up until it’s crumbled. Don’t cook it all the way because you are going to continue cooking it with the broccoli. Throw in your chopped broccoli and cook that until it’s tender and crisp, and the beef is fully cooked.
Add garlic and some soy sauce, and mix it up. About a minute later, put all of this in a large bowl and set aside.
Add some more oil to your pan and throw in your rice and some more soy sauce, season with pepper, and stir until everything mixed together and heated through. Don’t ask me why you have to chill the rice only to heat it up again. I’m assuming it has something to do with not ending up with mushy rice.
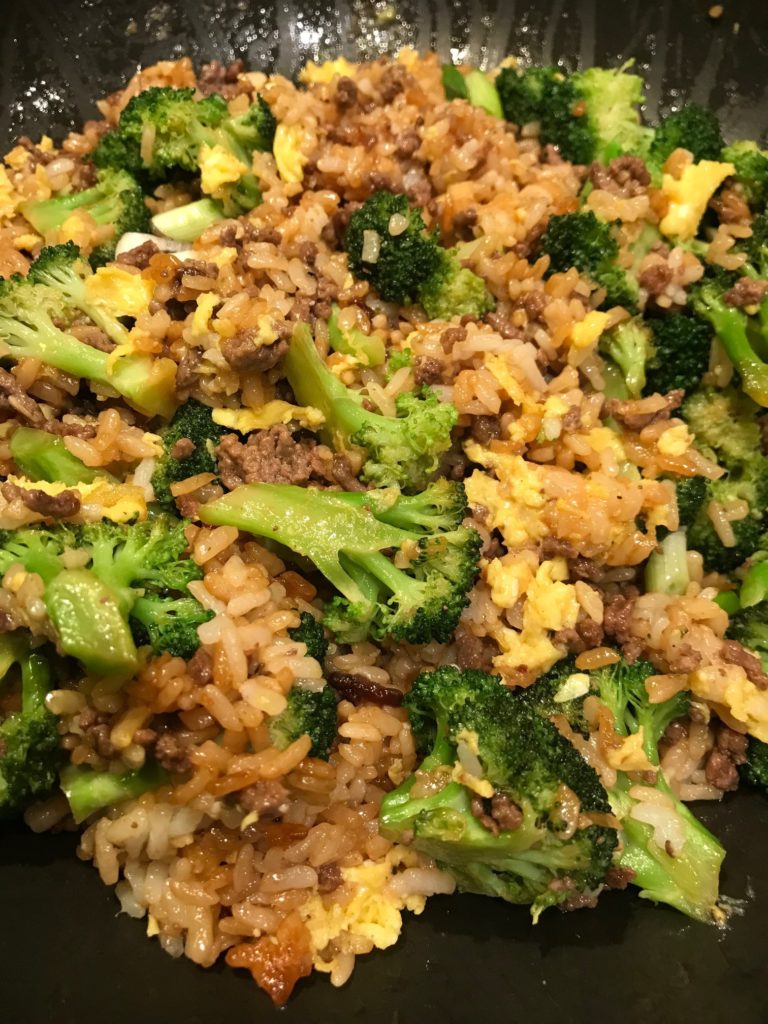
Now the fun starts. Scoot the rice over to one side and add your beaten eggs to the other half.
Season with salt and pepper, and then stir until the eggs are almost set. Remove the pan from the heat, add your beef mixture that you set aside, throw in your green onions, and gently fold everything while making sure you break up large pieces of egg. Season it with more salt and pepper, and you are done!
Dish it up in a bowl. If you’re feeling super fancy, sprinkle more green onions on top.
The boys loved this dish. The younger boy was obligated to eat one piece of broccoli. He claimed it was terrible, but not a bad way to cook it. I’ll take that. I just loved how it came together so quickly. Definitely a make again.
Cook 1 cup of rice with 1 1/2 cups of water. Chill. You can also used leftover rice.
Heat 1 tablespoon of the oil in a large nonstick skillet or wok over medium-high heat until shimmering. Add the beef, break it up into small pieces with a spoon, and cook until halfway cooked through, about 2 minutes. Add the broccoli, cover, and cook, stirring every minute or so, until the broccoli is crisp tender and the beef is cooked through, about 4 minutes total.
Add the garlic, drizzle in 1 tablespoon of soy sauce, stir to combine, and cook for 1 minute. Transfer the mixture to a large bowl. Set aside.
Add the remaining 1 tablespoon of oil to the pan over medium-high heat. Add the rice and the remaining 2 tablespoons of soy sauce. Season with pepper and cook, stirring occasionally, until the rice is heated through, about 4 minutes.
Push the rice to one half of the pan and add the beaten eggs to the other half. Season the eggs with salt and pepper. Stir occasionally with a rubber spatula until almost set, 1 to 2 minutes. Remove the pan from the heat, add the broccoli and beef, sprinkle with the green onions (leave some for garnish), and gently fold everything together with the rubber spatula, breaking up any large pieces of egg. Taste and season with salt and pepper as needed. Garnish with green onions.
It’s Superbowl Sunday! Just like last year, it’s just the three of us eating snacks, watching commercials, and enjoying the 90s-inspired half-time show (go Eminem!). I plan to play with my air fryer and make: Tater Tots, Mozzarella Sticks, and Jalapeno Poppers. For dinner, we’re having Instant Pot White Chicken Chili with cornbread. I’ll blog it if it turns out to be good.
Today I’m sharing a really easy casserole (yes, yet another casserole!) that you could make today or during the week. It’s comforting, cheesy, beefy, and simple. Picky eaters will like it too. I’ve slightly modified it from the original, which you’ll find on The Food Network.
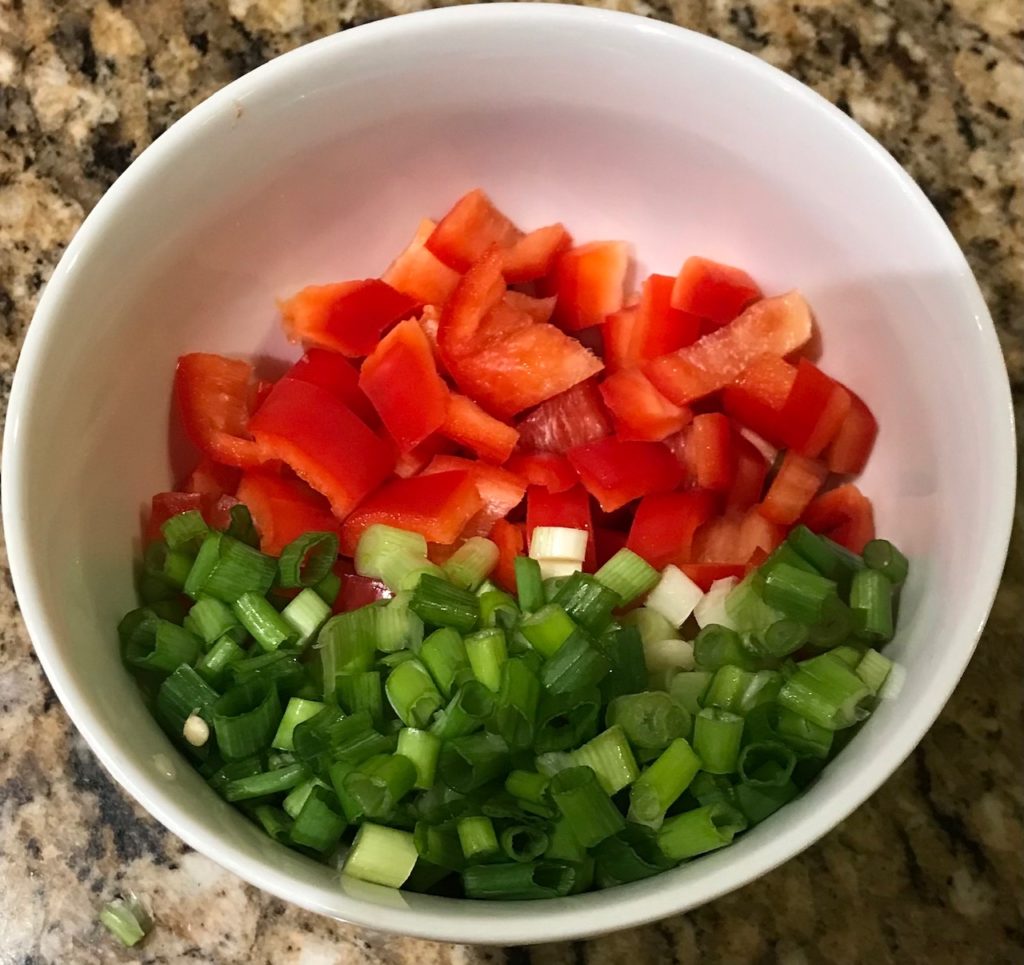
Go preheat your oven to 425F. You’re going to need it to melt all that yummy cheese. Find a 2-quart casserole pan and spray it with cooking spray. Boil some noodles according to the package. Pull the sour cream out of the fridge. While you’re boiling your noodles, dice a red bell pepper and chop a bunch of green onions.
Grab your packaged ground beef. Shred some Parmesan cheese, or buy the shredded stuff. It seems like I haven’t been able to buy a block of Parmesan cheese since the pandemic hit unless I want to spend $20/pound for the imported stuff. No thank you.
Measure out some tomato paste and Italian seasonings. BTW, after you open that can of tomato paste and only use a tablespoon, don’t throw it away! Get a plate, plop tablespoons of paste onto the plate, and freeze. When they’re frozen, pop them in a baggie and store in the freezer. It’s a good way not to waste tomato paste and you’ll have some for other recipes. You’re welcome.
You’ll also need some salt and pepper on stand by. Grab a can of diced tomatoes. Grate some cheddar cheese. If you have some parsley, chop a few leaves for garnish. Sorry, I sound like I’m barking out orders. Please gather you’re ingredients. It’s better to have everything you need to work with at your fingertips.
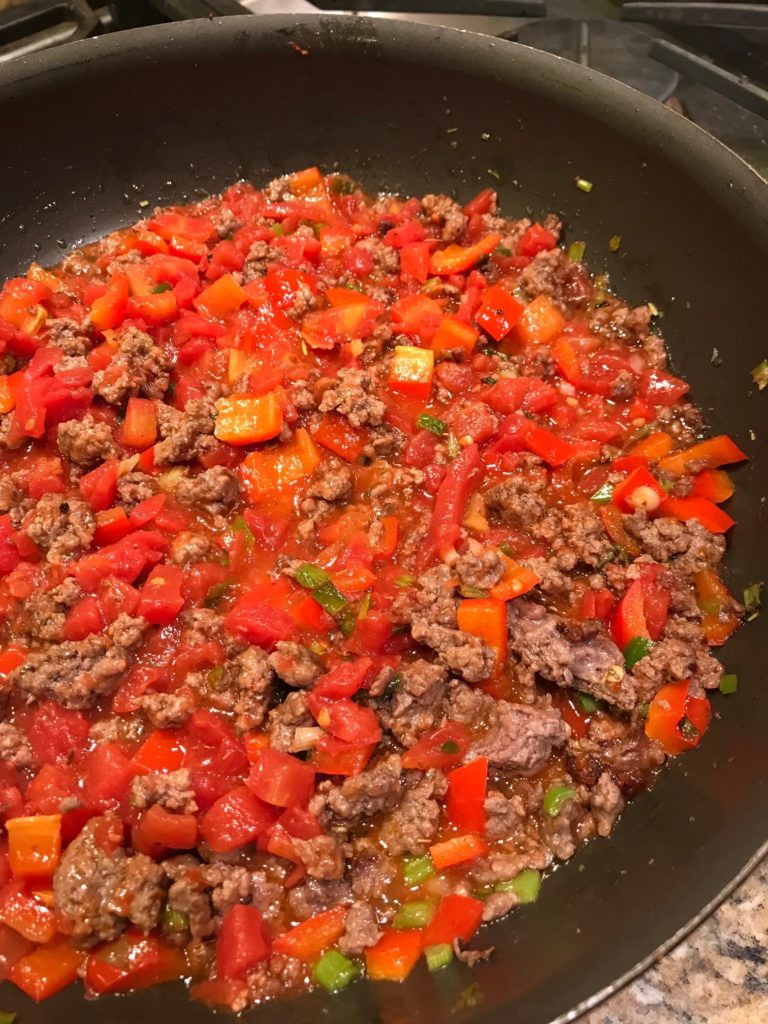
Take your ground beef and brown it in a skillet for about 4 minutes. Toss in your veggies with a pinch of salt and cook for 3 minutes so the veggies are still a little crunchy. Move the meat mixture to the side and add your tomato paste. You’ll cook this for about a minute to help get the raw flavor out. Add Italian seasonings and another pinch of salt. It’s important to add a little salt bit by bit as you go rather than add a ton of it at the end. Throw in your diced tomatoes and stir. Simmer it for a couple minutes. It should thicken up a bit.
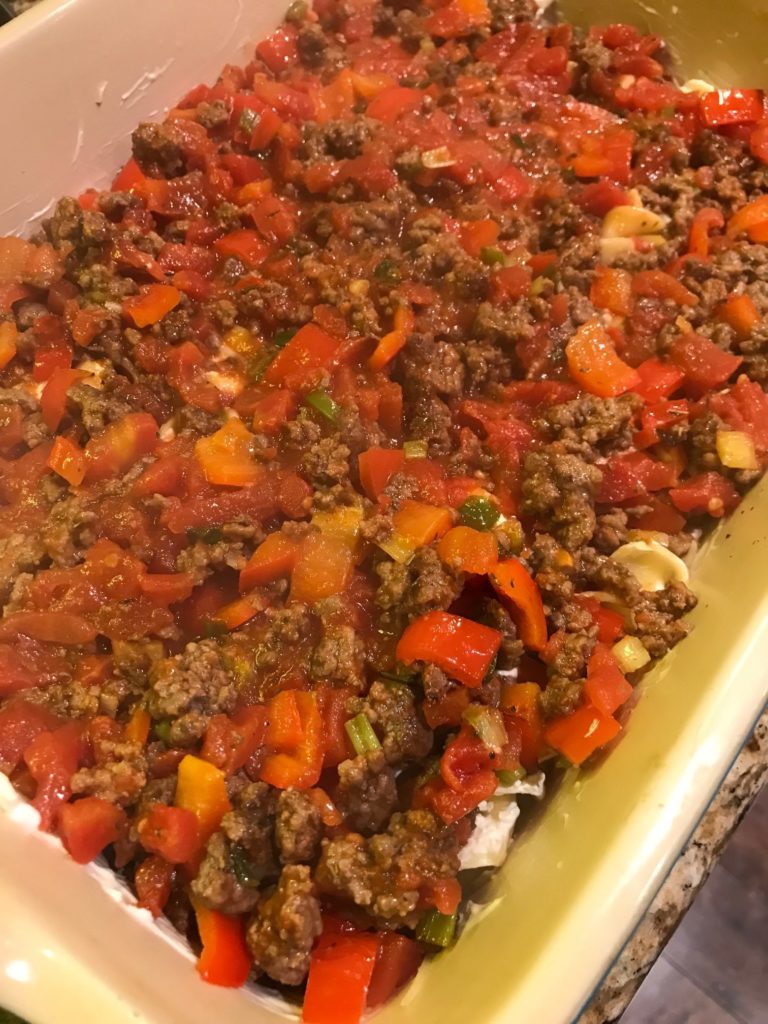
When your noodles are done, drain and put them in your casserole pan. Add sour cream, Parmesan cheese, and pinch of salt and pepper. Stir it around until it’s well mixed. This will be your first layer. Next, pour the beef mixture over the noodles. Do not mix!
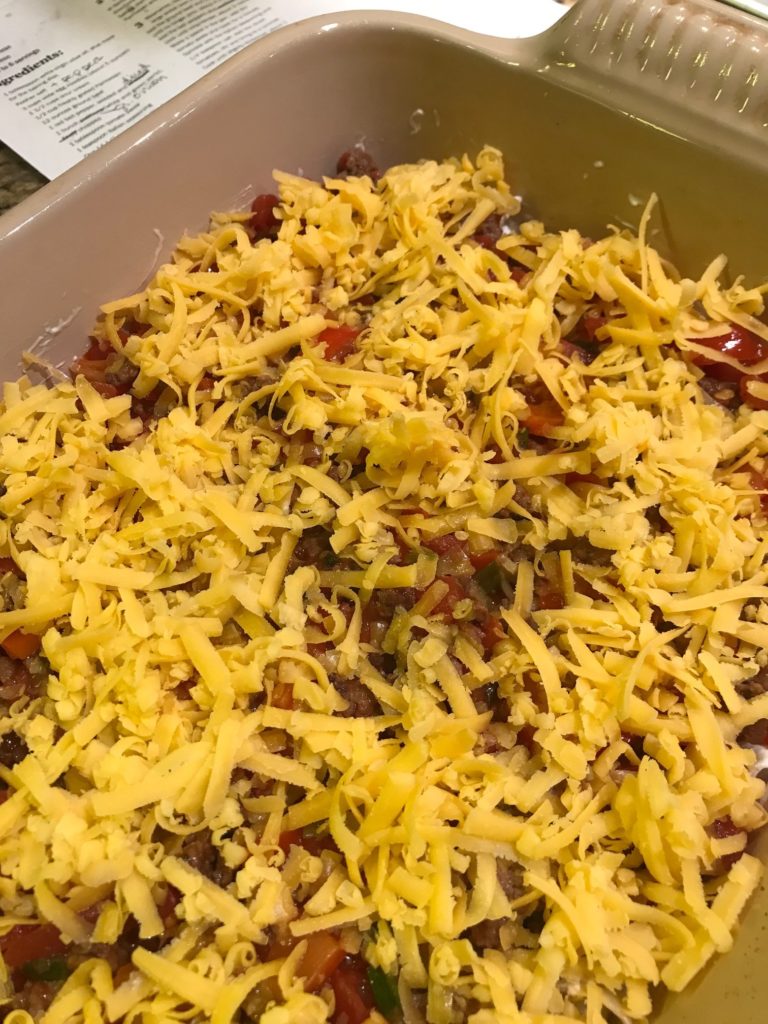
Sprinkle the grated cheddar cheese over the whole thing.
Add more than 2 cups if you’re wild. I used restraint and stuck with 2 cups. It was very difficult. I see a patch in the middle that could have used more cheese.
Stick it in the oven and bake until the cheese is all melted and gooey, about 15-20 minutes. I’d start checking on it after 15 minutes. You don’t want to scorch the top. Pull it out when it’s ready and let it sit for about 10 minutes. I know. It’s a hardship you’ll have to bear.
Serve and garnish with parsley so it looks fancy.
You’re done! In addition to being easy to make, it reminds me of lasagna without all the work. It’s creamy. It’s saucy. It’s unforgettable. You’ll want to make this again and again.
Preheat the oven to 425 degrees F. Spray a 2-quart baking dish with cooking spray.
Bring a large pot of salted water to a boil. Add the noodles and cook to al dente according to the package directions. Drain and put in the prepared baking dish. Toss with the sour cream, Parmesan, and a pinch of salt and pepper.
Meanwhile, heat olive oil in a large skillet over medium-high heat. Add ground beef and cook, stirring, until no longer pink, about 4 minutes. Add the red peppers, green onions, and a pinch of salt. Cook until crisp-tender, about 3 minutes. Move the beef mixture to one half of the pan, add the tomato paste to the other side, and toast for a minute. Sprinkle with the Italian seasoning and a pinch of salt. Add the diced tomatoes. Stir and bring to a simmer. Cook until slightly thickened, about 2 minutes.
Pour the beef mixture over the noodles (do not mix!) and sprinkle with the grated cheddar cheese. Bake on the middle rack until the cheese is melted and the edges are bubbling, 15 to 20 minutes. Let stand for 10 minutes before serving. Garnish with fresh parsley.
One of my neighbors dropped off a million lemons for me. Now what do I do with them? I made a few loaves of Copycat Starbucks Lemon Loaf, which was amazing by the way. I was tempted to make Lemon Bars, but I seriously need to lay off the sugar. Instead, I searched high and low for the perfect lemon dinner recipe. I found something delicious, but made it my own. The original, Lemon Spaghetti, turned into Lemon Chicken Fettuccine!
This is probably controversial, but we eat meat. Like at every dinner meal. I want to implement Meatless Mondays, but it’s been shot down so many times I’ve given up. I once tried to sneak in a meatless meal by serving cheese tortellini in red sauce and was scowled at. Where’s the meat?! Fine, fine. Therefore, I knew this dish had to have some sort of meat so I chose chicken thighs. It was also pointed out to me that spaghetti is the wrong pasta shape for this dish. Fine, fine, suddenly I was using fettuccine instead. See what I have to do around here?
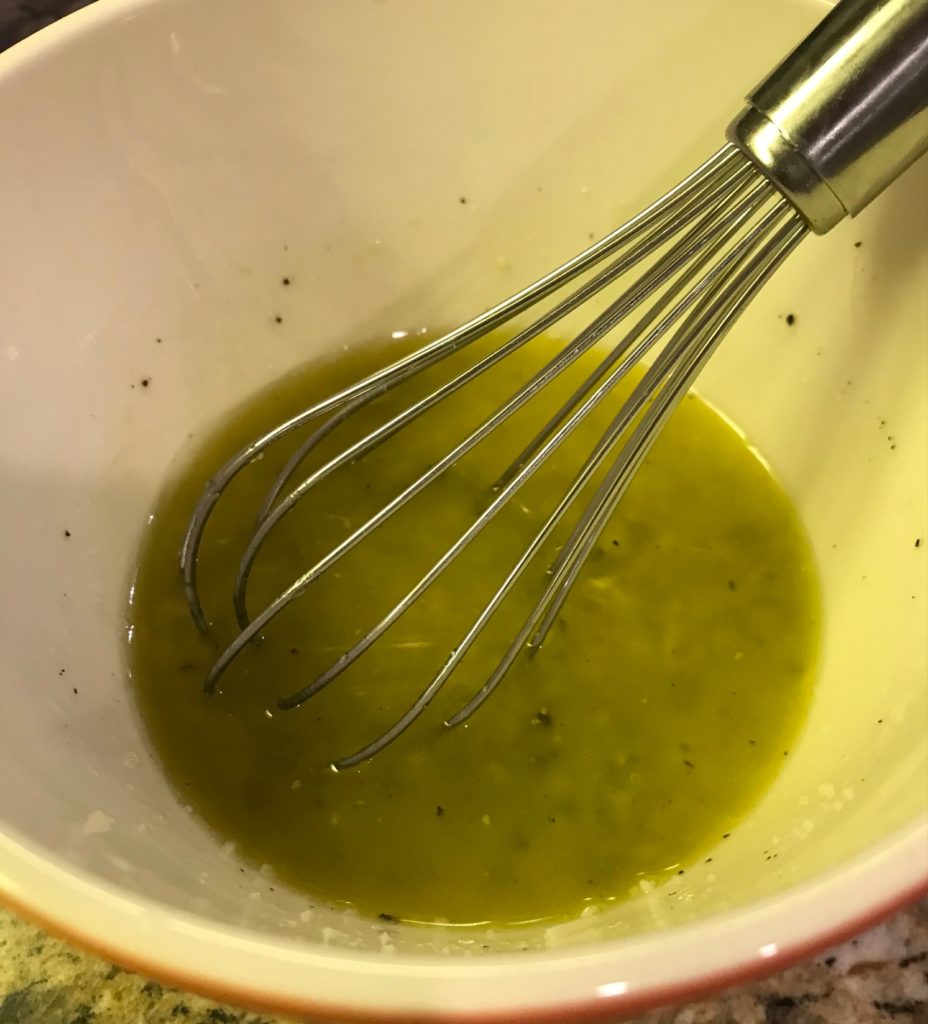
The recipe serves six very hungry eaters (or eight ideal portions) so I split the recipe in half. First chop chicken into bite-sized pieces. Season with salt and pepper. You can leave the chicken thighs whole and chop then after, but chopping them ahead of time reduces the cooking time. You just need to be careful not to overcook the chicken. Fortunately, chicken thighs are forgiving, unlike chicken breasts, so you should be fine. Cook up the chicken in a little olive oil. You can easily use rotisserie chicken instead. While this is going on, boil a large pot of salted water and cook your pasta. If you’re into multitasking, whisk up your sauce at the same time: oil, Parmesan cheese, and lemon juice.
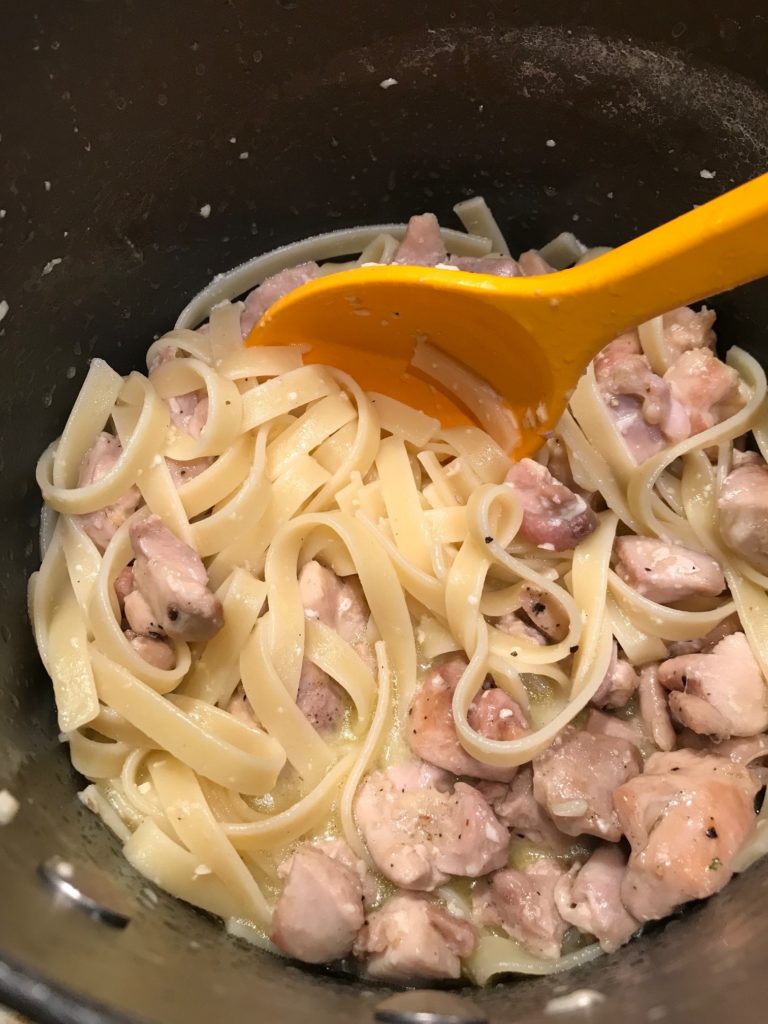
Drain the pasta, but be sure to save about 1/4 cup of pasta water. Toss your lemon sauce and pasta water, about 1/4 cup at a time, into the hot, cooked pasta. Season again with more salt and pepper. Throw in your chicken and stir.
Serve in bowls and garnish with more cheese and some chopped basil. You’re done!
It’s cheesy. It’s lemony. It’s meaty.
Because this is a quick dish to make, it’s perfect for the weeknight when you’re in a hurry to put dinner on the table. It also makes great leftovers so feel free to double it. Definitely a make again.
Chop chicken thighs into bite-sized pieces. Season chicken with salt and pepper. Heat a skillet with olive oil. Cook chicken for about 4 minutes on medium heat. Stir and then cook for another 4 minutes until cooked through. Set aside.
Boil a large pot of salted water. Add pasta and cook al dente, according to the package.
In a small bowl, whisk oil, cheese, and lemon juice until blended.
Drain the pasta, reserving 1/4 cup of pasta water. Toss the pasta with the lemon sauce and reserved pasta water, adding 1/4 cup at a time. Season with salt and pepper. Add chicken and stir. Garnish with more cheese and chopped basil.
Merry Christmas! All vaccinated and boostered up, we were excited to have family over, which was a change from the previous year. For appetizers, we had a selection of meats, cheeses, olives, and fruits along with Ina Garten’s amazing Rosemary Roasted Cashews. These nuts are incredible: a little sweet, a little herby, a little spicy, and a little salty. I highly recommend them. It’s also easy to make and it’ll impress your guests.
For dessert, I broke with tradition and did not…wait for it…serve pie. I know. This was a controversial move on my part. Don’t get me wrong. I love pie. Pie is my friend. But I find apple pie and pumpkin pie BORING. Inevitably, some likes one pie over the other and suddenly you’ve got multiple pies on your hands and now your jeans don’t fit. Last year, I bought a pie (can’t remember what kind…see how boring this is that I can’t even remember…was it apple? was it pumpkin? who knows!) and made a pumpkin cake because damn it, I like cake. Guess what? Everyone had a little bit of both and hands down everyone loved the cake more than the pie. Told you. Don’t knock it until you’ve tried it.
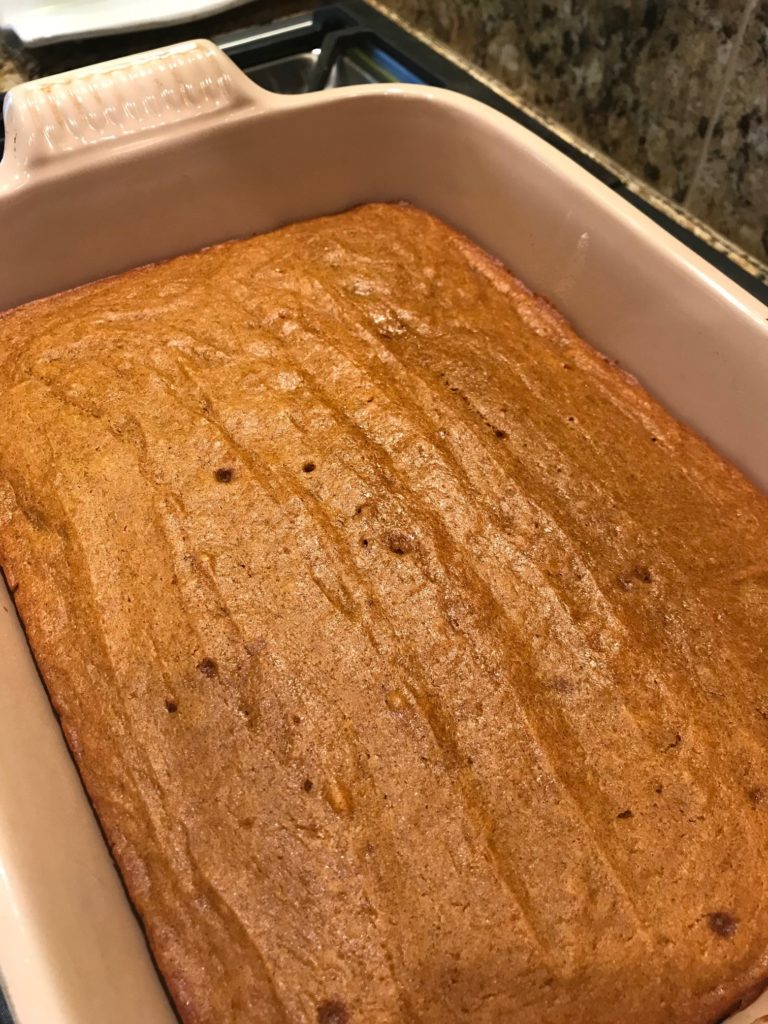
So here’s a super difficult, highly complicated pumpkin cake with cream cheese frosting. Kidding! Easiest. Cake. Ever. Give many thanks to Delish.
Warning. The pictures suck. I was in a big hurry because I had a million other things to do, but that’s the beauty of this dessert. So simple to make.
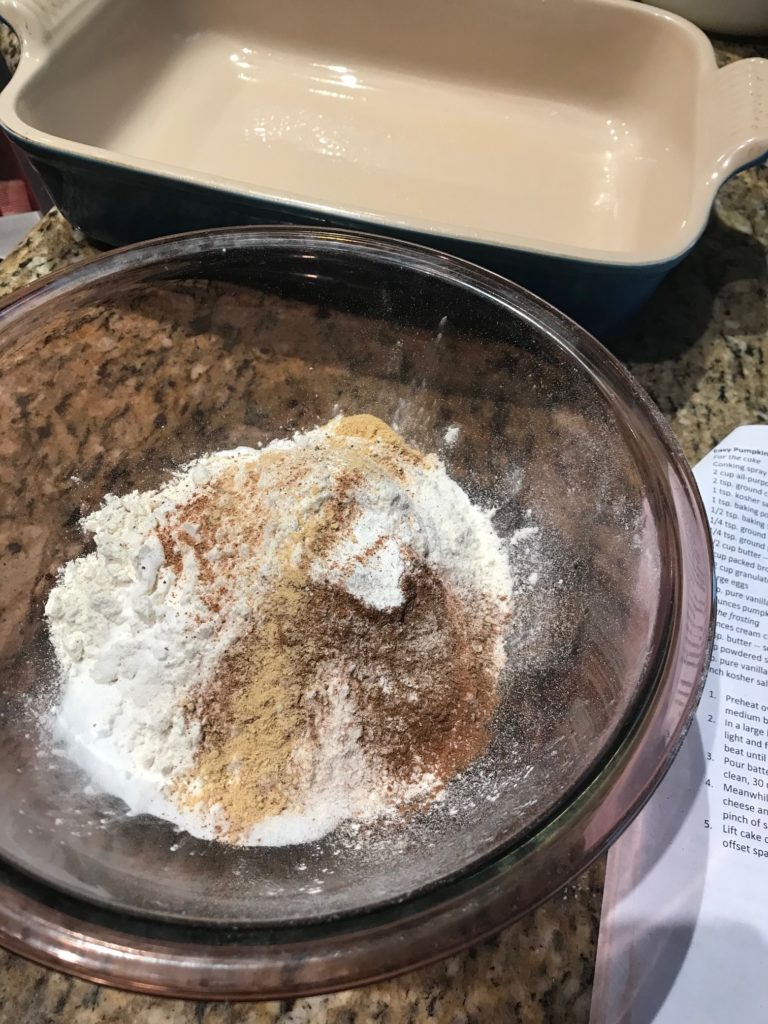
Grab your ingredients while rushing around and setting the table. Mix your dry ingredients.
Whip out you stand or hand mixer and the rest of your cake ingredients. Swear to yourself because you forgot to set out the butter to soften. Never fear. Bring it out, cut it into small pieces, leave it on a metal surface like a cookie sheet, and return 15 minutes. You’ll be a happy camper. Trust me. And while you’re waiting for the butter to soften, run around the house and pick up stuff so you’re in-laws don’t think you’re a slob.
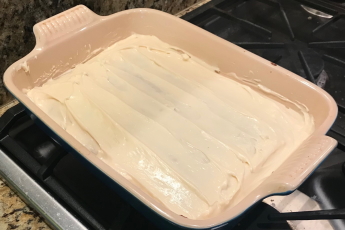
Now that the butter is ready to go, use your mixer to beat the butter and sugars. Add your eggs, one at a time. Throw in some vanilla and pumpkin puree. Then, slowly add your dry ingredients and mix. Pour it into a greased 9×13 baking pan and pop it in the oven.
About 30 minutes later, you have cake. See how easy that was?
While you’re waiting for it to cool so you can frost it, run around and make the mac and cheese and candied sweet potatoes. If you’re so inclined, have a glass of wine. Or two. It’s important to make sure you are serving your guests good wine.
Now that the cake is cool, make the frosting. Kick yourself AGAIN for forgetting to pull out ahead of time the cream cheese and butter to soften. Will one ever learn?! Cut both up in small pieces and set aside. Now this is a good opportunity to make those nuts. Be sure to snack on a few to ensure they’re okay. Quality control is important.
When your cream cheese and butter are softened and ready to go, in your trusty mixer, beat them together until creamy, add the powdered sugar, beat some more, and then add the vanilla and a tiny bit of salt. Sounds weird to use salt, but it brings out the sweetness of the frosting.
What I love about this frosting is that it’s super smooth and easy to spread. Not sure if it’s the cake or the frosting, but the frosting never tears the top layer of the cake that sometimes happens while frosting a cake.
You’re done! And you’re also kicking yourself because you forgot to buy the gingersnaps to crumble on top and every grocery store is closed. I thought about using Nilla Wafers, but decided against it.
What I love about this cake is not only how easy it is to make, but how delicious it is. It’s super moist, sweet but not too sweet, infused with those pumpkin spices everyone loves, and just simply yummy. Now go run around and set up your appetizer plate. The family is about to show up.
Preheat oven to 350F. Grease a 9”-x-13” baking pan with cooking spray.
In a medium bowl, whisk together flour, cinnamon, salt, baking powder, baking soda, nutmeg, and ginger.
In a large bowl using a hand mixer (or in the bowl of a stand mixer), beat butter and sugars together until light and fluffy. Add eggs, one at a time, beating well after each addition. Add vanilla and pumpkin puree, and beat until incorporated. Add dry ingredients and mix until just combined.
Pour batter into prepared baking pan and smooth top. Bake until a toothpick inserted in middle comes out clean, 30-45 minutes. Let cool completely.
Meanwhile, make frosting: In a large bowl using a hand mixer (or in the bowl of a stand mixer), beat cream cheese and butter until smooth. Add powdered sugar and beat until no lumps remain, then add vanilla and a pinch of salt.
Frost cake using a spatula and top with crushed gingersnaps.
I’m fascinated with Louisiana. Maybe it’s because I’m from California and our cuisine has no history. In my opinion, Californian food means locally grown and fresh, which is great and all, but I don’t find any culture in it. It’s too new. I’m sure I’m taking it for granted. I love living here and would never move (except to Hawaii and I LOVE their food, but that’s for another day). Southern food has a history to it that California doesn’t.
In high school, I read The Awakening by Kate Chopin. Her book was my introduction to Louisianian culture. The part that interested me the most were the Creoles, a people of mixed colonial French, African American and Native American descent, and Cajuns, or Acadians, who are also from French descent, but distinctly their own with a full rich history.
I went to New Orleans in high school and fell in love with the food: gumbo, jambalaya, red beans and rice, blackened fish, beignets, and the list goes on. I remember eating the most amazing chocolate pecan pie in New Orleans that ruined me for life. No other pie can live up to it.
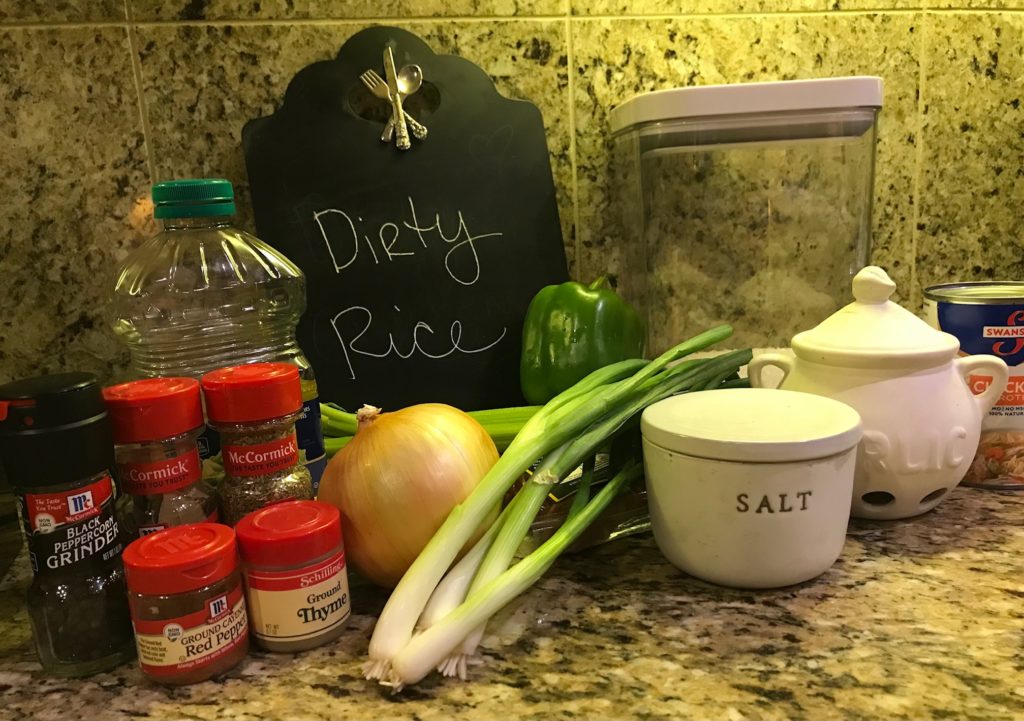
Louisiana made such an impression that I wanted to make the food, but I have never made Dirty Rice until now. You’re probably wondering why one would want to eat something with the word “dirty” in it. That doesn’t sound very good. But it’s easy to make, delicious, inexpensive, and filling. Can it get any better than that? Dirty Rice is a Creole dish made from rice that turns “dirty” from being cooked with meat, cayenne, and black pepper. Today, Dirty Rice commonly contains pork, beef, or chicken. Historically, the meats were organ meats, which were the cheapest cuts that the slaves could afford. The meat would be cooked and finely chopped, creating a broth that colored the rice. After the slaves were freed, this dish remained popular with the poorer people of Louisiana, both black and white, both Creole and Cajun.
The recipe I used came from the kitchn. I didn’t modify the recipe at all, but it would be easy to. I used 12 ounces of andouille sausage, but you can substitute it with another type of sausage, ground beef, chopped up chicken thighs, or even ground turkey.
First gather your ingredients.
Next, dice up your meat and veggies, and measure out the rice and seasonings. Open up a can of chicken broth unless you’re fancy and have homemade broth on hand. Not me.
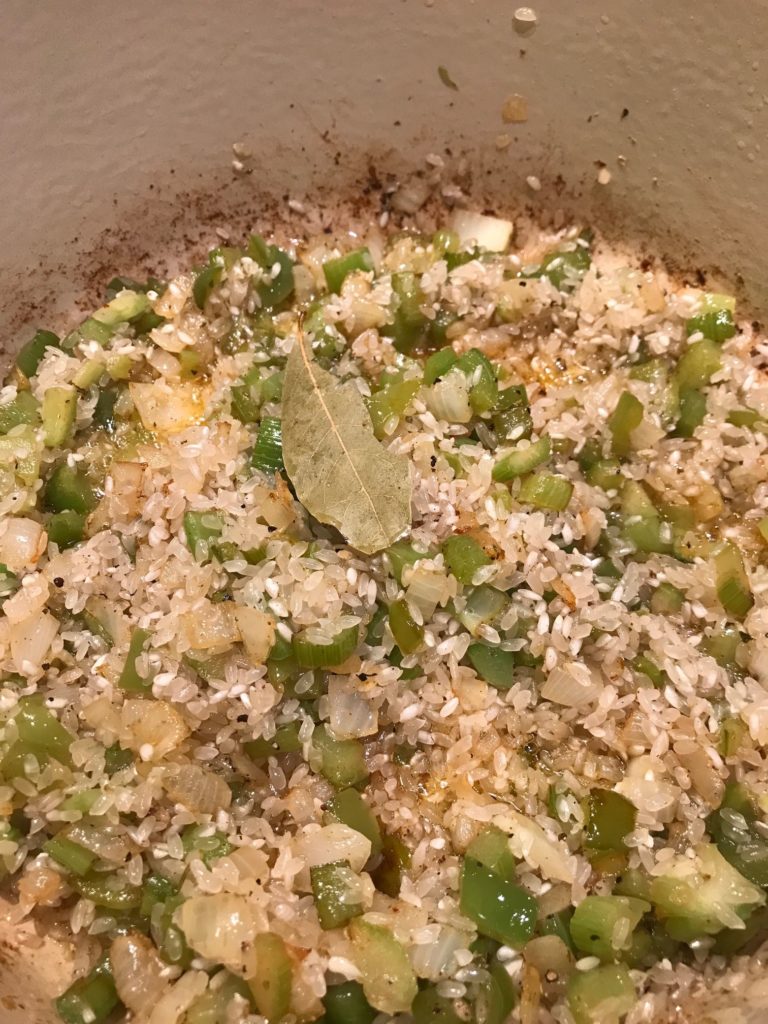
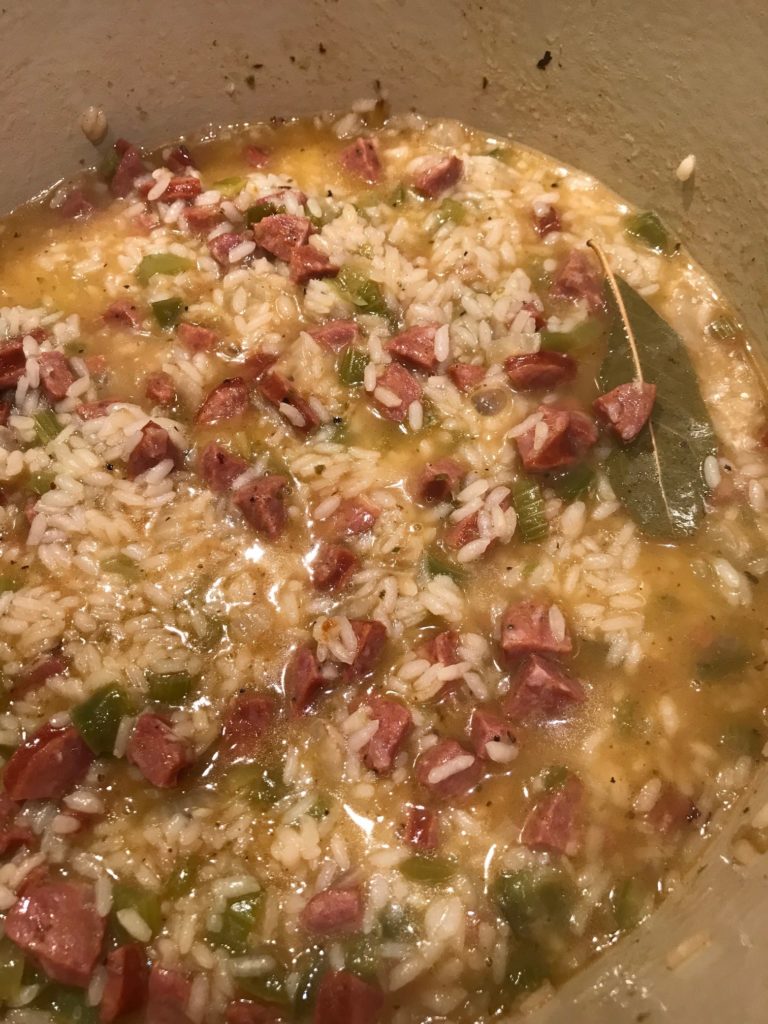
Grab a dutch oven or other large pot, fry up the sausage in a couple tablespoons of vegetable oil, and remove when browned. Next, add the holy trinity, which consists of chopped onion, celery, and bell peppers, and is common in Creole and Cajun dishes. Cook for several minutes until soft. Add rice, garlic, and your seasonings. The recipe says to cook this until the rice crackles, but that sounds scary and my rice merely sizzled. Maybe that’s the same thing. Who knows?
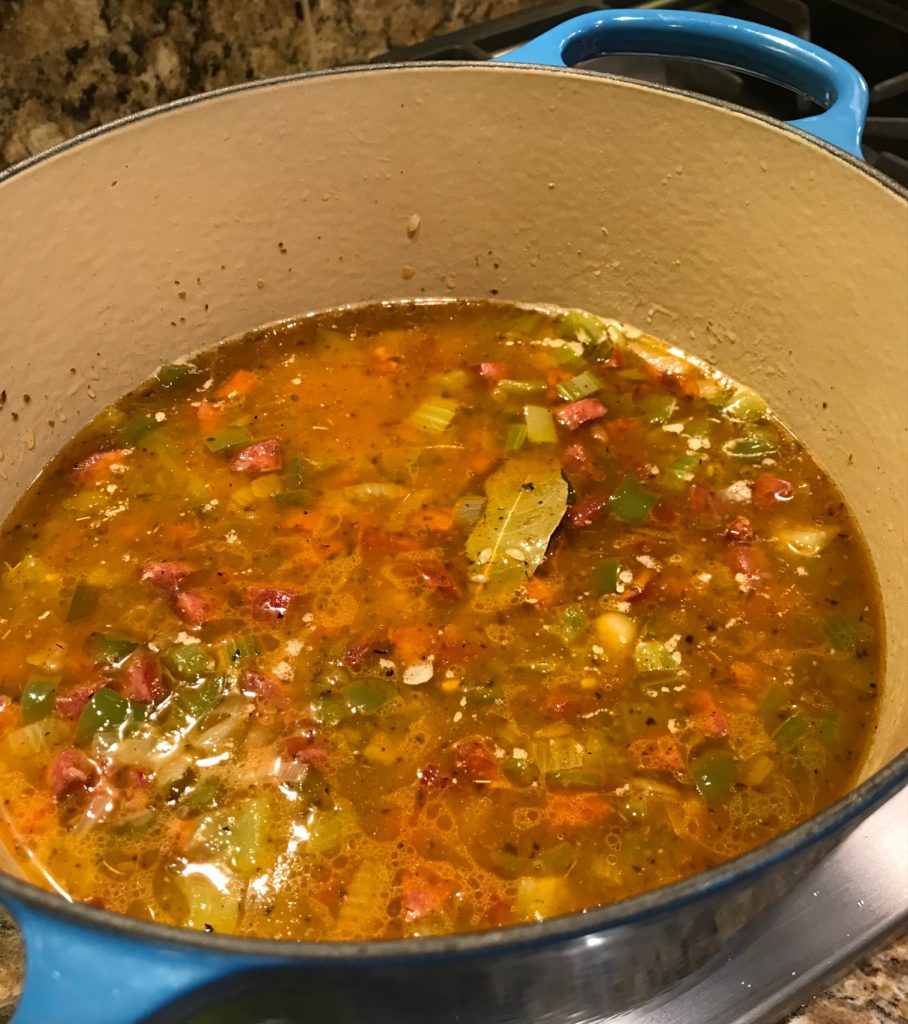
Add broth, water, and sausage, and simmer it on low.
Half way through, stir it so everything is well mixed.
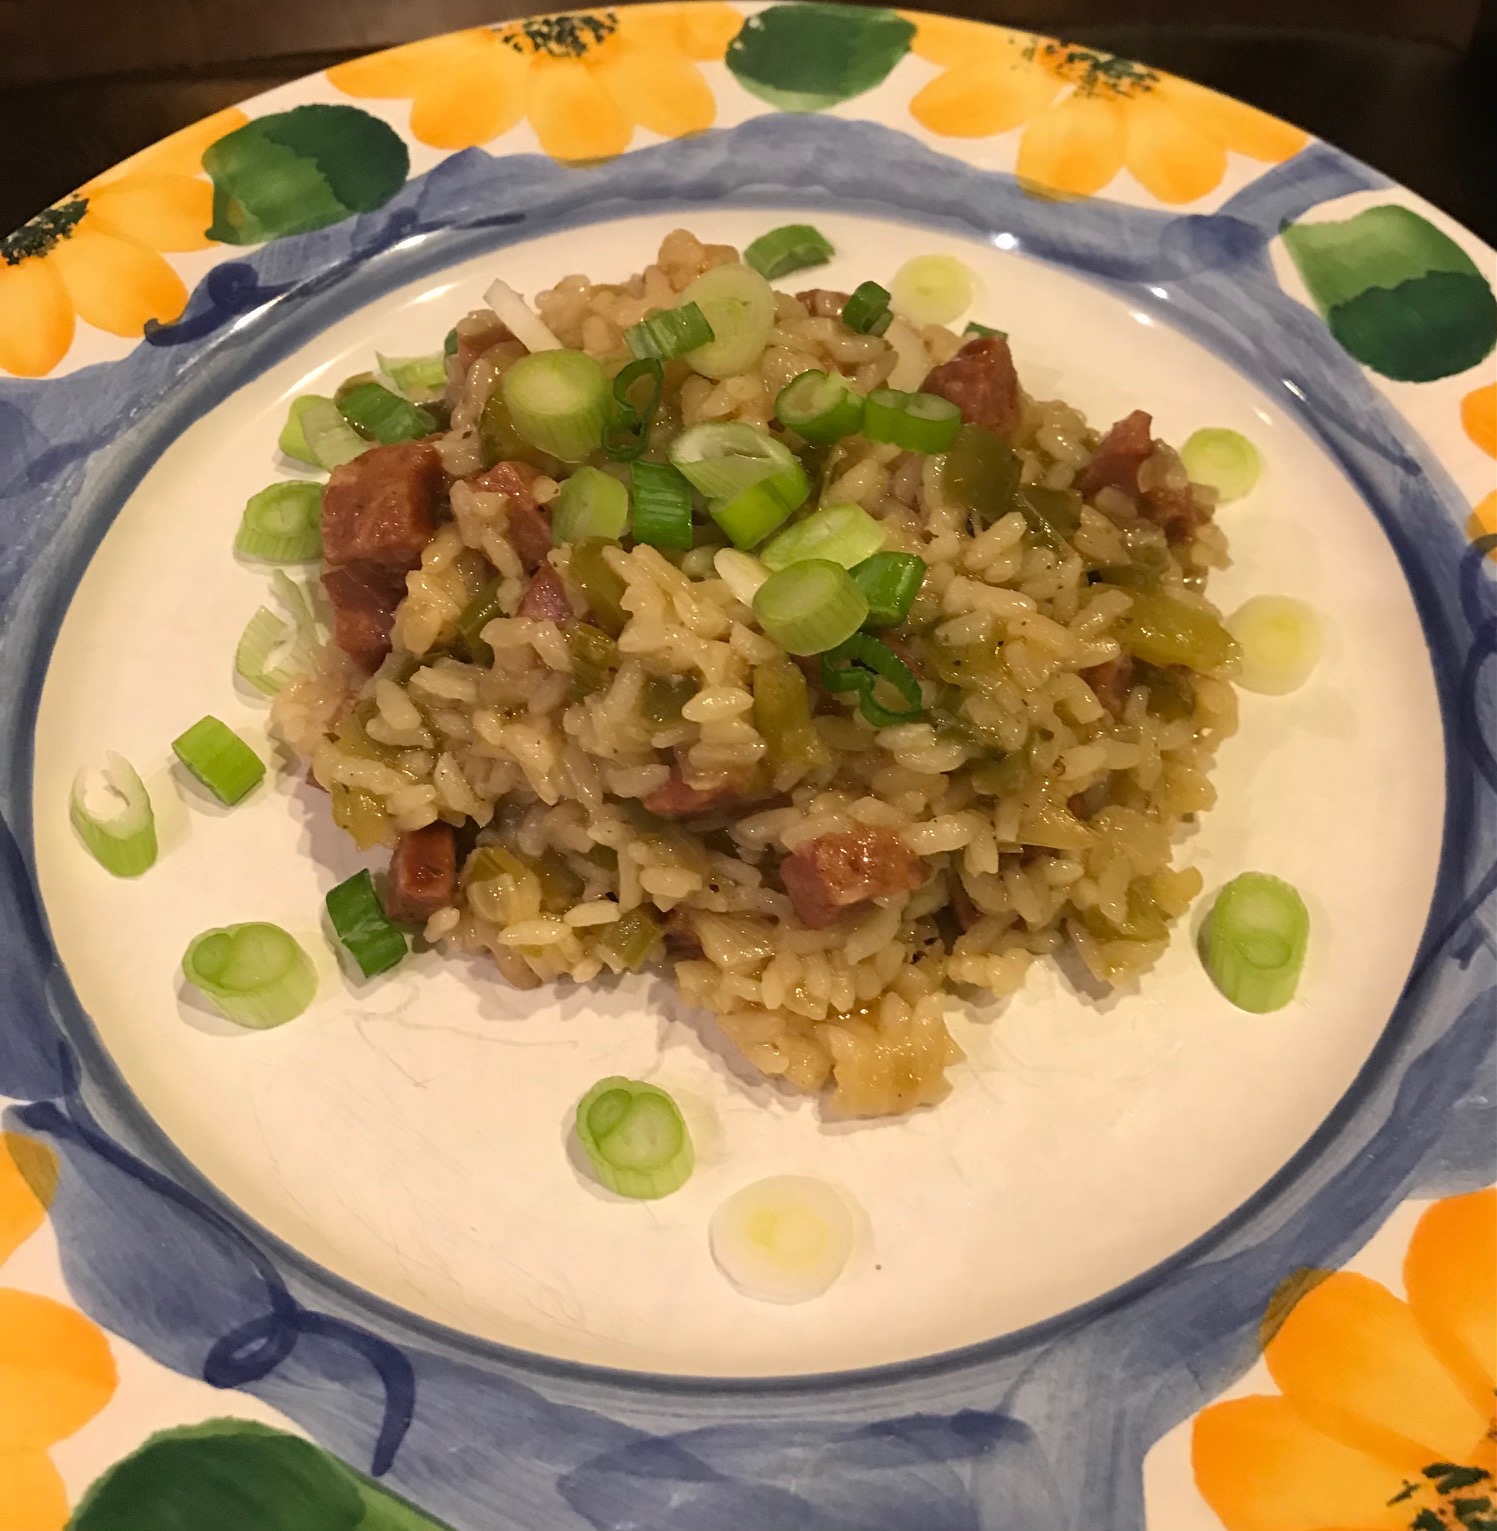
When the rice is tender, take it off the burner and let it rest, covered, for another 5 minutes. Scoop a portion onto a plate and throw some green onions on top. Now it’s time to eat!
Although it has plenty of black pepper and cayenne, it isn’t too spicy. I love the caramelized sausage, which gives it smoky and sweet notes. Don’t skip the garnish. The green onions add a nice crunch. The boys approved of this meal, particularly because the younger boy could easily pick out the Holy Trinity. He also didn’t get any green onions. Definitely try this. Everyone will love and it’s super simple to cook. It also makes great leftovers!
Heat the oil in a Dutch oven or large pot over medium-high heat until shimmering. Add the sausage and cook until browned, about 6 minutes. Using a slotted spoon, remove the sausage to a plate and set aside.
Reduce the heat to medium. Add the onion, celery, and bell pepper to the pot and cook, stirring occasionally, until softened, 8 to 10 minutes. Add the rice, garlic, bay leaf, salt, oregano, thyme, black pepper, and cayenne. Cook, stirring occasionally, until the rice makes a crackling/sizzling sound, about 3 minutes.
Add the broth, water, and reserved sausage. Scrape up any browned bits from the bottom of the pot. Bring to a boil. Stir the rice and spread into an even layer. Reduce the heat to low, cover, and simmer for 10 minutes. Stir the rice, cover again, and cook undisturbed until the rice is tender, 5 to 10 minutes more. All the liquid should be absorbed.
Remove from the heat and let it sit covered for 5 minutes for the rice to steam. Fluff the rice with a fork and season with more salt and pepper as needed. Sprinkle with the green onions and serve.
I continued my search for casseroles that are easy and delicious. I wanted something with a little Asian influence so when I came across Spicy Thai Red Curry Chicken Casserole from the Food Network, I was pleased. It looked easy to make and promising enough. Alas, this casserole became my nemesis. The first two attempts were complete failures, but I was determined to get it right. The third time was a charm and I’m here to give you my version of this dish. It’s really simple once you figure out that you need to layer, not “evenly scatter” the ingredients, add enough liquid, and cook it long enough. I have no idea how the original could ever work.
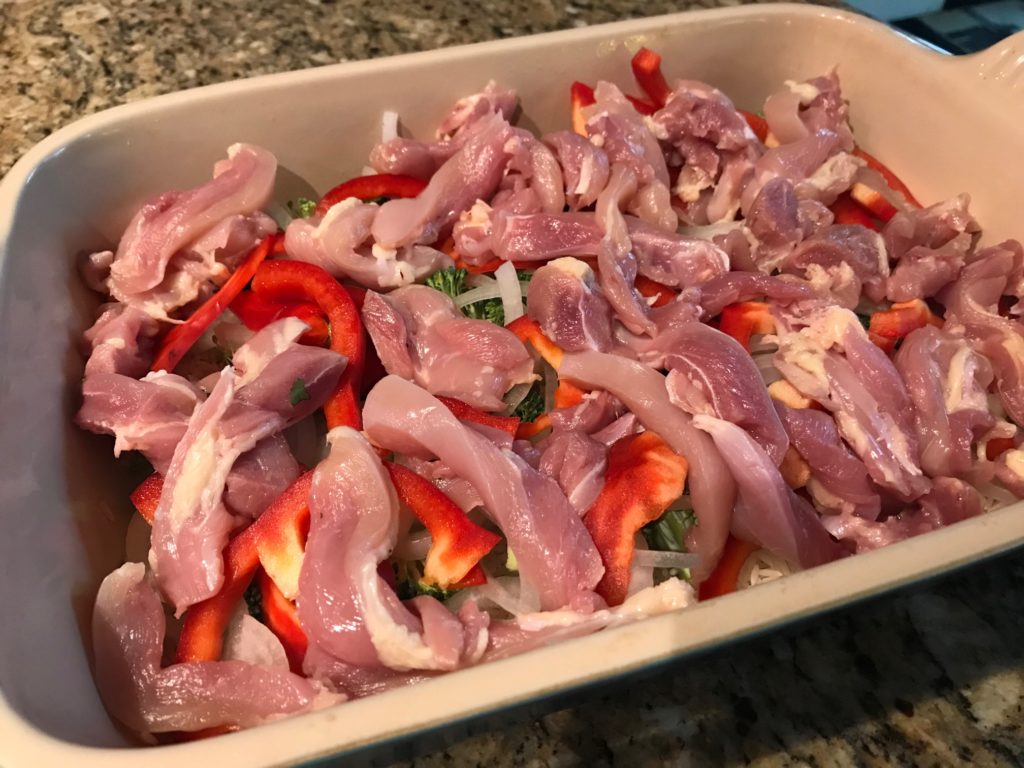
Gather your ingredients: rice, veggies, chicken., light coconut milk, broth, red curry paste, fish sauce, brown sugar, lime, peanuts, and cilantro. I stuck to the same ingredients that were in the recipe. Nothing to change there.
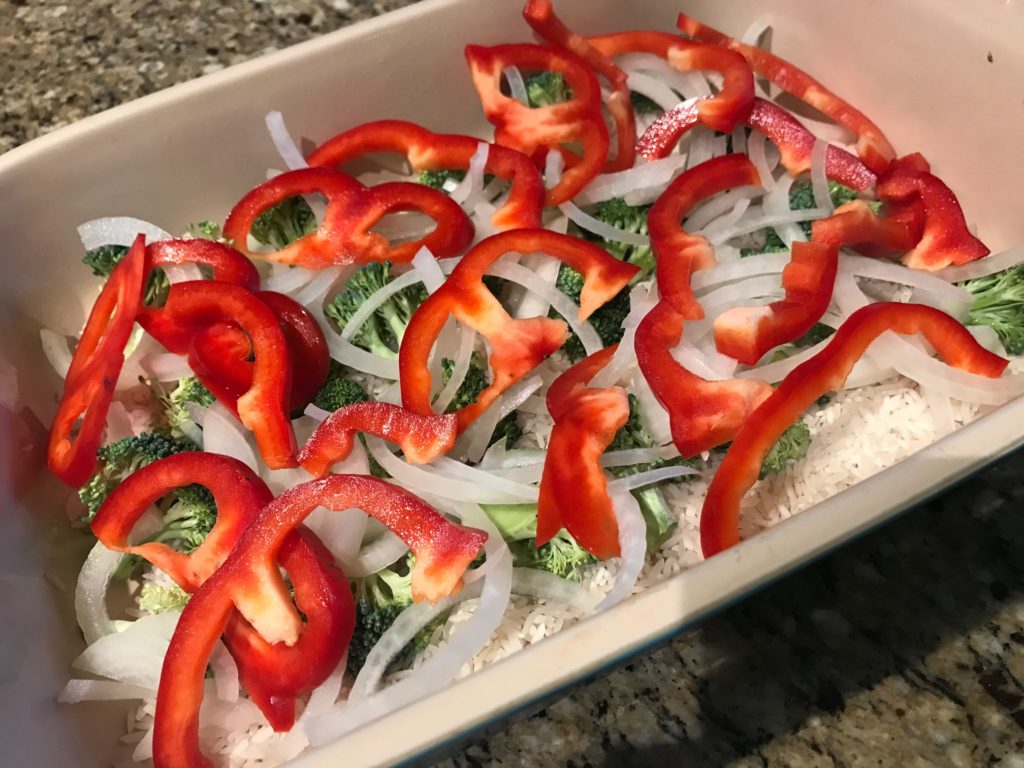
In a casserole pan, add a layer of rice. The original recipe wants you to mix the rice with the veggies and chicken, but this was a bad idea and caused failures to attempts #1 and #2. Who likes crunchy rice? Not me. You need the rice completely submerged in the liquid so it’ll cook.
Next, slice up your peppers and onions. Cut the broccoli florets into bite-sized pieces. Layer over your rice. Do not mix it!
Slice your chicken. I like to slice the chicken last to avoid cross contamination with the veggies. It probably doesn’t matter in this case because we’re cooking the veggies, but it’s a habit I like to practice.
Layer your chicken over the veggies. Do not mix it! (Note my general theme.)
Looks good. Now you need your liquid that will cook the rice. In my first attempt, I used the amounts listed in the recipe. It turned out not to be enough liquid so after 50 minutes, I kept adding cups of water every 10 minutes while I tried to wash the rice off the veggies and chicken to get the rice to cook. After 80 minutes, it was edible enough to eat, but I was extremely disappointed. I hate when dinner is late and we were all very hangry at this point.
In my second attempt, I used more broth, but because I followed the recipe and mixed the ingredients, once again I was smushing the rice down after it had been cooking for 50 minutes to get the rice to cook properly. I almost had crunchy rice on my hands, but I managed to rescue it.
Still frustrated but confident that my third attempt would work, I mixed the wet ingredients and poured it over the casserole. I checked that the rice was fully submerged. It was. I was good to go! I popped it in the oven and prayed to the cooking gods that all would go well. Meanwhile, I chopped up some salted peanuts and fresh cilantro for a garnish. I had plenty of time while the casserole cooked so I sneaked in a couple of episodes of HGTV while making the boy’s lunch.
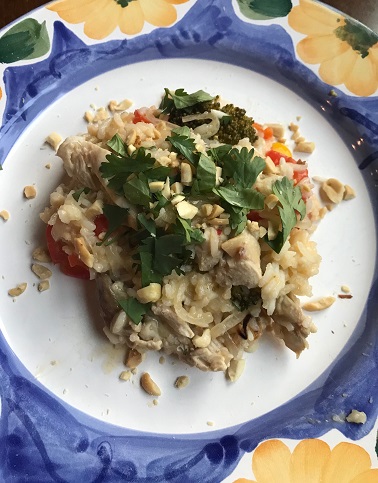
I checked on the casserole after 45 minutes. Not ready so I continued to babysit it, checking the rice every five minutes. After 60 minutes, it was done! I cautiously took a bite of rice. Delicious. I could taste the spice of the curry paste, the saltiness of the fish sauce, the sweetness of the brown sugar, and the acidity of the lime. The flavors were perfect and so were the veggies, cooked yet still firm. Adding the peanuts added an extra crunch and reminded me of pad Thai.
With my changes, I completely recommend this casserole. Did I mention not to mix the rice?
Preheat the oven to 375 degrees F. Coat a 9-by-13-inch pan with cooking spray.
Add a layer of rice to the bottom of the pan. Evenly scatter a layer of broccoli, red pepper, and onion. Top with chicken slices. Season with salt and pepper.
In a bowl, whisk together the coconut milk, broth, curry paste, fish sauce, brown sugar, and lime juice. Pour the mixture over the ingredients in the pan, making sure the lquid covers the rice. Bake until the rice is cooked and most of the liquid is absorbed, 60 minutes. Sprinkle with the chopped peanuts and cilantro before serving.