Blog

Italian Marinated Sirloin Steak

Jump to Recipe

The final days of summer are gone. It’s officially fall, but the hot, breezy weather isn’t convincing me to bring my sweaters out just yet. There’s still time to grill.

Keeping with that theme, you must try this easy steak marinate. I chose sirloin steak because it happens to be one of the more “inexpensive” steaks. Beef prices have gone up so inexpensive is a relative term compared to the other pricey cuts of beef. Sirloin is not as tender as filet mignon or marbled like a rib eye, but it’s a dependable, lean hunk of meat. It’s the friend that will never fail you.

This recipe comes to you from The Food Network. I changed a couple things, but that’s because I did not plan in advance and did not have fresh herbs. I was too lazy to run to the store, too. Dried herbs are never as good as fresh, but this marinade is pretty damn good so I think it’s fine to use whatever you have on hand.

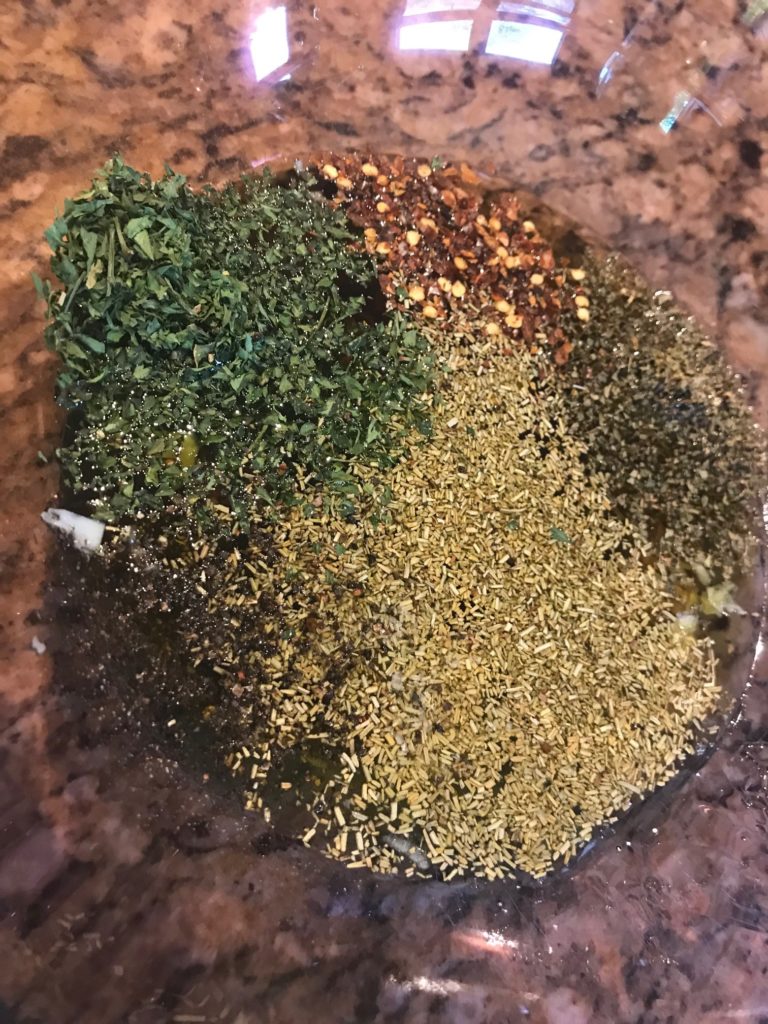
Make your marinade the night before. Combine olive oil, red wine vinegar, grated garlic, a trio of herbs, a little honey, and some red pepper flakes.

Italian Marinated Sirloin Steak

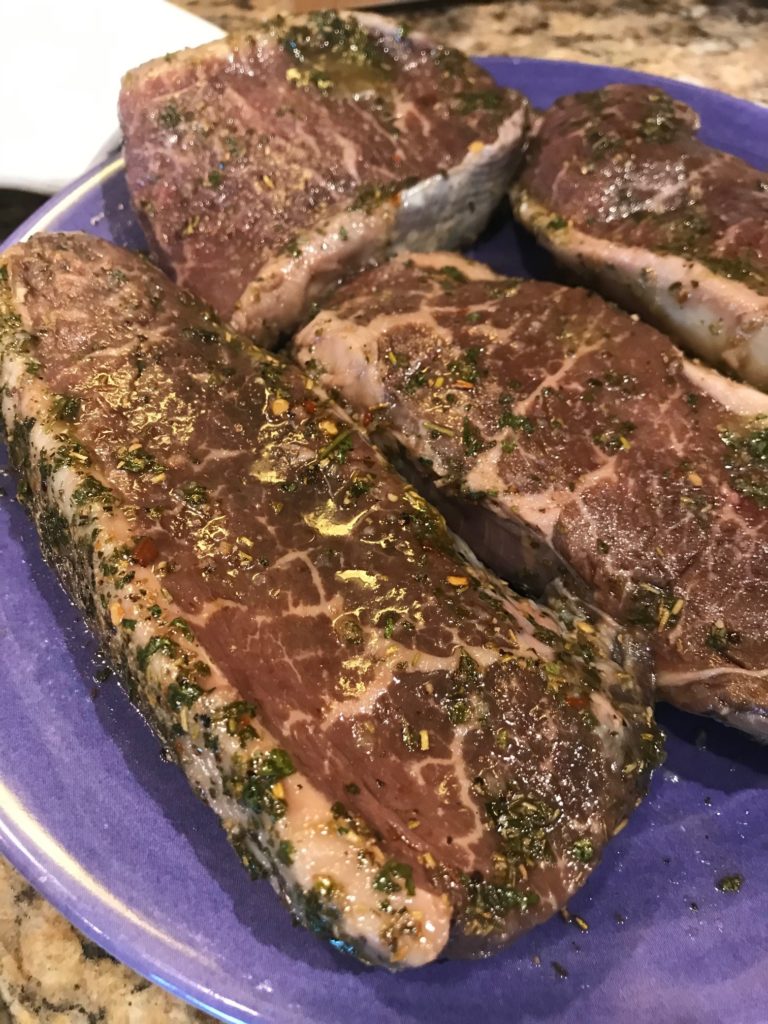
In a gallon size resealable bag, add your steaks. The recipe calls for one large 2-pounder, but that’s crazy. I can’t find that anywhere. I plopped in 4 nice pieces totaling to about 1 1/2 pounds. This is plenty of meat for a small 3-person army with leftovers. Reserve a little marinade if you want to drizzle some over your cooked steaks. Pour the rest of your marinade into the bag, and squish the meat and marinade around until the meat is well coated. Seal it up and stick it in the fridge overnight. I like to put it in a glass pan in case the bag leaks. I hate cleaning my fridge, especially after the exploding soda incident. Let’s not speak of that.

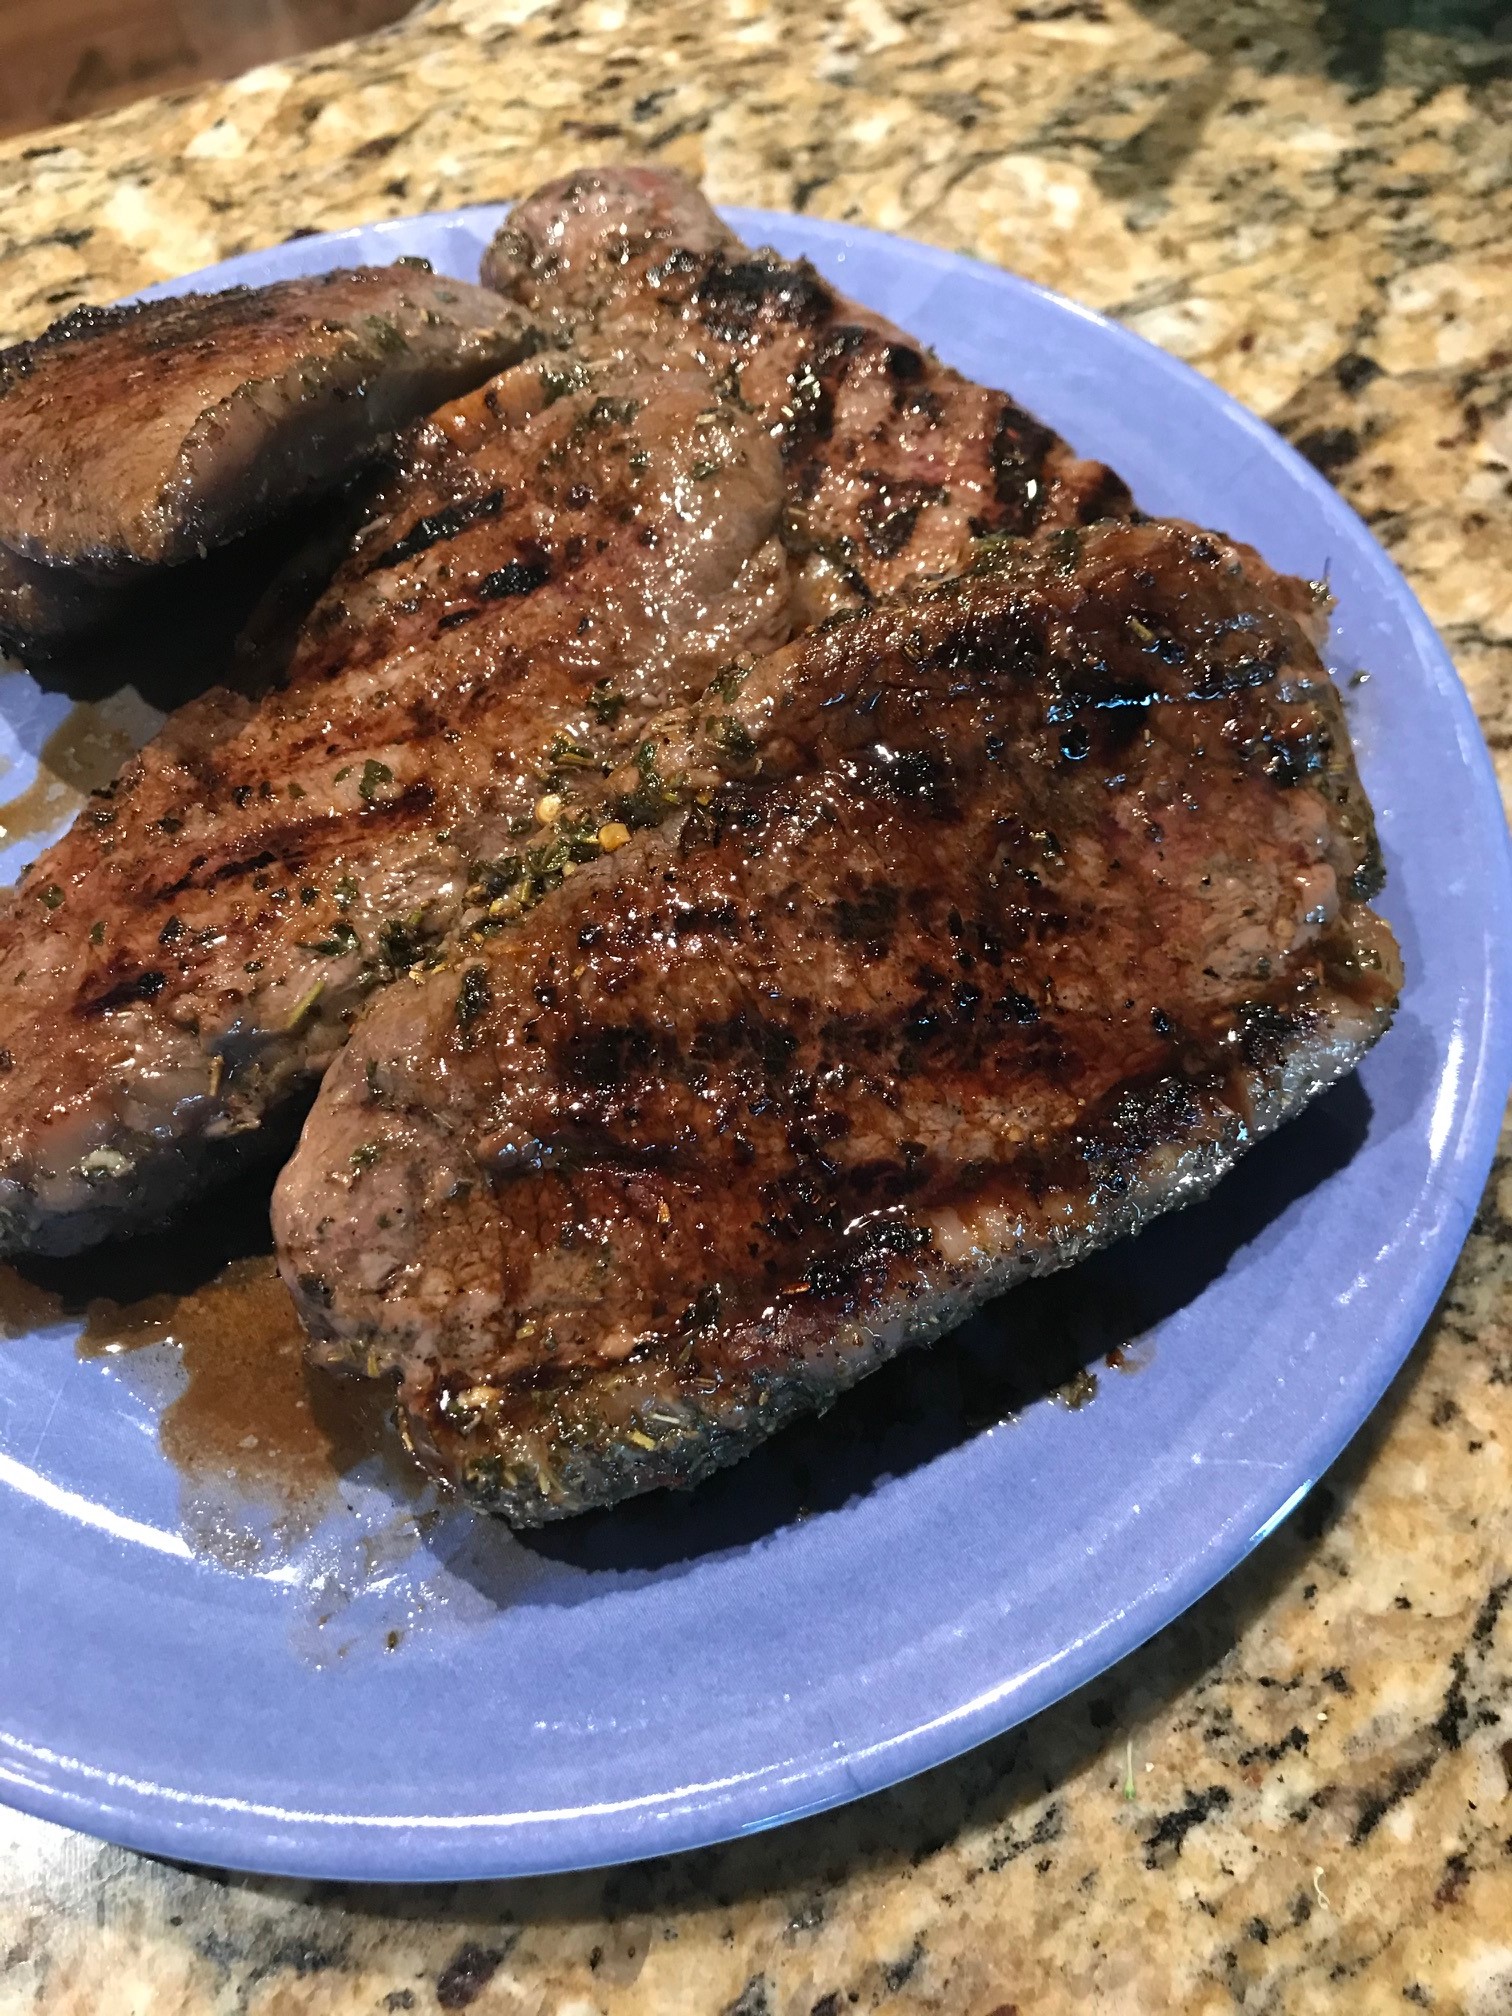
When you are ready to grill, remove the steaks from the bag, dripping the extra marinade off, and place on a plate. Heat up your grill or grilling pan in my case because I didn’t want to send my husband out to grill in the unhealthy smoky air. I’m a nice wife.

Italian Marinated Sirloin Steak

What you end up with is perfection. The rosemary, parsley, and oregano give it a delicious herby quality while the sweet honey and garlic/pepper kick rounds it out. Everyone gets along and you end up with summer on a plate.

Italian Marinated Sirloin Steak

Italian Marinated Sirloin Steak

Ingredients
  

  • 1/2 cup olive oil
  • 1/4 cup red wine vinegar
  • 4 cloves grated garlic
  • 1 tablespoon dried chopped rosemary
  • 1 tablespoon dried parsley
  • 1 tablespoon dried oregano
  • 2 teaspoons honey
  • 1/4 teaspoon red pepper flakes
  • kosher salt and freshly ground pepper
  • sirloin steaks

Instructions
 

  • Whisk the olive oil, vinegar, garlic, rosemary, parsley, oregano, honey, red pepper flakes, and 1/2 teaspoon each salt and pepper in a medium bowl. Reserve 3 tablespoons of the marinade in a small bowl. Cover and refrigerate until ready to serve.
  • Combine the remaining marinade with the steak in a large resealable bag. Turn the bag several times to coat the meat. Refrigerate at least 4 hours or overnight, turning the bag occasionally.
  • Preheat a grill or grill pan to high. Transfer the steak to a plate or baking sheet, letting the excess marinade drip off. Season the steak with salt and pepper. If possible, let stand at room temperature for 30 minutes.
  • Grill the steak until a thermometer inserted into the thickest side reaches 130 degrees F. For a 1 1/2 to 2 inch steak, this is about 16 to 20 minutes for medium rare, flipping every 4 to 5 minutes. Transfer the meat to a cutting board and let it rest 10 minutes. Serve whole or slice the meat to your preferred thickness, against the grain. Serve with the reserved marinade.
Blog

Ramen Chicken Noodle

Jump to Recipe

Fall is coming up and I want to prepare you with this spin on a chicken noodle soup. I don’t know about you, but I pretty much don’t like canned chicken noodle soup. I know it’s the beloved classic of Americans, but when it’s from a can, the noodles and veggies are mushy. And the chicken? You need a magnifying glass to find any.

I know I just criticized your nostalgic soup so I must be crazy to to tell you to go make some Top Ramen, the crunchy dehydrated nest of god knows what’s in them noodles that you find in every college kitchen. But there’s something sentimental about combining chicken noodle soup with Top Ramen. Reminds me of growing up and then being an “adult” in my first apartment, trying to make ends meet. It’s hot, comforting, and full of noodle goodness.

This recipe comes from Delish, and I’ve thrown in some new twists. Feel free to customize this to your preference with your favorite veggies, or use turkey instead of chicken.

Prep your ingredients. Chop up a couple red peppers and carrots. If you don’t like those, try using celery, broccoli, or bok choy. If you’re a veggie hater, skip it all. Next, thinly slice green onion and mince a few cloves of garlic. Season a couple chicken breasts with salt and pepper. Grab a 4-cup box of low-sodium chicken broth, a couple packages of ramen noodles (throw away the seasoning packets!). Chop some cilantro, cut a lime into wedges, and half another lime to have handy.

Ramen Chicken Noodle

Next, heat up some olive oil in a Dutch oven or large soup pot, and saute the chicken breasts until cooked through. Remove when cooked and chop into cubes to the size you prefer. You can skip this step by shredding a rotisserie chicken, but I didn’t have one and I wasn’t about to get into my car to buy one. A word of advice. Always have ground beef, chicken breasts or thighs, and bacon hanging out in your freezer for “emergencies.” Yes, I do have bacon emergencies, but that’s a story for another time.

In the same pot, heat up a little more oil, and toss in your veggies and garlic. Season with salt and pepper and cook until they are softened, but not squishy. Remember, this is not canned soup.

Ramen Chicken Noodle

Add chicken broth and simmer. Add your ramen and cook according to the package, about a couple of minutes. Add the cooked chicken and cilantro. Squeeze a lime over it.

Ramen Chicken Noodle

Mix it up.

Ramen Chicken Noodle

And that’s it. Serve in a bowl with lime wedges (or not).

Ramen Chicken Noodle

Sit back and enjoy the perfectly cooked veggies with pieces of chicken you can actually see. Slurp up the noodles that your mom scolded you about when you made those sucking noises. Be amazed at how the lime juice improves the taste of the broth, which adds acidity and a little flavor. This soup brings on happiness.

Ramen Chicken Noodle

Ramen Chicken Noodle

Servings 4

Ingredients
  

  • 2 tablespoons olive oil divided
  • 2 chicken breasts
  • kosher salt and freshly ground pepper
  • 2 red bell peppers chopped
  • 2 large carrots peeled and chopped
  • 1/2 cup green onions thinly sliced
  • 3 cloves garlic minced
  • 4 cups low-sodium chicken broth
  • 2 packages ramen noodles discard seasoning packets
  • 1/4 cup cillantro chopped
  • juice of 1 lime
  • lime wedges optional, for serving

Instructions
 

  • Season chicken breasts with salt and pepper. In a Dutch oven or large soup pot, heat 1 tablespoon of olive oil. Saute chicken until cooked through. Remove from pot, chop into cubes, and set aside.
  • In the same pot, heat another tablespoon of olive oil. Add peppers, carrots, green onions, and garlic. Season with salt and pepper. Cook until soft for about 6-8 minutes.
  • Add chicken broth and bring to a boil. Turn down to simmer. Add ramen noodles and cook according to package, until tender, for about 2-3 minutes. Stir in cooked chicken, cilantro, and lime juice. Simmer until heated through. Serve in a bowl with lime wedges.
Blog

Beef and Lentil Stew

Jump to Recipe

Someone told me I cook a lot of chicken. I’ve never noticed, but I do. I love chicken. What’s not to love? It’s inexpensive and easy to work with. Thighs happen to be my new favorite meat because they are completely forgiving and the hoarders have mostly left them alone. But I do love beef so let’s branch out a bit.

I had a bag of brown lentils that I bought when the shelves were bare of canned lentils and most beans (hoarders!). I never used them because I found canned lentils a few weeks later that I used for another recipe. So I felt obligated not to waste these lentils and use them. But I’m actually really unfamiliar with lentils. It turns out that lentils are the easiest thing to make. They’re a legume and a cousin to the bean. You don’t need to soak them overnight like beans plus they are loaded with fiber and other good stuff. I thought lentils were just another bean, but not so.

With my trusty dried lentils, I made Beef and Lentil Stew from A Spicy Perspective. I made this during early summer, but I plan to make it again this fall when I need something super comforting.

I changed the recipe up a little based on what I liked and had in the pantry. Start by gathering and prepping your ingredients.

Beef and Lentil Stew

In a large pot (like a heavy Dutch oven), saute beef chuck and onions together until the onions are soft. Then throw in some minced garlic and cook for another minute or so. Season the meat mixture with some salt and pepper and cook until beef is browned.

Beef and Lentil Stew

Add your veggies, those lentils, beef stock (not broth), and seasonings. I used a half a cup more stock than the recipe called for because I wanted a slightly thinner stew, but mostly these cartons have 4 cups in them and I didn’t want to keep track of a half of cup of stock.

Beef and Lentil Stew

Bring to a boil, reduce heat, and then simmer for at least an hour. Curl up with your favorite beverage and go watch an episode of Tiny House Nation. Episode 3 of season 1 on Netflix was particularly good. Just saying. You’ll even have time to spare.

The stew is ready when the beef and lentils are tender. Fish out those bay leaves if you can. Add some tarragon, salt, and pepper. You’re done.

Beef and Lentil Stew

This stew is fall in a bowl. The soft texture of the lentils with the hearty chunks of beef makes it both luscious and substantial. The veggies round out the dish, giving you all your food groups. Treat yourself to dessert, which is perfectly acceptable after eating this healthy meal.

Beef and Lentil Stew

Beef and Lentil Stew

Servings 4

Ingredients
  

  • 1 tablespoon olive oil
  • 1 1/4 pounds beef chuck cut into 3/4 inch cubes
  • 1/2 onion chopped
  • 2 garlic cloves minced
  • 2 carrots sliced
  • 2 celery stalks sliced
  • 3/4 cup dried brown lentils
  • 14 ounces finely chopped canned tomatoes
  • 4 cups beef stock
  • 2 bay leaves
  • 1/2 teaspoon dried thyme
  • pinch cayenne pepper
  • 1 1/2 tablespoons fresh chopped tarragon
  • salt and pepper

Instructions
 

  • Prepare your ingredients, such as cut beef into cubes and slice vegetables.
  • Heat the oil in a large Dutch oven or large pot over medium-high heat. Saute the beef and onions for 3-5 minutes until the onion are soft. Add garlic. Season with salt and pepper. Continue cooking until beef is browned.
  • Add the carrots, celery, lentils, tomatoes, beef stock, bay leaves, thyme, 1 teaspoon salt, and cayenne pepper.
  • Bring to a boil. cover, reduce heat, and simmer, for about 60-75 minutes until the beef and lentils are tender. Remove the bay leaves and stir in the tarragon Add salt and pepper to taste.
Blog

Chicken Fajitas Foil Packets

Jump to Recipe

Last week, I shared with you Pineapple BBQ Chicken Foil Packets. Lo and behold, I’m still on my foil packets kick. I love Mexican food so let’s make fajitas! I often order fajitas when I go to a Mexican restaurant because I can’t make them at home. Although I do try, no way can I duplicate that sizzling pan experience. Sorry to tell you, but don’t expect this recipe to make up for that. On the other hand, you do get a lot of good flavor without a lot of work that satisfies your cravings. Like the last foil packet recipe, you can cook it on the grill or in the oven. The air quality is still bad here (California is on fire right now) so I’m opting for the oven.

This is a pretty easy recipe. Many thanks to the Kitchn. Slice up red bell peppers (the original recipe calls for green….too bitter!) and red onions. You can use any color pepper or onion. Place them in a large bowl. Rinse and drain a can of black beans, and throw that in. Make sure the beans are well drained. You don’t want to accidentally add any extra liquid or you’ll end up with a drippy mess. You don’t want soggy fajitas.

Add olive oil, taco seasoning, and some salt and pepper. The original recipe doesn’t call for salt, but I think it needs it. Taste your taco seasoning. Not salty enough? Add some salt, mix, and taste it again. It’s really important to taste your food as you cook so the seasoning is how you like it.

After tossing that all together, divide it into four piles on sheets of foil.

Chicken Fajitas Foil Packets

Need some help on this? Here’s some advice from my previous post:

Now the fun part. Make four large sheets of heavy-duty foil about the size of a small, quarter-sized baking sheet. You could make one sheet and try that out first, and if it’s the right size, make three more of the same size. I took a gamble and eye-balled it, but it worked. You just want to make sure you have about 2″ around the sides for the crimping. If it turns out you made your sheets too small, just make a larger one and place it under the original sheet. It’s all good. There’s no precise science to this. And if you don’t have heavy-duty foil, just double line your packets to prevent leaking.

Season 4 6-ounce chicken breasts with taco seasoning, salt, and pepper. It’s really important that you use breasts as close to 6 ounces or the chicken and veggies won’t be done at the same time. If you can’t find 6-ounce pieces, cut up larger breasts into smaller pieces of approximately 6 ounces.

Next, place each chicken breast on a pile of veggies.

Chicken Fajitas Foil Packets

Fold the sides and then the edges. Need some help? Check out the tbsp. for directions and pictures. Here’s what mine looked like:

Chicken Fajitas Foil Packets

Grill or oven bake for about 20-25 minutes. Slice chicken into strips and serve with tortillas. I like making a taco, and add grated cheese and guacamole. Super tasty and not a lot of work.

Chicken Fajitas Foil Packets

Chicken Fajitas Foil Packets

Ingredients
  

  • 2 medium red bell peppers
  • 2 medium red onions
  • 15 ounces canned black beans drained and rinsed
  • 2 tablespoons olive oil
  • 2 tablespoons taco seasoning divided
  • kosher salt to taste
  • 1 teaspoon freshly ground pepper
  • 4 6-ounce boneless, skinless chicken breasts

Instructions
 

  • Grilling method: Heat an outdoor grill to medium-high, direct heat. Oven method: Preheat oven to 425F.
  • Slice red bell peppers and red onions, and add to a large bowl. Drain and rinse black beans. Add beans to the bowl. Add olive oil, 1 tablespoon of taco seasoning, salt (to taste), and 1/2 teaspoon of the black pepper. Toss to combine.
  • Prepare 4 (10-inch long) sheets of aluminum foil. Use heavy-duty foil or double sheets to prevent leaking.
  • Divide the vegetable mixture among the 4 sheets of foil, leaving a 2-inch border on all sides.
  • Season chicken breasts with the remaining 1 tablespoon of taco seasoning, salt (to taste), and the remaining 1/2 teaspoon black pepper. Place a breast on each vegetable pile.
  • Fold the sides of the foil to meet over the center. Crimp the edges together to create completely sealed packets.
  • Grilling method: Place the packets directly onto the grill grates, cover, and grill until the chicken is cooked through and the vegetables are tender, 20 to 25 minutes. Oven method: Place packets on a rimmed baking sheet and roast for 20 to 25 minutes.
  • Let cool for 10 minutes before opening the packets and serving. Serve with tortillas and your favorite fixings.