Blog

Parmesan Chicken

Jump to Recipe

I love Parmesan chicken. It’s one of my favorites, but one that I’ve never made well. I usually end up ordering it at restaurants, wishing I could replicate it at home. I think I figured out the problem. I had the wrong recipe.

The two biggest flaws: breading is soggy and doesn’t stick. Other recipes have you dip the chicken in a wash of egg or milk, roll it around in bread crumbs with Parmesan cheese, and then hope all would go well. Wrong. There’s a lot of science behind this recipe, but if followed, you’re guaranteed to make perfectly breaded, crispy chicken with cheesy goodness on the outside, and moist chicken on the inside.

First, let’s thank Ina Garten, the Barefoot Contessa, for this recipe. She makes the best food. Fancy yet comforting. Her recipes are solid and reliable. BTW, I split the recipe because it’s just the three of us, and find that reheating the leftovers isn’t that successful. You lose the crunchiness that makes it so good.

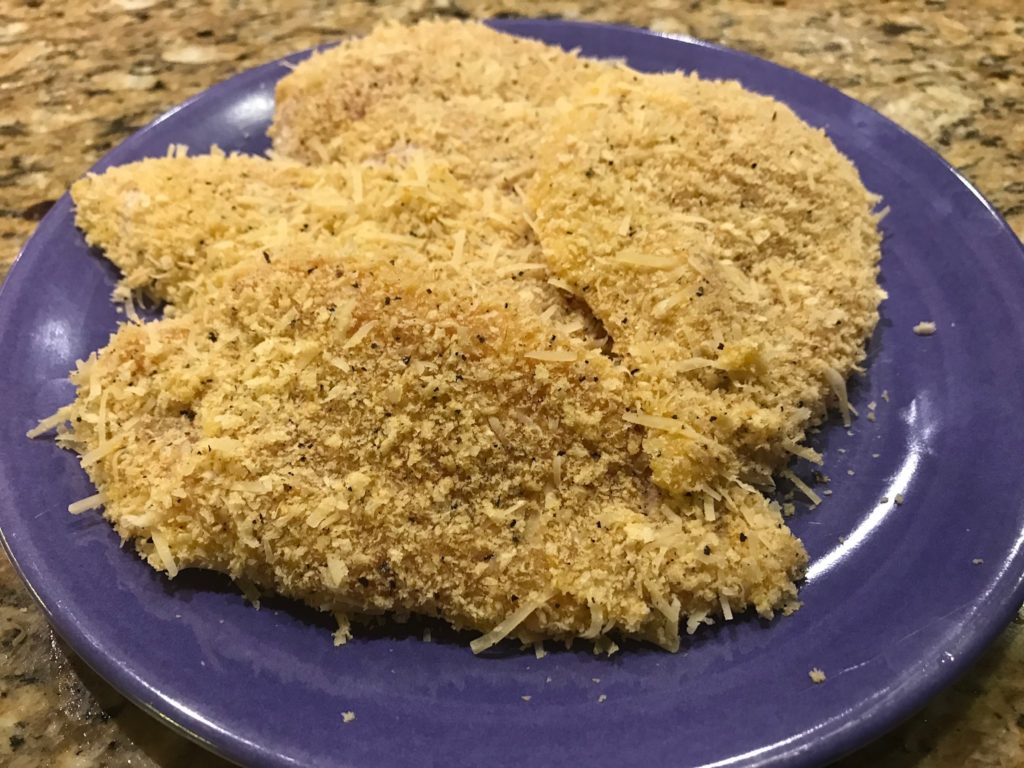
Purchase thin chicken breasts or pound them yourself to about 1/4-inch thick. I like to cover the chicken with wax paper and pound it with a mallet. The wax paper protects the chicken from tearing., but frankly, if I can find chicken already sliced thin, I buy that instead.

You’ll need three dishes to coat the chicken. One reason why the breading falls off is because most recipes skip the important flour dredge. This is a mixture of flour, salt, and pepper. I think it helps the egg wash, which you dip the chicken into after the flour, stick to the chicken, which you absolutely need for the last layer, a mixture of dry bread crumbs and cheese. Each layer builds on each other. When you are done coating your chicken, everything should stick to the chicken rather than slide off. This method is fool-proof, and I mean that in the best possible way. I would be the first to screw it up. And with other recipes, I have. Many times over.

Parmesan Chicken

When you cook it, you don’t need a super hot pan. Heat up the pan with butter and olive oil to medium-low heat. The lower heat setting helps the chicken brown nicely while not drying it out. Cook on each side for about 2-3 minutes. Carefully, try lifting a corner of the chicken. If the chicken sticks to the pan, do not flip it over! Wait another 30 seconds and try again. Be patient and gentle. When it looks like the chicken is not glued to the pan, slip the spatula under the chicken and flip it in one motion. Sometimes I use my fingers to guide and balance it to the correct side. Now would be a good time to show you a video of this. If only I had such technology. Just try to imagine it instead. If you can’t, just flip it. It’s all good.

When it’s all toasty brown on one side, it should look gorgeous like this.

Parmesan Chicken

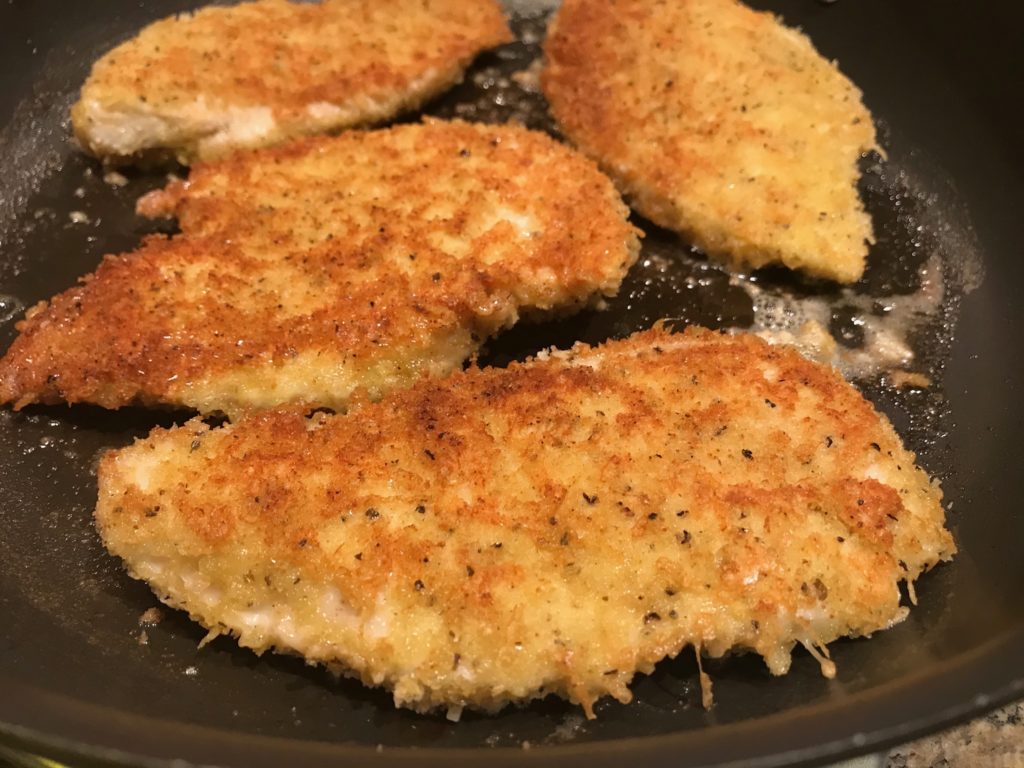
I’m pretty proud of myself here. It’ll be this way for you too.

Meanwhile, make the lemon vinaigrette for the mixed green salad. I don’t think a salad is really necessary and found the dressing to be a bit too acidic for my taste, but my husband loved it. It does compliment the richness of the cheese, but I’m a ranch girl. I would put ranch on everything if I could.

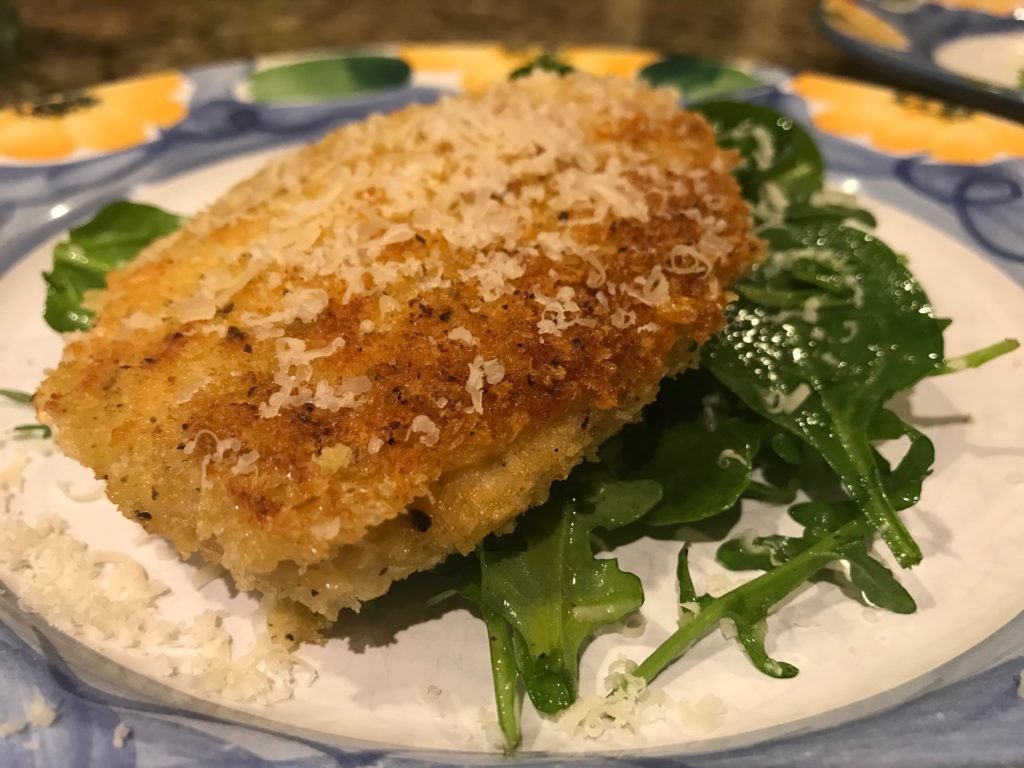
When the chicken is golden on both sides, it’s ready. I placed the chicken over the greens, but the recipe instructs you to place the greens on the chicken. Either way. I wanted my greens a little wilted so under the chicken they went. I shredded plenty of extra Parmesan cheese on top. Like ranch, one cannot have too much cheese.

This makes a super impressive, fancy looking dinner that really didn’t take much time at all.

Parmesan Chicken
Parmesan Chicken

Parmesan Chicken

Servings 6

Ingredients
  

  • 6 boneless, skinless chicken breasts
  • 1 cup all-purpose flour
  • 1 teaspoon kosher salt
  • 1/2 teaspoon black pepper
  • 2 large eggs
  • 1 1/4 cup seasoned dry bread crumbs
  • 1/2 cup freshly shredded Parmesan cheese plus extra for serving
  • 2 tablespoon butter
  • 2 tablespoon olive oil
  • salad greens for 6 washed and spun dry

Lemon Vinaigrette

  • 1/4 cup freshly squeezed lemon juice
  • 1/2 cup olive oil
  • 1/2 teaspoon kosher salt
  • 1/4 teaspoon black pepper

Instructions
 

  • Using a meat mallet, pound the chicken breasts until they are 1/4 inch thick.
  • Combine the flour, salt, and pepper on a dinner plate. On a second plate, beat the eggs with 1 tablespoon of water. On a third plate, combine the bread crumbs and 1/2 cup grated Parmesan cheese. Coat the chicken breasts on both sides with the flour mixture, then dip both sides into the egg mixture, and dredge both sides in the bread-crumb mixture, pressing lightly.
  • Heat 1 tablespoon of butter and 1 tablespoon of olive oil in a large sauté pan. Cook 3 chicken breasts on medium-low heat for 2 to 3 minutes on each side, until cooked through and golden. Remove from pan and set aside, covered to keep them warm. Add more butter and oil to the pan, and cook the rest of the chicken breasts.
  • Make the vinaigrette in a small bowl by whisking together the juice, olive oil, salt, and pepper. Toss the salad greens with vinaigrette.
  • To serve, place a mound of salad on each plate and then place a chicken breasts on each salad. Shredded additional Parmesan cheese on top.
Blog

Christmas Dinner: The Sides

In my opinion, the sides make the Christmas dinner. I don’t dislike turkey, but I’m not its biggest fan (except this Expertly Spiced and Glazed Roast Turkey might have changed my mind) so I like to focus on the side dishes. There are too many delicious sides I like so the problem turns out to be which ones to make. The list starts out long, is cut, grows again when I ask the family if I’m missing anything (why do I ask them?!), and then finally reduced to something manageable and not too gluttonous.

I make all the sides the day before and heat them up on Christmas. I used to make them the day off, but that’s just insane. Nothing was ready on time and I would end up running around like a crazy woman with my family telling me to sit down. Sit down? This food doesn’t make itself! Do you want dinner or not?! See the tension I’m talking about? Ahhhh! No, thank you.

This year I trimmed the list down to cranberry sauce, dressing, mashed potatoes, mac and cheese, and a salad. There’s only five of us this year so this was plenty. We also had gravy (from a jar doctored with turkey drippings), brioche rolls (from the store), and my MIL’s famous Frozen Cranberry Salad. Five days later, we’re still eating leftovers.

I’ve made these recipes a few years in a row because I’ve found they are the best of the best. I really don’t need to go any further and they are not complicated to make.

Let’s start out with the cranberry sauce. It sounds fancy, but it’s the easiest thing to make. You just need fresh cranberries, juice, and honey. It’s also so much better than store bought cranberry sauce. You won’t go back.

Simmer it down. Cranberry sauce.

Told you it was easy.

Get the recipe: Alton Brown’s Cranberry Sauce. BTW, I’ve never found a recipe of his that I didn’t like. He’s goofy, but smart, backing up his mad methods with science.

Speaking of Alton and his mad methods, he taught me how to make the best mashed potatoes. I used to cringe when people said that mashed potatoes are so easy. If they’re so simple, why do mine come out so gluey? Science. I was using the wrong potato and the wrong mashing method. Yes, you can use russet potatoes, especially if you like fluffy mashed potatoes, but if you like creamy mashed potatoes like I do, go with Yukon gold potatoes. It has to do with the amount of starch in the potatoes. Russets have more starch than Yukon gold potatoes. Using Yukons makes for a creamier, less fluffy mashed potatoes. Like I said, science.

A potato masher works, but you know what works better? My new best friend, the potato ricer.

With these two tools in my back pocket, my mashed potatoes are now amazing. Creamy, buttery, with a hint of pepper…everything mashed potatoes should be.

Get the recipe: Alton Brown’s Creamy Mashed Potatoes.

While I do love mashed potatoes, I love love LOVE mac and cheese. I rarely eat pasta (carbs) so this is a decadent treat for me that is worth every calorie. This recipe requires a little extra work, but it’s well worth it. It has both Gruyere and cheddar cheeses. This turns out to be the perfect marriage of cheeses. Cheddar is gooey and buttery, but needs another cheese to melt properly. Meet Gruyere, which is mild, nutty, tangy, AND melts easily. Mmmmm…cheese.

The recipe calls for 12 ounces of Gruyere to 8 ounces of cheddar, but you can use any amounts of each that you happen to have as long as it adds up to 20 ounces of cheese. I discovered this when this year, I might have accidentally nibbled on too much Gruyere and noticed I bought a little less than I should have. Doh. So there was more cheddar than Gruyere this year. It’s all good.

This recipe also makes a lot of mac and cheese so I split the recipe and we still have leftovers. Feel free to make the whole recipe if you have a ton of guests. All this cheesy goodness will disappear quickly.

Get the recipe here: Macaroni and Cheese. It’s another good recipe from Ina Garten. I prefer it without the tomato breadcrumb topping, but I encourage you to try it either ways. I think the Gruyere is the secret, but give credit to the nutmeg that brings it all together. This is not your Kraft mac and cheese.

Now speaking of Ina Garten, she makes the best turkey dressing. I’m super picky about my dressing. I’ve tried a million different ones: store bought (ugh), cornbread (too crumbly), sage (not exciting enough), whole wheat (too healthy), cauliflower (not authentic)…you get the idea. Although I adore her (who doesn’t?) and think her recipes are spot on, I had been disappointed so many times that I had low expectations when I tried her recipe. Wrong. This dressing is amazing and gets rave reviews by everyone at home. It doesn’t have any unusual ingredients. I just think it’s the right mixture of everything you’d expect, but using toasted sourdough bread cubes and dried cranberries puts it over the top.

Along with your standard ingredients of celery and onion, use apples, which adds sweetness and prevents a dry dressing.

Using a VERY generous amount of butter (let’s not talk about how many sticks of butter today), saute the veggies and apples in a pan.

Ten minutes later, every will be soft and yummy. I could probably eat this straight out of the pan, but I used some self-control, unlike the Gruyere cheese incident.

In a very large bowl with the bread cubes, add this mixture along with browned crumbled sausage, broth (homemade if you want to show off), and dried cranberries. The cranberries add another dimension of sweetness against the onions and a chewy texture that complements the toasted bread. Plus cranberries scream turkey so you gotta have them.

Mix well and plop it into a baking dish.

Because I bake it the next day, I add additional broth right before it goes into the oven to ensure it won’t dry out.

Get the recipe: Sausage and Herb Stuffing. As Ina would say, “How easy is that?”

With all these heavy side dishes, I wanted to make a salad to balance it off. Well, this salad wasn’t exactly as light as I originally planned, but it turned out to be clever. You see, I love cute food. My crazy smooshed looking Spooky Peppers is evidence of my insanity. I came across the cutest idea for a caprese salad so I decided to make my own Caprese Christmas Wreath Salad.

Caprese Salad Wreath

Caprese Christmas Wreath Salad

Ingredients
  

  • fresh basil
  • cherry tomatoes
  • small mozzarella balls marniated in herbs and olive oil

Instructions
 

  • Remove the basil leaves from the steams. Use the larger leaves to create a ring around the plate.
  • Using a toothpick, skewer a tomato, a basil leaf, and a mozzarella ball.
  • Arrange in a circle on the basil leaves. Continue until you've created enough circles to fill the wreath. Add small basil leaves to fill in the wreath as needed.

Merry Christmas! I hope I made your dinner a little easier with these dependable side dish recipes.

Blog

Orzo Salad

Jump to Recipe

Every year, the extended family gets together for Christmas. We catch up on our lives, steal gifts during the no-so white elephant exchange (I ended up with olive oils…love it! My husband walked away with a Starbucks gift card, which I immediately stole.), and eat lots of yummy food. My nephew (my husband’s cousin’s son?) made these amazing appetizers with crostini, whipped cream cheese (I think), and smoked trout. Oh my god…they were awesome. I really want the recipe, but he probably just threw it all together because he’s that type of guy.

My dish wasn’t anywhere near as fancy, but I think it was respectable, reliable, and recommended. At least, I recommend it! The beauty of this recipe is that you can adjust it to suit your needs. If you want to add more goodies, don’t hold back. If you don’t like garbanzo beans, leave them out and use your favorite bean instead. Don’t like cucumber? Use zucchini. You get the idea.

Thank you to the Food Network for sharing this recipe. I followed the recipe closely, but next time, I’m going to try adding more goodies. The secret ingredient has to be the chopped walnuts. Completely unexpected, but memorable, giving the salad an extra crunch. In second place, the salty feta cheese closely followed by the fresh mint.

The dressing is pretty easy and is your basic vinaigrette. You can really use this dressing in any pasta or green salad. Instead of vinegar, you use lemon, which gives an extra boost of freshness.

There’s a lot of chopping involved, but it’s a good excuse to nibble on some veggies. Dice up red pepper and English cucumber, taking care to make equal, bite-sized pieces.

Finely chop red onion. Combine with garbanzo beans (aka chickpeas), which really adds a good texture to the salad so if you don’t like them, please use another type of bean. Cut some Kalamata olives in half, which along with the feta that you’ll add at the end, gives a saltiness that balances out the tangy salad dressing. Add walnuts, fresh mint, and fresh parsley. I questioned the walnuts, but as I mentioned earlier, they are surprisingly magical. I would say that you could use dried parsley if you want, but don’t skip the fresh mint. Dried mint isn’t the same.

Except for the feta, mix everything together while the orzo is still hot so that it absorbs the dressing. Add a little more olive oil if it’s too dry for you, but I found the mixture to be perfect. Make sure to sample it and add salt to taste. I also added some freshly ground pepper although the recipe didn’t call for it. Chill and add the feta when you know it won’t melt, which would be a bad thing.

What I like about this salad is that it’s perfect for both a side dish for dinner and potlucks: makes a lot, travels well, is good at room temperature, and doesn’t go bad from sitting out. It’s also relatively easy to make while still being impressive. The colors make it look attractive and fresh. Even better…you can make this salad the day before and it will taste even better than the day of.

Orzo Salad

Orzo Salad

Servings 8 cups

Ingredients
  

For dressing:

  • 2 teaspoons lemon zest
  • 6 tablespoons lemon juice freshly squeezed
  • 1 clove garlic grated
  • 1/2 cup extra-virgin olive oil
  • 2 teaspoons kosher salt
  • 1 teaspoon black pepper

For salad:

  • 1 large red bell pepper diced
  • 1 1/2 cups English cucumber pulp scooped out and discarded, diced
  • 3/4 cup red onion finely chopped
  • 15.5 ounces garbanzo beans (chickpeas) drained and rinsed
  • 1 cup pitted Kalamata olives halved
  • 1 cup walnuts roughly chopped
  • 1/4 cup fresh mint finely chopped
  • 3 tablespoons fresh Italian flat-leaf parsley finely chopped
  • kosher salt and freshly ground black pepper to taste
  • 1 pound dried orzo
  • 6 ounces Greek feta crumbled

Instructions
 

  • In a small mixing bowl, whisk together the lemon zest and juice, garlic, olive oil, salt and pepper. Set the dressing aside.
  • Combine the red bell pepper, cucumber, onion, chickpeas, olives, walnuts, mint, and parsley in a large mixing bowl.
  • Meanwhile, bring a large pot of water to a boil. Stir in 3 tablespoons of salt and a small splash of olive oil. Add the orzo and cook for 7 to 9 minutes, or according to the directions on the package. Drain the orzo in a colander, then add it to the vegetable mixture while the orzo is still hot. Immediately pour the dressing onto the orzo and vegetables, and stir to combine. The hot orzo will readily absorb the dressing.
  • Season with salt and pepper to taste. Add a splash more olive oil if the salad seems too dry. Allow the salad to cool to room temperature, and then add the feta. Cover and refrigerate for 1 to 2 hours. You can also make this the day before.