I have a ton of turkey leftovers from Thanksgiving dinner. Ok, maybe not a ton. More like 7 pounds. The boys have been eating turkey everything this week, including these turkey tacos that were delicious and easy to make. You can easily use chicken instead, but I needed to use up all this turkey so turkey it is.
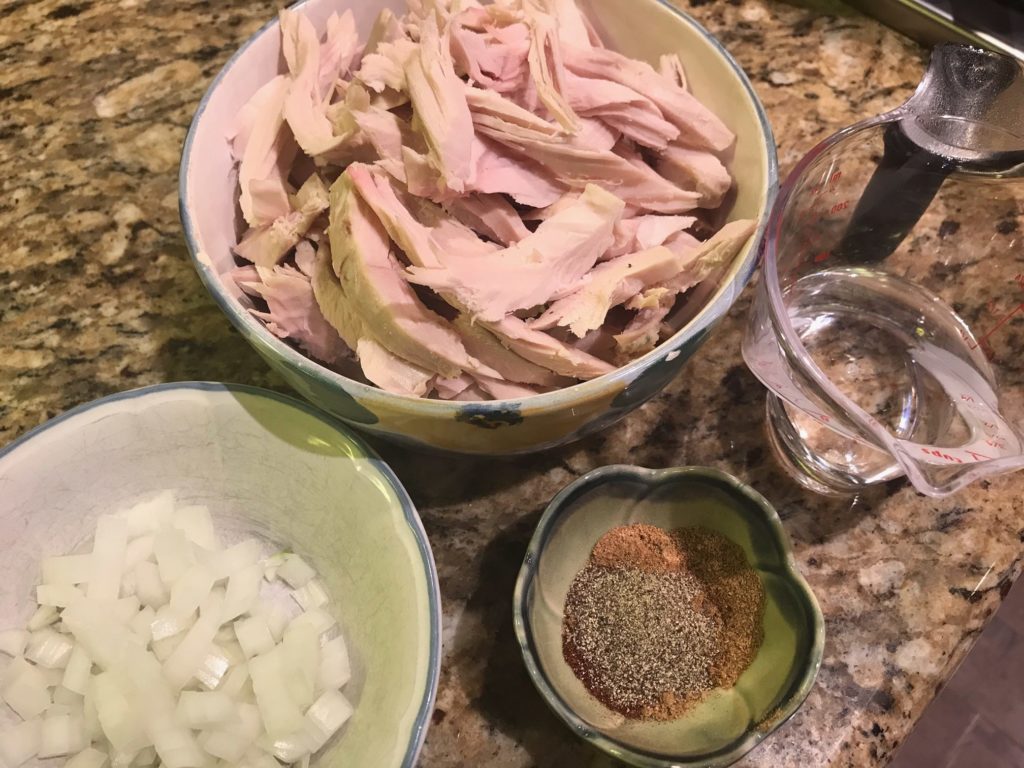
Gather your ingredients. Chop up an onion. Shred the turkey. You know what to do.
Saute the chopped onion in a little olive oil until cooked. Throw in the turkey, spices, and a little water. Mix it all up.
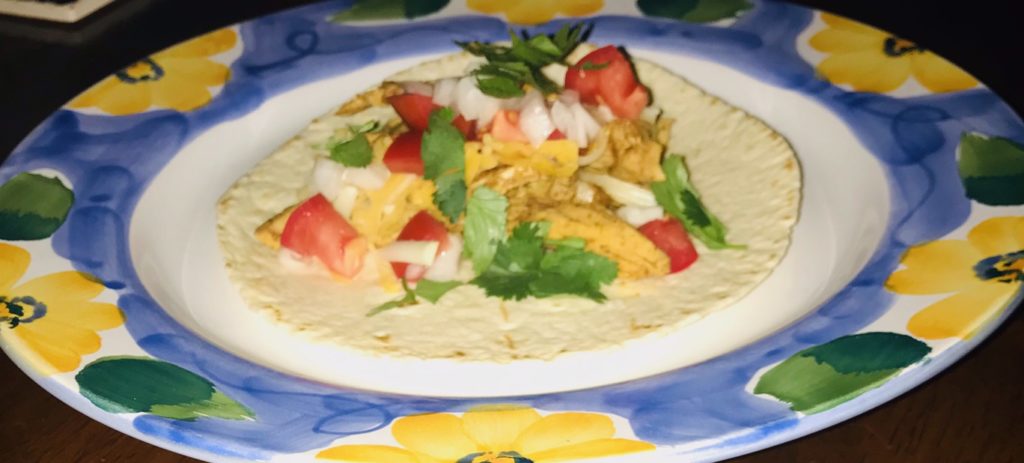
When the water is mostly absorbed and your turkey is heated through, you are done. Assemble into tacos with your favorite toppings. See how easy that was?
I have to admit that I usually make tacos using those seasoning packets (gasp!), but I really should break that habit. Mixing up cumin, coriander, and chili powder is just as easy as opening an envelope and is a great combination that provides lots of flavor. It doesn’t taste the same, but is just as good, if not better. These mild tacos are the opposite of spicy so feel free to throw in some hot sauce before or after you cook the turkey to kick up the fire. And don’t judge the flour tortilla. To each his own.
Heat olive oil in a large skillet. Add onion and saute until cooked, for about 5 minutes.
In the same skillet, add turkey, cumin, coriander, chili powder, black pepper, and water. Stir to mix. Add salt to taste if needed.
Cook for 3-5 minutes until the turkey is warmed through and most of the water is evaporated. Remove heat and assemble into tortillas. Add your favorite toppings.
It goes without saying that 2020 has been a most unusual year. This year has made a significant impact in the way we live our lives so Thanksgiving looked differently this year too.
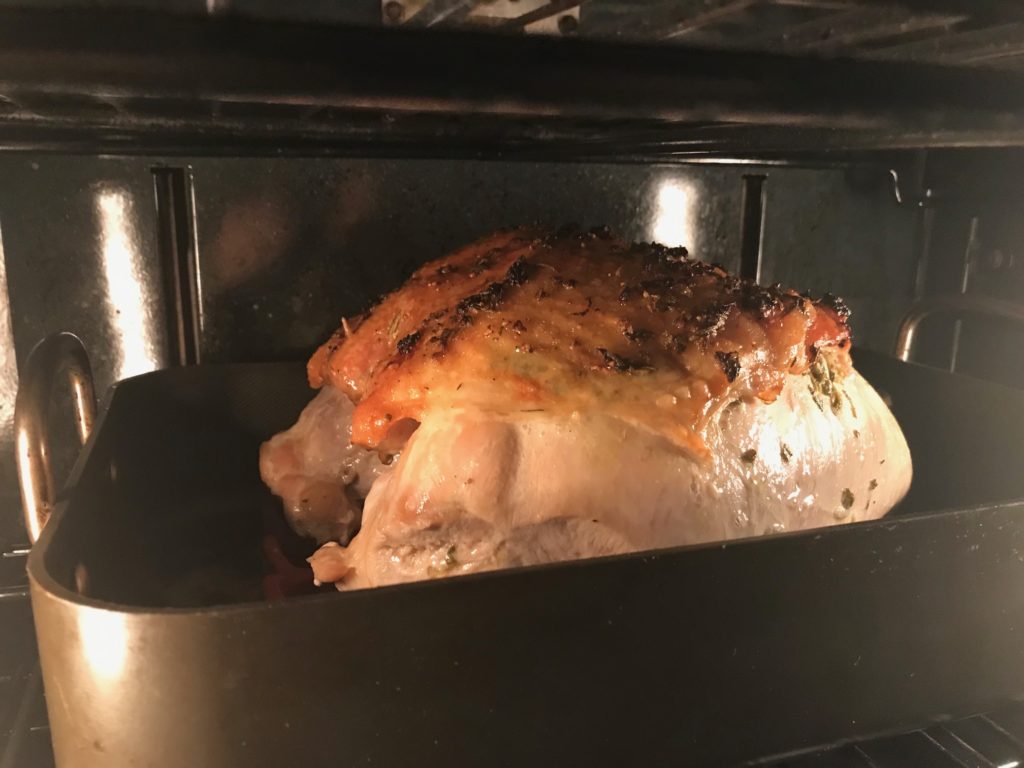
We usually have anywhere from 7-10 people over and a decent sized turkey. Because it was just the three of us, I took a different route this year and purchased an 8 pound bone-in, skin-in turkey breast. None of us want the legs anyway and I detest working with realistic food so let’s just avoid the whole bird cavity thing.
It turns out that I wasn’t the only one with this idea and found lots of turkey breast recipes. I settled on one of Ina Garten’s recipes. I trust her completely so I knew she wouldn’t steer me wrong.
Everything turned out fantastic except the rolls and that was completely my fault. I was so excited at how they looked after 20 minutes in oven that I pulled them out before they were golden brown. They ended up being like rocks. Sadness. Eat more stuffing, people.
First, pull out the turkey from the refrigerator at least an hour before you roast it. It’ll roast more evenly than if you stick a cold bird into a hot oven.
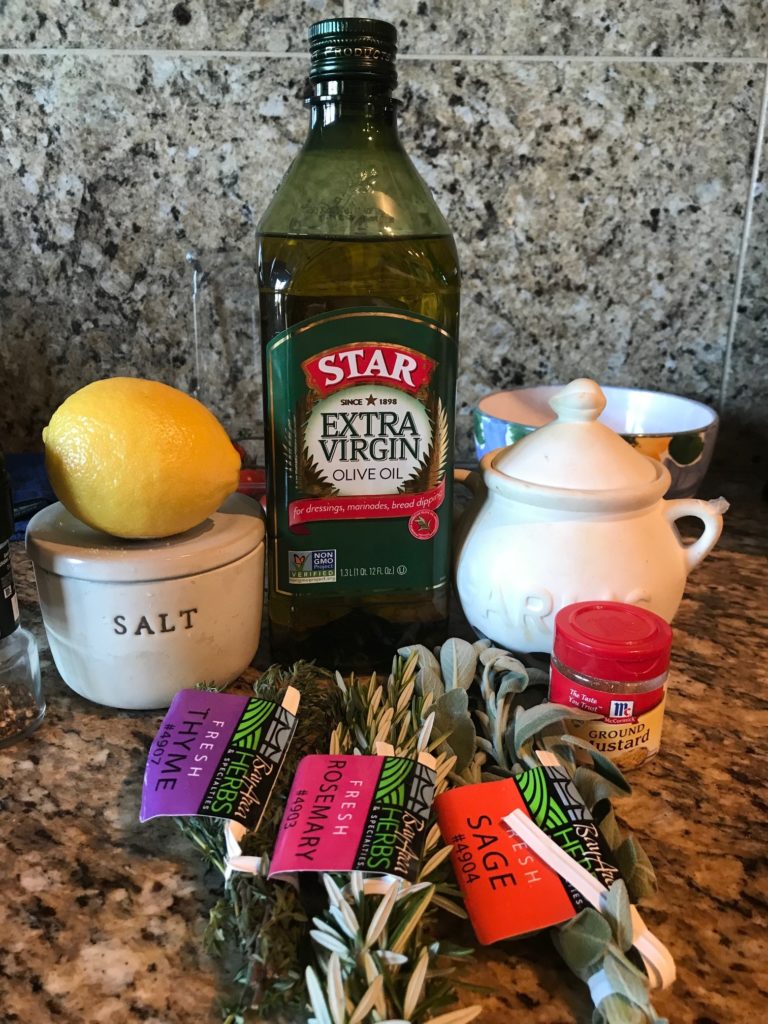
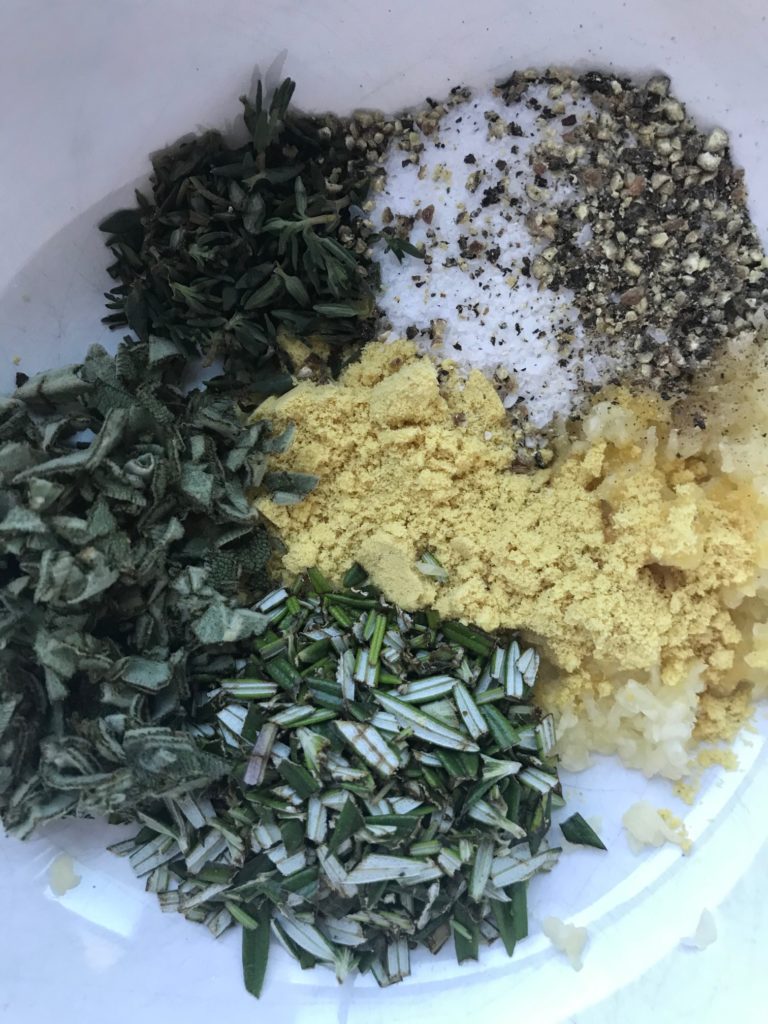
While it’s sitting, prepare the paste that you’ll run under and on the skin. Gather your ingredients. This is one of those times where you really should use fresh herbs. You just spent all this money on your turkey so you should invest a little more on fresh thyme, rosemary, and sage. The extra chopping won’t kill you and the herbs smell good too.
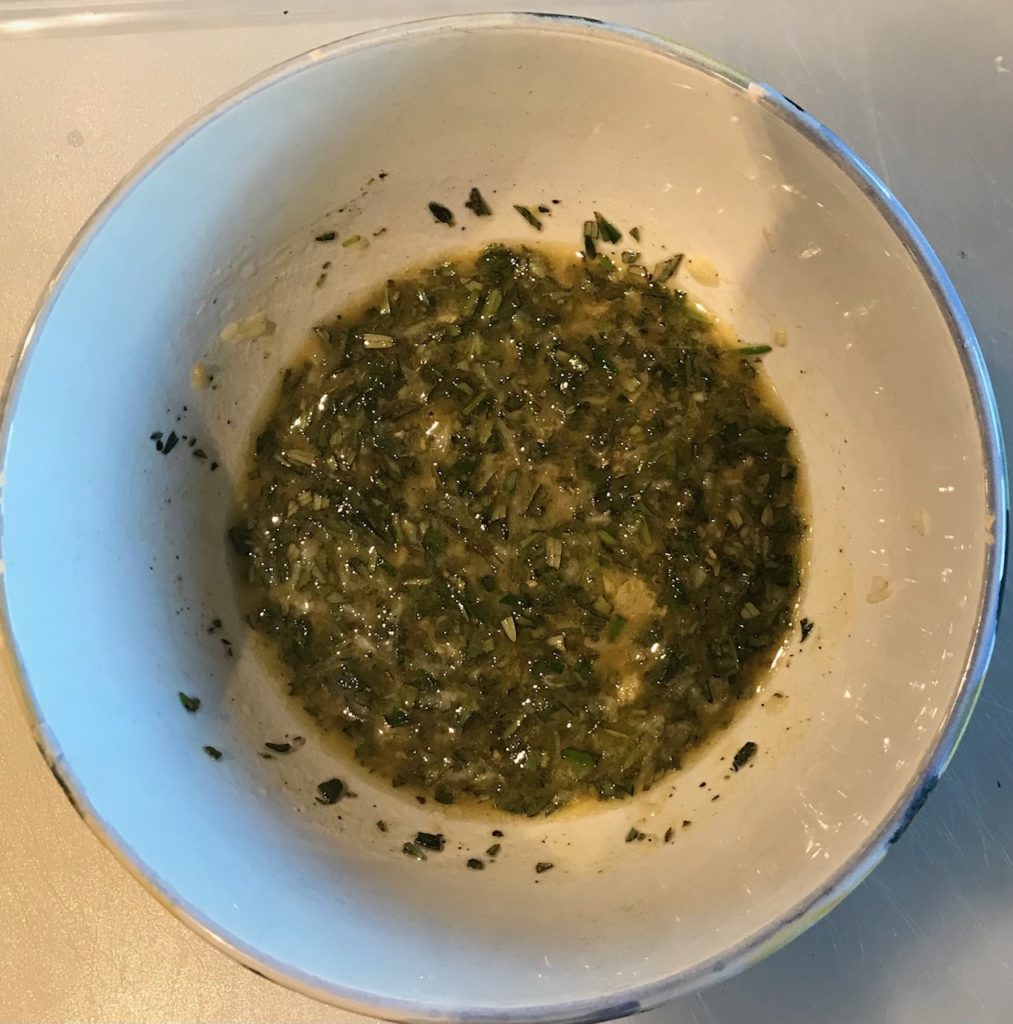
Mix together all the ingredients, except the white wine, in a small bowl. Take a sip of wine to make sure it’s ok. You don’t want to poison anyone with bad wine.
Mix it up until it turns into a paste.
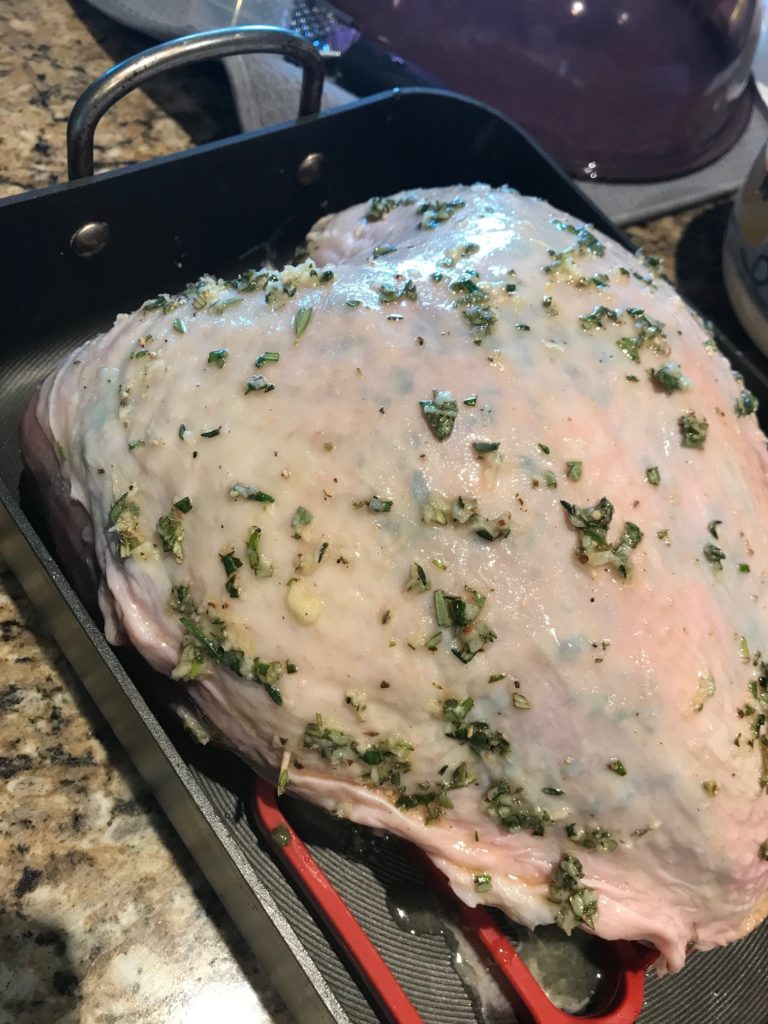
Loosen the skin with your fingers to make a large pocket and spread half of the paste directly on the meat. Rub the rest over the skin. If I had to do this again, I’d probably put all the paste under the skin and just season the skin with salt and pepper. Why? Because we threw the skin away along with all those good seasonings. If you like skin, do it Ina’s way.
When you are done, it’ll look something like this. Little did I know how ginormous an 8 pound turkey breast could be. It’s huge. And that includes the bone. Anything bigger and I would have needed a larger roasting pan. At this point, I’ll refrain from making any large breast jokes. This is a family show, people. Move along.
Throw a cup of wine in the roasting pan. Drink the rest.
In a preheated 325 F oven, roast the bird for about 2 hours. Ina says to pull it out when the internal temperature reaches 165 F, but I like to pull it out sooner, at 155 F, and let it sit longer. The turkey will continue to cook and eventually rise up to 165 F.
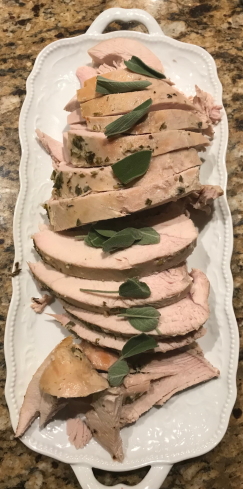
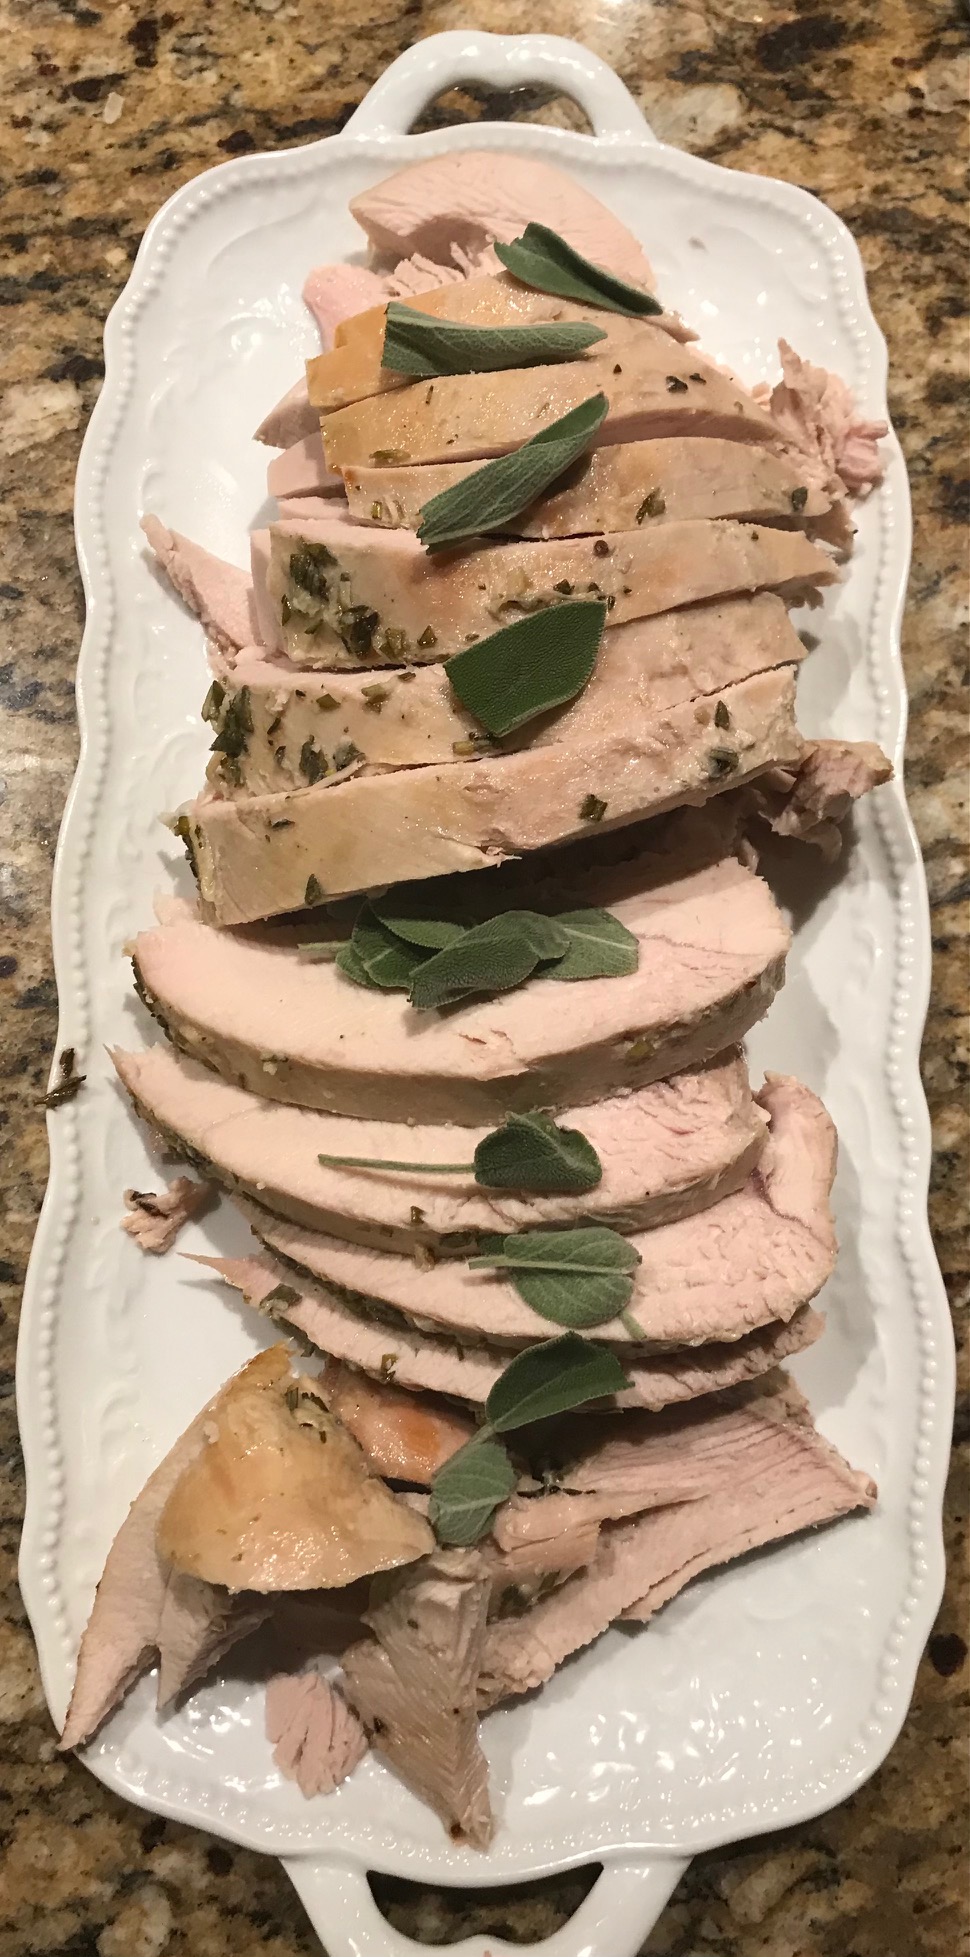
After it’s done resting, slice it up. Soooo much easier than carving a whole turkey.
Garnish with a few fresh herbs. I chose sage, the scent of Thanksgiving. The recipe says to spoon the pan juices over the turkey, but I completely forgot and dug in. You guys are lucky I even remembered to take a picture. There was a whole table full of sides to get to and I forgot to take a picture of that. But I have to say this was an amazing flavorful turkey that was not the least bit dry and did not disappoint. There will be tons of leftovers. Make again.
1whole bone-in turkey breast, about 6 1/2-7 pounds
1tablespoonminced garlic cloves
2teaspoonsdry mustard
1tablespoonchopped fresh rosemary leaves
1tablespoonchopped fresh sage leaves
1teaspoonchopped fresh thyme leaves
2teaspoonskosher salt
1teaspoonfreshly ground black pepper
2tablespoonsolive oil
2tablespoonsfreshly squeezed lemon juice
1cupdry white wine
Method
Preheat the oven to 325 degrees F. Place the turkey breast, skin side up, on a rack in a roasting pan.
In a small bowl, combine the garlic, mustard, herbs, salt, pepper, olive oil, and lemon juice to make a paste. Loosen the skin from the meat gently with your fingers and smear half of the paste directly on the meat. Spread the remaining paste evenly on the skin. Pour the wine into the bottom of the roasting pan.
Roast the turkey for 1 3/4 to 2 hours, until the skin is golden brown and an instant-read thermometer registers 155-165 degrees F when inserted into the thickest and meatiest areas of the breast. (I test in several places.) If the skin is over-browning, cover the breast loosely with aluminum foil. When the turkey is done, cover with foil and allow it to rest at room temperature for at least 15 minutes. Slice and serve with the pan juices spooned over the turkey.
You know I love a good taco (mmmm…carnitas), but I also love a good soup, especially when it’s cold outside. So what happens when you can’t decide between two radically different meals? You combine them, of course! Meet taco soup!
The beauty of this recipe is that you just dump a bunch of cans into a slow cooker, let it do its thing all day, and then you eat loads of taco goodness. If you don’t have 6-8 hours to slow cook this soup, you can also simmer it in a pot on the stove for about an hour.
The original recipe comes from Paula Deen. I’ve made it so many times, but I’ve made a couple substitutions and clarifications. I’ll explain along the way.
First, in the slow cooker (if you have a saute setting) or in a pan, brown some ground turkey and chopped onions with some salt and pepper. The original recipe did not call for the salt and pepper, but I think it’s important to season your meat or it could taste bland. This recipe also calls for beef, but turkey is so much better. The beef overpowered the other ingredients and made it too meaty, if that’s possible. But this is just my opinion. Feel free to use any type of ground meat.
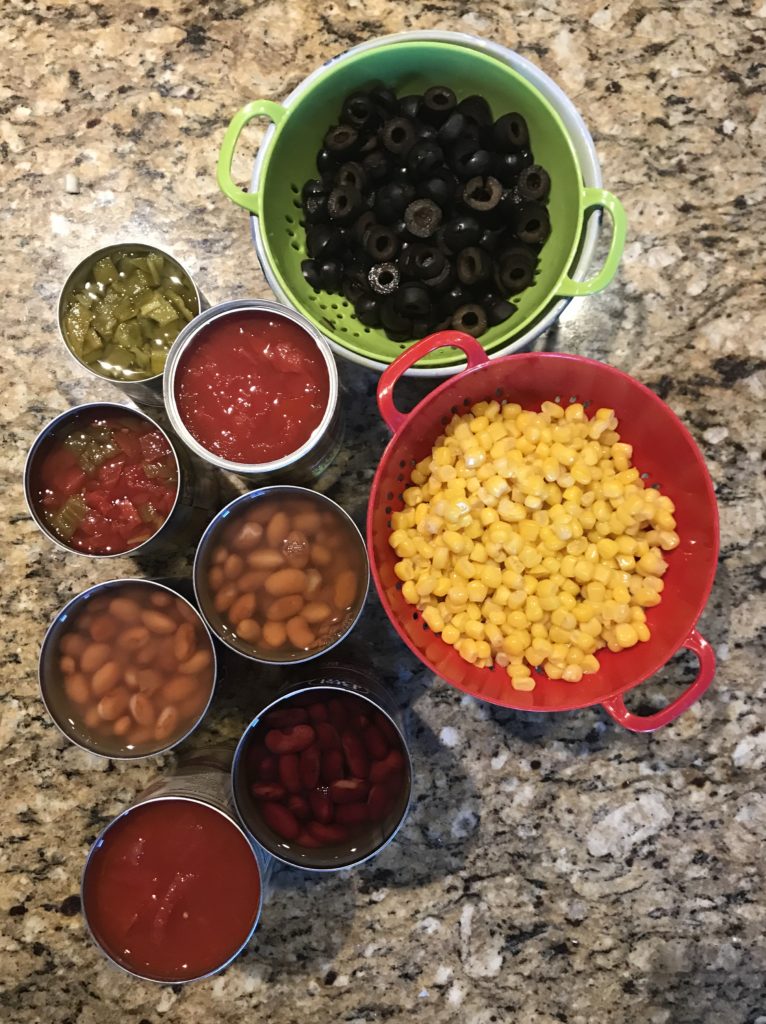
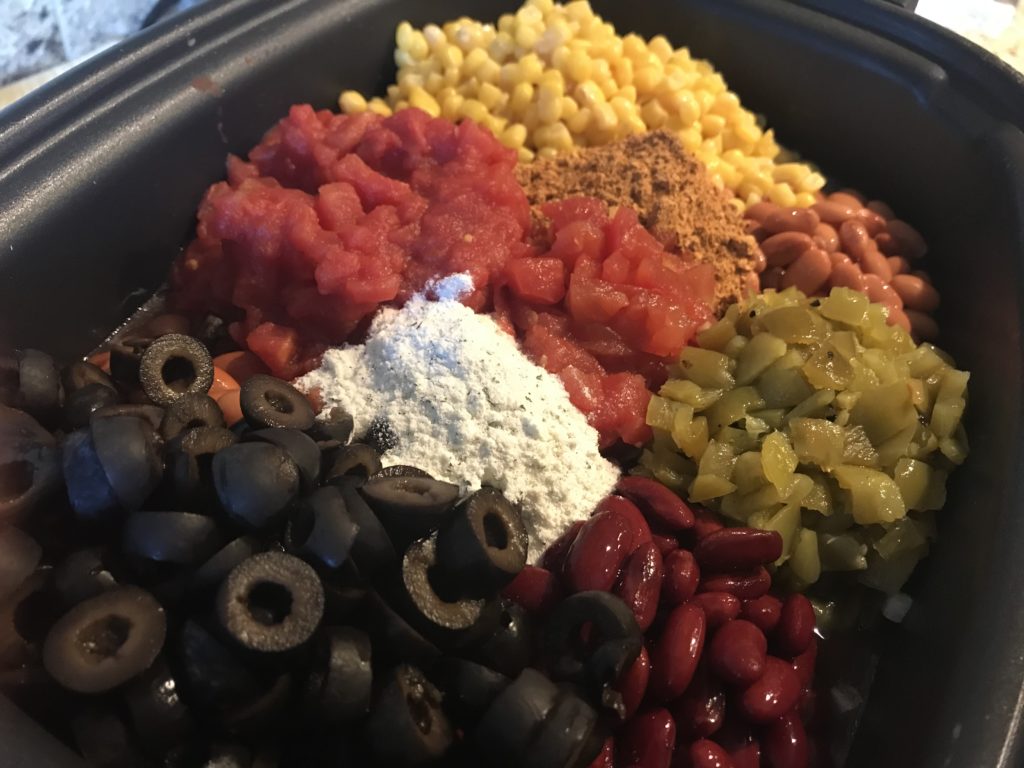
Next you’ll be doing some labor intensive can opening. About 9 cans worth. I’m not kidding. This recipe has a ton of ingredients, but isn’t that better than chopping 9 different ingredients? Seriously, the can is your friend.
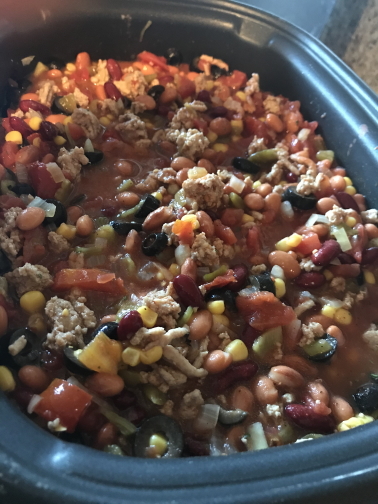
After opening all these cans, add the browned meat to a large slow cooker and then start dumping each can in. Be sure to drain the olives and corn, but not the beans. You’ll need that for the liquid, which is something the original recipe doesn’t mention. Learn from my mistakes. This is soup, not some sort of defiant bean chili that would make every Texan cry. You’ll also add packets of ranch dressing mix and taco seasoning. Ranch?! Yes! Trust me. As with bacon, everything is better with ranch. This soup is no exception.
This is a pretty mild soup so if you need something with more kick, don’t use mild canned tomatoes with chiles. Buy the hot stuff. If that’s not spicy enough, add a few dashes of your favorite hot sauce, a couple pinches of red pepper flakes, or a couple chopped up jalapenos. Sliced pickled jalapenos would be good too.
Mix it all together and slow cook on low for at least 6 hours (or simmer for an hour). When it’s ready, mix it up again and ladle it into soup bowls. Garnish with your favorite taco toppings or even top with some corn or tortilla chips.
This soup is so satisfying on a cold winter evening or even in the middle of summer when you want a taco but you’ve run out of tortillas (but you happen to have 9 cans of stuff…okay, a stretch of the imagination, but work with me here!). It’s so delicious that you’ll even forget to take pictures of it served. Like I did.
This recipe makes a lot of soup. Freeze leftovers or refrigerate to enjoy throughout the week.
Brown the ground turkey and onions on the saute setting of a slow cooker or in a skillet. Season with salt and pepper to taste.
If needed, transfer the browned turkey and onions to a large slow cooker or a stockpot.
Drain the corn and olives. Do not drain the rest of the cans. Add the beans, corn (drained), tomatoes, green chiles, olives, taco seasoning, and ranch dressing mix.
Cook in a slow cooker on low for 6 to 8 hours or simmer over low heat for about 1 hour in a pot on the stove.
To serve, ladle soup into bowls. Top with corn or tortilla chips, sour cream, cheese, green onions and/or jalapenos.
On Thanksgiving, I made a turkey for dinner. Now, this is a daring feat for me. Turkey is my nemesis. It’s never done according to plan. I’ve followed recipes. Doesn’t matter. The white meat cooks faster than the dark meat. In fact, the thighs are usually raw while the breast meat is perfectly done. I’ve tried tenting the breast and continue roasting, but I just end up with dry meat. One year was so bad that I ended up hacking up the turkey after the breasts were done and finished off the legs and thighs separately. Ugliest. Turkey. Ever.
I’m a faithful reader of Bon Appétit. When they published this year’s turkey recipe, Expertly Spiced and Glazed Roast Turkey, not only did I trust them, I saw the brilliance in their method. It was similar to my hacked up turkey, but done in a much smarter, less critical way. You ask the butcher to cut it up for you into five pieces that not only solves when the turkey is done problem, but also the carving issue (which I haven’t even delved into). Each piece cooks at the same rate because the meat is properly distributed. Wow. Why didn’t I think of that?
So when I made it for Thanksgiving, everyone agreed that this non-traditional turkey was amazing and should be repeated on Christmas. I was a bit worried that my Thanksgiving success was a fluke, but I put on my big girl pants and decided to try it again. I was so brave that I didn’t even buy a backup ham. Fortunately, I didn’t need it.
It uses a dry brine instead of the messy wet brine that requires you to soak your turkey in a bucket for a couple of days (what a mess that was…never again).
Let me interject that you need to have a meat thermometer, preferably an instant read one. If you are roasting a turkey without one, you are very confident. Me…not so much.
This recipe suggests that you preorder your turkey and nicely ask your butcher to cut it up into five pieces plus remove the backbone. You can purchase a frozen turkey, thaw it, and cut it up at home. Alas, I’m not that patient or talented. Therefore, I used the humorous script Bon Appétit prepared for me, “Hello, talented and smart and underappreciated butcher [pause for uncomfortable laughter], I’d like to purchase a 10-to-12-pound turkey, cut into five pieces: the legs, wings, keep the breast whole, backbone removed. Yes, I’m doing that ridiculous Bon Appétit recipe. Yes, it better not suck.” I love Bon Appétit. My butcher thought I was a little weird.
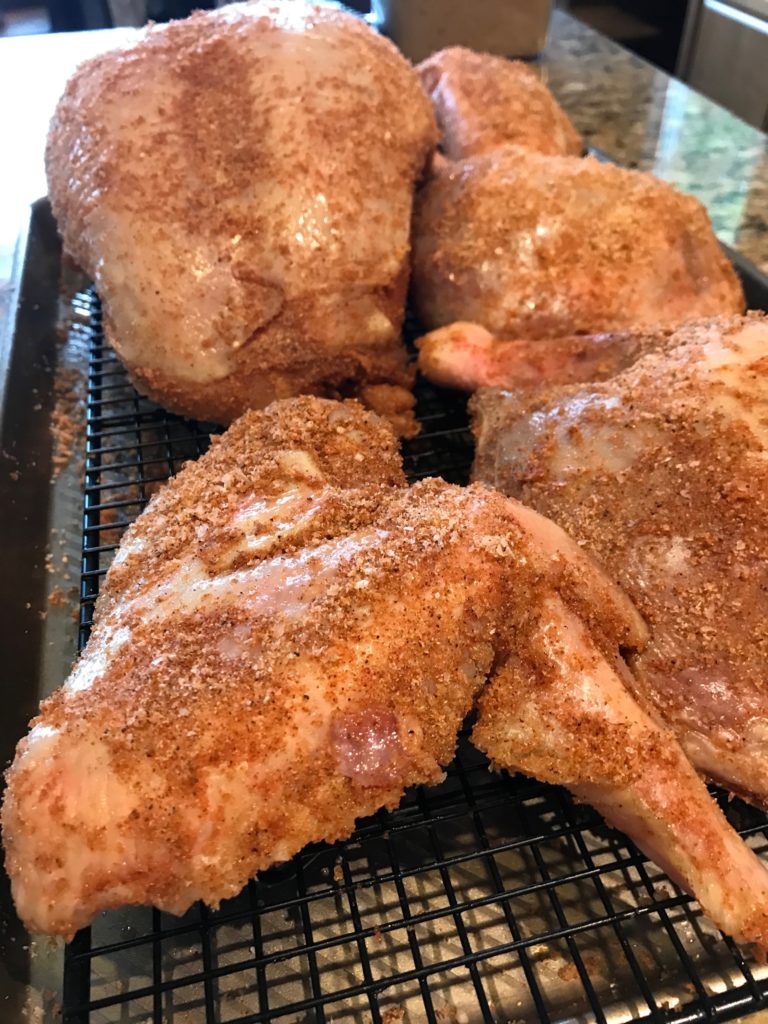
Back safely at home, away from the deadpan eyes of my quizzical butcher, I made the rub for the brine: pepper, kosher salt, garlic powder, onion powder, smoked paprika, and brown sugar. I don’t have a spice mill or mortar/pestle so I used ground pepper, and it turned out fine. I used a 10-12 pound turkey and had plenty of rub, but I used it all. Can one have too much rub? Don’t answer that.
Sit your turkey on a cookie rack on a baking sheet. This helps circulate the air to the bottom of your turkey and later, you’ll use the same set-up to roast it. Rub the seasonings on the turkey. I know. This can be unpleasant, but (and I mean this in the best way possible) get over it. It’s better than if it was a whole turkey where you have to dig around for those mysterious parts you won’t be using. Ick. Did I mention turkeys are my nemesis?
Now the fun part. Shove everything to the corners of your fridge to make way for this bird to habitat your fridge for the next two days. Don’t cover it either. I was less than thrilled of the smell it left behind, but it will go away. After two days, the rub will be absorbed and the skin will be dry. This is a good thing because dry skin will make the skin crispy and beautifully brown.
Pull it out of the fridge. Let it sit for 2-3 hours. Don’t worry. Bacteria will not grow and give your guests food poisoning. The turkey should not go from a cold refrigerator to a hot oven. It’ll freak out and not cook evenly. You need to bring the bird up to room temperature first. I recommend putting your dog outside if you have one.
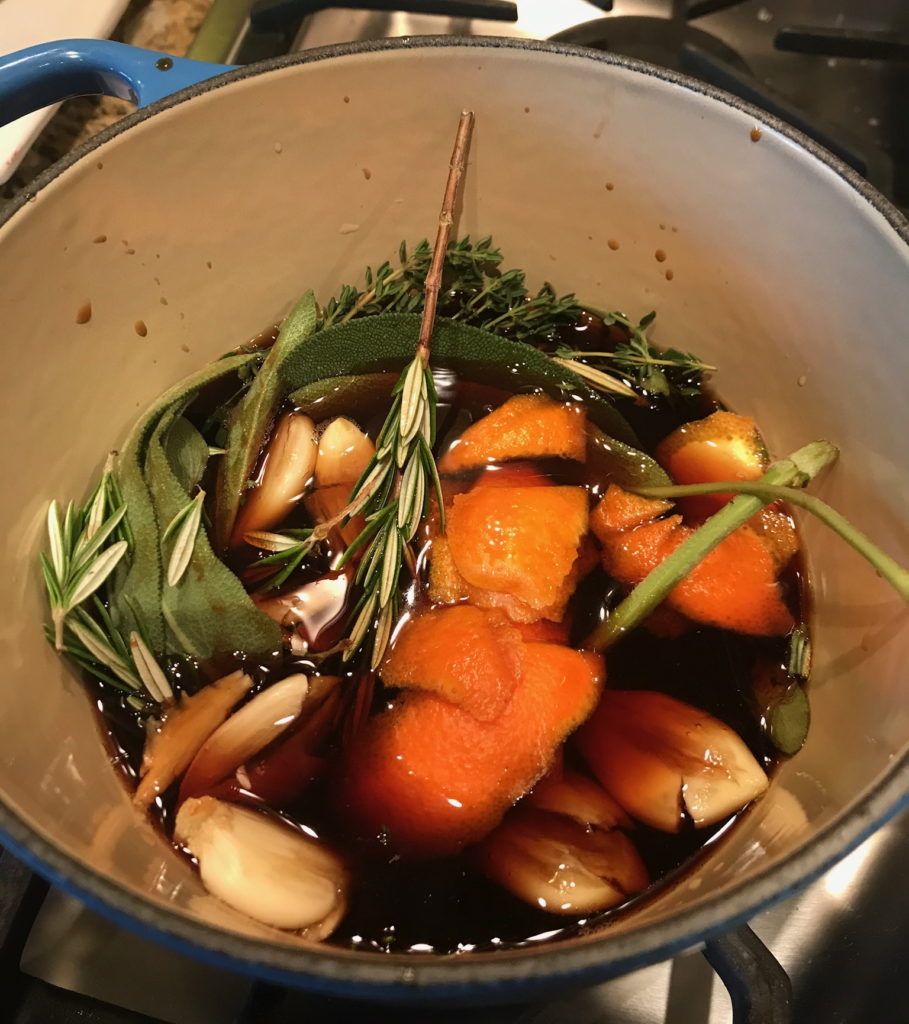
The turkey will roast in two phases, first at a high heat to brown it and then at a lower heat for longer to cook it through. During the first phase, make the glaze, which you’ll baste on the turkey every 20 minutes during the second phase. I have to admit that got distracted while eating the Brie appetizer and only basted once. It turned out delicious anyway.
The glaze is essential and gives it that sweet, Christmas-spiced taste, which is pretty amazing considering there are no spices in the glaze. I attribute this to the brown sugar and garlic, with some help of the sage.
Combine all the glaze ingredients and simmer for 10-15 minutes until it’s slightly thickened. After I removed it from the heat, I found that it continued to thicken so take this into account when you are determining if it’s thick enough. I made a double batch because I didn’t want to run out, which I did the first time. Then again, the first time I remembered to baste it every 20 minutes. Doh!
The recipe also calls for adding water to the baking pan. This helps it cook and keep it moist. Sorry. I had to use that word. There’s no other way to describe it. Let’s move on.
Using an instant-read thermometer (but any meat thermometer will do…just have one…trust me on this one), start checking on the turkey at the 50 minute mark. Make sure that the thickest part of the breast is 150F and the thigh is 170F. If it’s not, glaze it again, and check every 5-10 minutes.
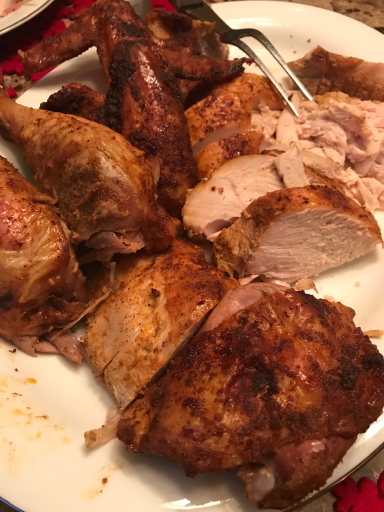
When it’s done, tent (aka cover) it with foil to keep it warm and let it sit for 30-60 minutes. I like to take this time to heat up the sides I made the day before. When everything is ready, slice up the white meat and separate the leg from the thigh. The easiest way to cut the leg and thigh is to find the joint by bending it a couple times and cut there.
The turkey was so good that I nearly forgot to take a picture of the final product. Everyone was already digging in.