I made this really delicious slow cooker recipe from The Food Network a few weeks ago when the weather started getting a little chilly. Hey, it’s slow cooker season! Then again, when is it not slow cooker season? Regardless, we are in pandemic mode, working and studying at home. Having the awesome smells coming the kitchen was an extra treat while plugging away. The end results were delicious plus it was super simple to make.
I didn’t change a thing. Not much more to say about that. Sometimes a recipe is just right.
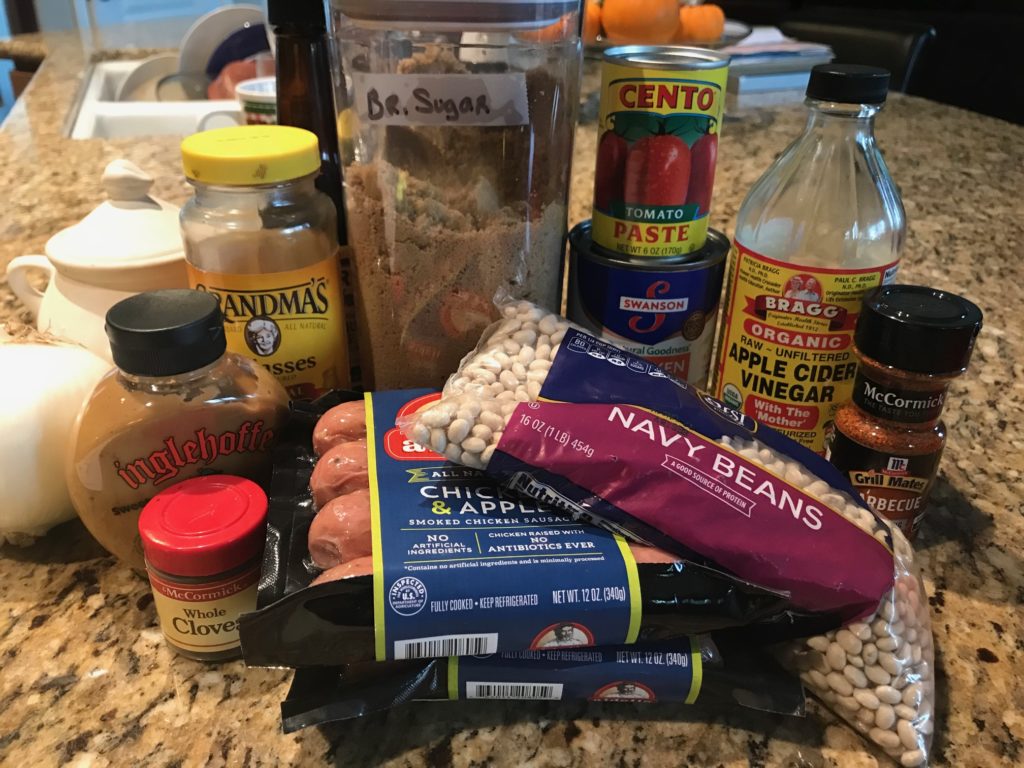
I gathered my ingredients, but put aside the cider vinegar and Worcestershire sauce. You’ll add that later at the end. There were a lot of ingredients, but nothing too exotic.
Slice an onion in half and stick a clove in each half. Ok, that’s a little strange, but it turned out not to be weird after all. The clove gave it a hint of spice that I wouldn’t have thought of. Next, slice the apple chicken sausages in half lengthwise. Throw everything in the slow cooker (well, measure first, of course) and mix, making sure the onion, sausage, and beans are all nestled in together. Cook on high for 6-7 hours until the beans are tender.
Remove the onions. They were there only to add flavor. Stir in vinegar and Worcestershire sauce. Then let it sit for at least 15 minutes. This last addition really gives it a tang.
And that’s it. Seriously. The hardest part was waiting. The apple sausage gave the dish a sweet taste that complemented the honey mustard and molasses. The dish was a perfect blend of tangy sweet and completely comforting. With the soft texture of the beans, everything felt like it was melting in your mouth.
I will definitely make this again. We managed to eat most of the sausages in one sitting, but there were plenty of beans leftover, which we enjoyed as sides until they were gone.
1 1/2poundschicken apple sausageshalved lengthwise
2tablespoonscider vinegar
1tablespoonWorcestershire sauce
Method
Whisk the broth, water, tomato paste, brown sugar, molasses, mustard, barbecue seasoning and garlic in a slow cooker. Add the beans. Push a clove into each onion half. Tuck the onions and sausages into the beans in the slow cooker. Cover and cook on high until the beans are tender, about 6-7 hours.
Discard the onion halves. Stir in the vinegar and Worcestershire sauce. Let the mixture sit, uncovered, for at least 15 minutes. (The longer the beans sit, the more flavorful they will be.)
I used to be suspicious of sheet pan meals. There’s no way everything can be done at the same time! Now that I’ve tried a few sheet pan recipes with great success (check these out), I think my fear is over. I made this one from BA and it turned out to be another win-win. Be brave with me.
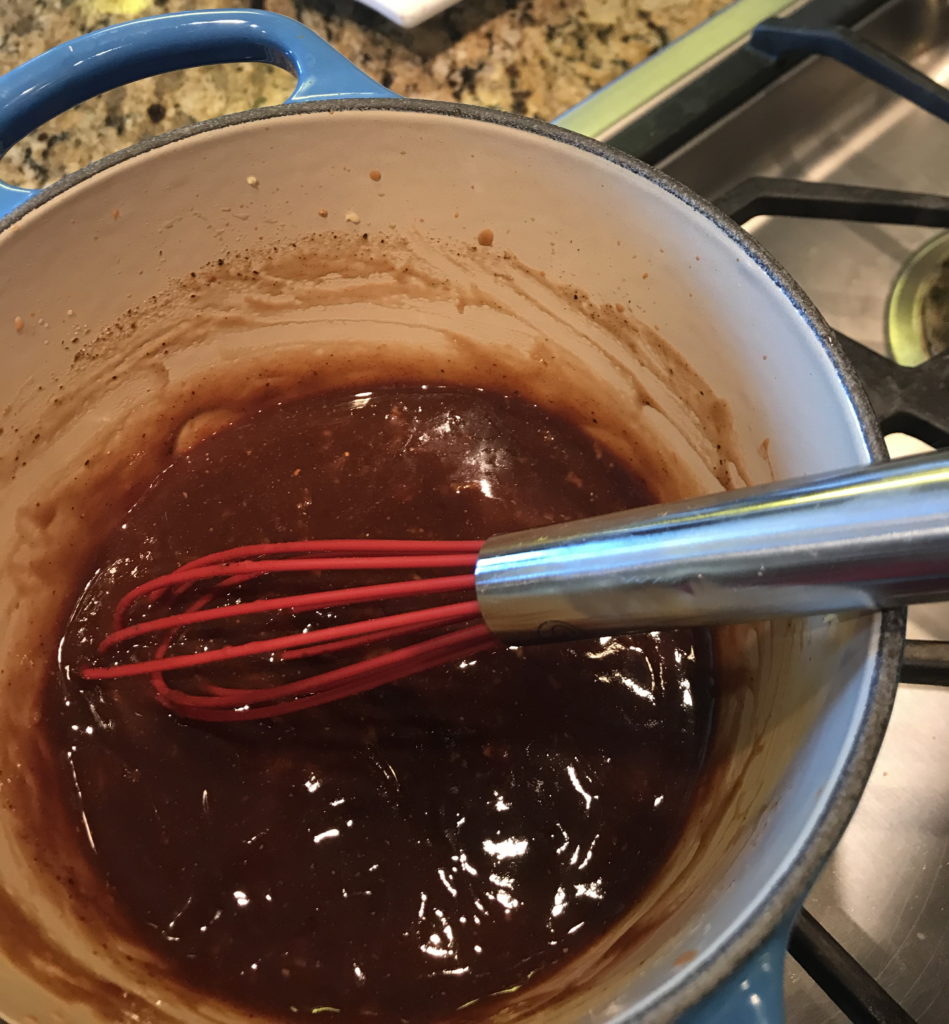
First, you make the sauce. Mix up all the ingredients. Pretty simple. Set some aside to glaze your meatballs (your reserved glazing sauce). Simmer the rest to reduce it down. Set aside (your reduced glazing sauce). You pour this over the meatballs at the end. The reserved stuff will brush the meatballs before you pop them into the oven.
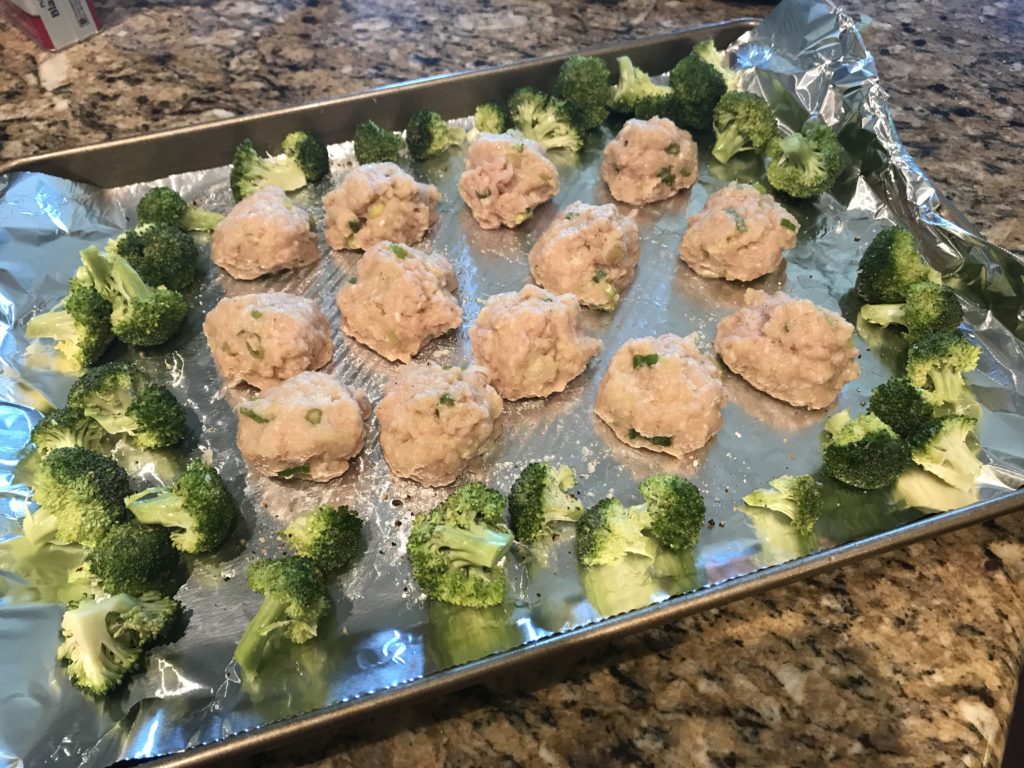
Next, prep your broccoli and put them on the a sheet pan lined with foil. BTW, I love broccoli. I eat it practically every day and I’m still not sick of it. Well, maybe it’s because I’m dipping it in ranch, but let’s not speak of that. The point is that I know a lot of you hate it and you can continue being haters. Just leave it off the sheet pan. Or maybe try some cauliflower, carrots, or potatoes, but I honestly don’t know about the cooking times. You might need to pull the veggies off before or after the meatballs are done.
Next make your meatballs. These meatballs are a bit healthier because you use ground chicken. Ground turkey or beef would work well too, but you might have to adjust the cooking times on the beef.
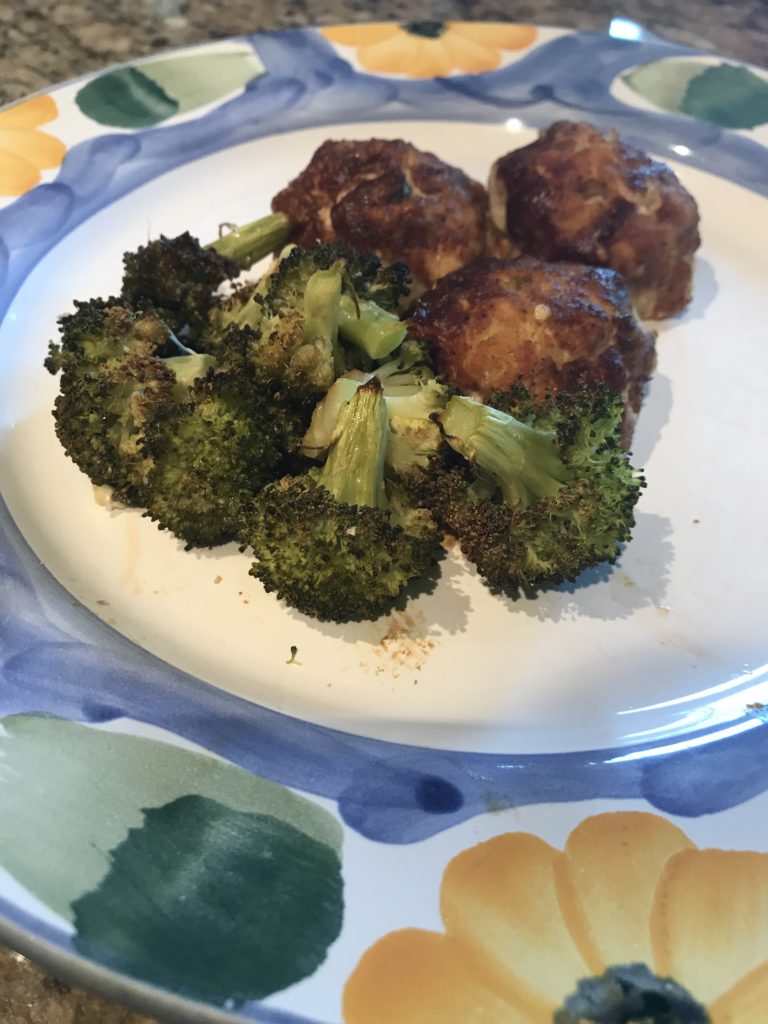
After I mixed all the ingredients together, I found that the meatballs were really wet. If I made these again, I’d probably use half the water and then slowly add more until the consistency was to my liking. When you are done making 12 1.5-diamater meatballs, put them on the baking sheet with the broccoli. Hmmm…I made 13. Close enough.
Brush with reserved glazing sauce. Be sure to save some for later. Don’t use the reduced glazing sauce. I know. This is complicated, but delicious.
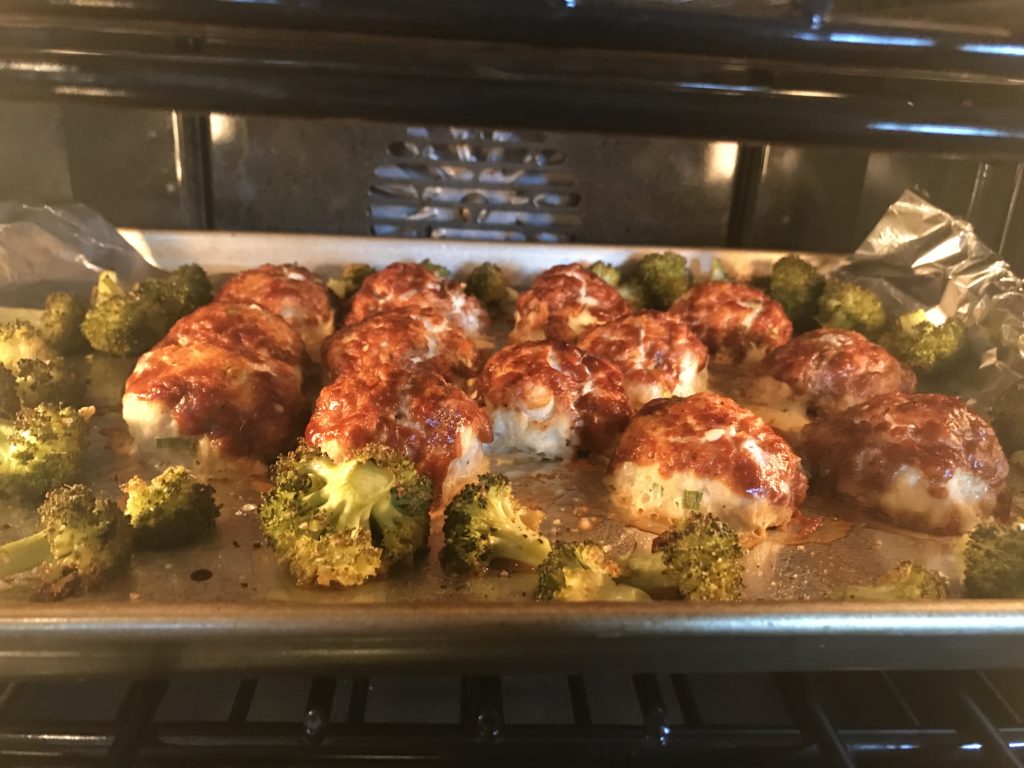
Bake everything until the meatballs are done, for about 15 minutes.
Remove it from the oven, set your oven to broil, brush the rest of your reserved glazing sauce, and broil until the broccoli is charred. Not burnt! Charred is not another word for burnt! Read this.
Pull it out of the oven and serve it over rice. Now drizzle the reduced glazing sauce and nosh. It’s pretty amazing. You’re welcome.
Mix ketchup, Worcestershire sauce, wine or water, honey, soy sauce, ginger, and pepper in a small saucepan. Measure out 1/4 cup mixture into a small bowl. This is your reserved glazing sauce. Set aside for glazing meatballs later. Bring remaining mixture to a simmer over medium-high heat, stirring occasionally and reducing heat if needed, until sauce thickens, about 5 minutes. Transfer sauce to a small bowl. This is your reserved glazing sauce.
Place a rack in upper third of oven; preheat to 450F. Line a rimmed baking sheet with foil. Trim broccoli stems and remove from the crown. Peel off the tough outer skin, if needed. Slice crosswise into 1/2-inch pieces. Cut florets into 2-inch pieces. Toss on prepared baking sheet with 1 tablespoon vegetable oil, 1 teaspoon salt, and a few pinches of red pepper flakes (optional). Push to the edges of baking sheet to create a space for meatballs. Brush space with the remaining 1 tablespoon vegetable oil.
Mix chicken, egg, scallions, garlic, ginger, panko, sesame oil, pepper, remaining 1 1/2 teaspoon salt, and 1/8 cup water in a medium bowl. Gradually add more water (up to another 1/8 cup) until the meat mixture is your preferred consistency.
Using wet hands, form into twelve 1 1/2 inch-diameter meatballs. Arrange on baking sheet. Brush with some of the reserved glazing mixture. Bake until meatballs are cooked through, 14–18 minutes. Remove from oven.
Heat broiler. Brush meatballs with remaining reserved glazing mixture. Broil until broccoli is charred and meatballs are browned in spots, about 5 minutes.
Spoon meatballs and broccoli over rice in bowl. Drizzle with reduced glazing sauce and sprinkle with sesame seeds (optional).
One reason why I think Indian food is so special is because it often requires you to cook your seasonings before using them. This brings out an intense flavor not found in many other dishes. With that said, I decided to try Slow Cooker Chicken Tikka Masala from the kitchn. It’s a wonderful creamy dish with tomatoes and cooked spices that is perfect over rice. And it’s hardly Indian at all. I looked it up and learned that it’s a popular British dish with South Asian roots. Well, this is awkward. This is sort of like saying chimichanga is Mexican food.
While I go research authentic Indian recipes, let’s enjoy this one because I promise that even picky eaters won’t turn this down.
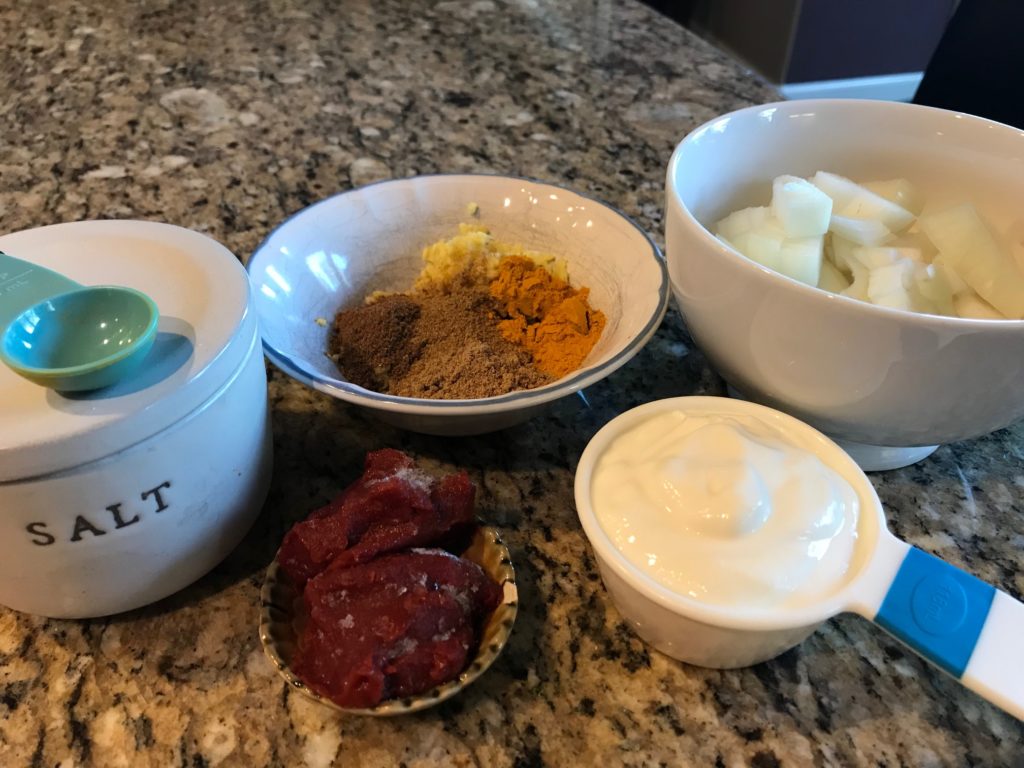
Gather your ingredients and measure them out. Chop up your onion. Mince that garlic. Grate the ginger.
You probably don’t have all these spices in your cupboard. You might be wondering where to get them or when you’ll use them again. I’m happy to say that you should be able to find all of these in your grocery’s spice section. You will not have to go to a specialty store. I recommend getting the smallest containers possible, even if it costs more by weight, because spices lose their taste and potency over time. You really don’t need a tall container of cumin unless you use it a lot.
I changed the recipe order because I didn’t want to dirty up a pan so instead of using a separate pan, I used the saute setting on my slow cooker. Heat oil and then saute your onion for about 8 minutes. Add the garlic, ginger, and spices, and cook for about 1 minute. When you can smell the spices is just long enough. Add tomato paste and cook for another minute. You want to see that the tomato paste is a little darker than before. Add the diced tomatoes and the rest of the salt. Bring it to a simmer, but to be honest, there was nothing really to simmer. Add the chicken, yogurt, and a teaspoon of salt in your slow cooker and mix it all up.
I cooked this on low for 8 hours. When it was done, I stirred in the cream and served it. The recipe suggests cooking it for another 30 minutes for a thicker sauce, but I found the sauce consistency to be perfect.
Serve over rice and garnish with cilantro. Everyone liked it. The boy did pick out the tomatoes and refused the cilantro (green foods are bad), but they gave this dish two thumbs up. I just like how easy and tasty it is.
2poundsboneless, skinless chicken thighscut into 1-inch pieces
1/2cupwhole-milk (not Greek) plain yogurt
1 1/2teaspoonskosher saltdivided
1largeyellow oniondiced
3clovesgarlicminced
1tablespoongrated fresh ginger
2teaspoonsground coriander
2teaspoonsgaram masala
1teaspoonground cumin
1teaspoonground turmeric
2tablespoonstomato paste
15ouncescanned diced tomatoesdrained
3/4cupheavy cream
chopped cilantrofor garnish
cooked ricefor serving
Method
In a slow cooker, heat the oil using the saute setting. Add the onion and cook, stirring occasionally, until tender, about 8 minutes. Add the garlic, ginger, coriander, garam masala, cumin, and turmeric and cook until fragrant, about 1 minute. Add the tomato paste and cook until darkened in color, about 1 minute. Add the drained tomatoes and 1/2 teaspoon of salt and bring to a simmer, scraping up the browned bits from the bottom of the pan.
Place the chicken, yogurt, and 1 teaspoon of the salt in the slow cooker. Stir to combine.
Cover and cook on the High setting for 4 hours or Low setting for 8 hours. Stir in the cream. If you prefer a thicker sauce, leave the slow cooker uncovered and cook on the High setting for 30 minutes. Taste and season with salt as needed. Serve garnished with cilantro and serve over rice.
Hi everyone! Fall is here and that means it’s soup time. Growing up, we always ate canned soup instead of making our own. I don’t know about you, but when I eat canned soup, I’m still hungry afterwards. I need something more substantial. The best way to solve this problem is to just make you’re own soup, which it’s so much easier than you think. For example, to make homemade chicken soup, you just need some low-sodium chicken broth, chopped up veggies, pre-cooked chicken pieces, and some egg noodles. Boil everything together and you’ve got soup. It’ll also impress your family.
Rachel Ray’s Mini Meatball Soup requires a little more work than that, but is still easy and super delicious. It’s a good week night meal with leftovers if you’re a small family like us. I decided to split it, which made two HUGE servings so we still had leftovers. The recipe below is the full recipe with a few tweaks.
Make your meatballs first. The recipe calls for making them while you’re sauteing your veggies, but there’s no way I can make meatballs in 5 minutes. I’m just not that talented.
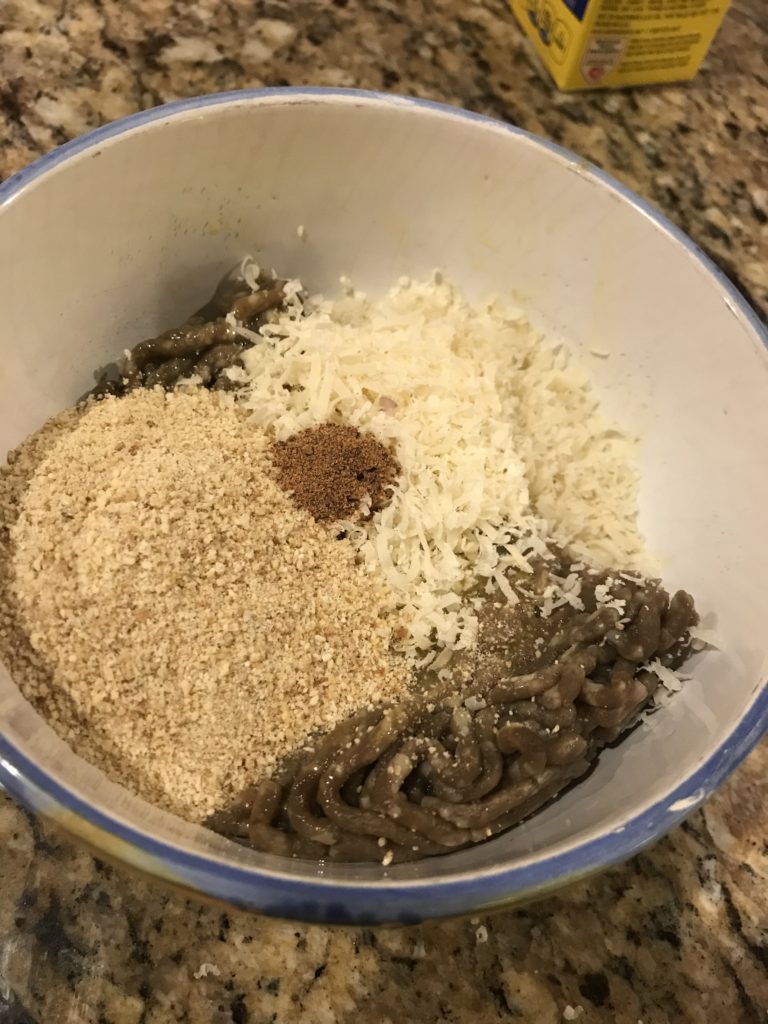
Mix up ground beef, egg, minced garlic (mincing the garlic would take me 5 minutes alone), grated cheese (see, now I’m grating cheese!), bread crumbs, salt and pepper to taste, and nutmeg (secret ingredient?).
The original recipe called for a blend of beef/pork/veal, but I’m lazy. I’m sure the combination is better, but this is supposed to be easy and I didn’t want to buy three types of meat. Set this mixture aside.
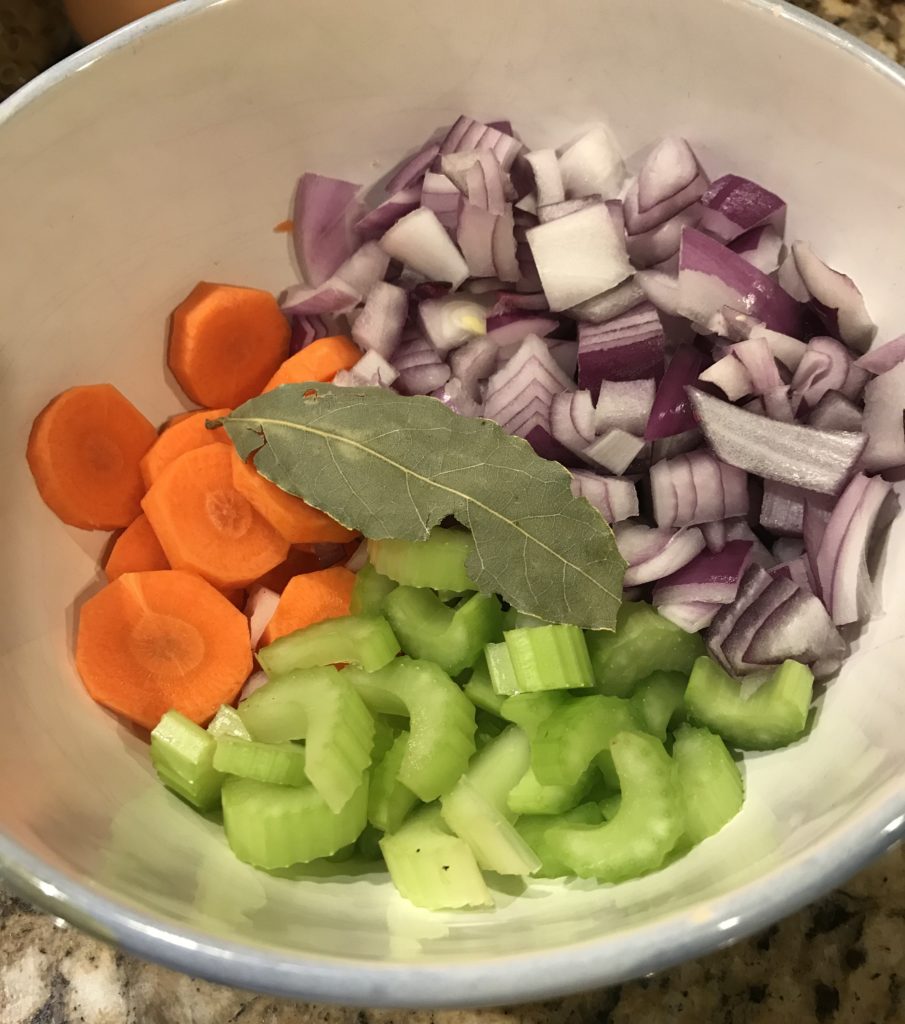
Chop up carrots, celery, and onions. Grab a bay leaf.
Heat up a tablespoon of olive oil in a deep-pot or dutch oven for about 2 minutes. Place your veggies and bay leaf in the pot. Season with salt and pepper to taste, cover, and cook for about 5 minutes. Don’t forget to stir it so the veggies don’t stick.
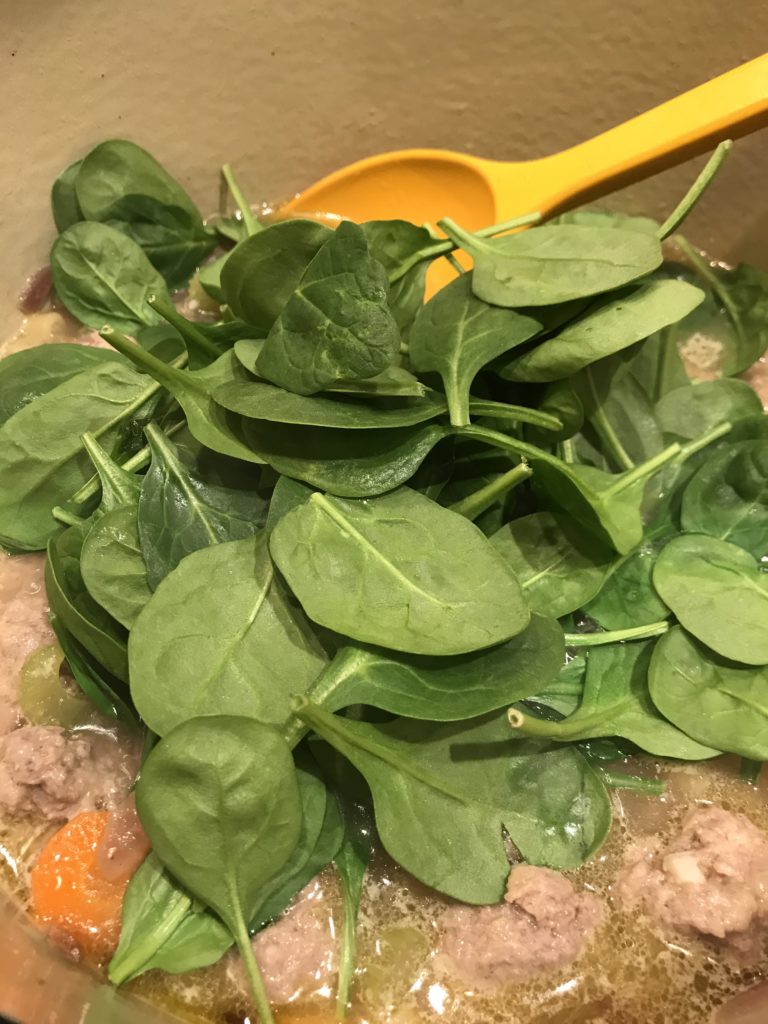
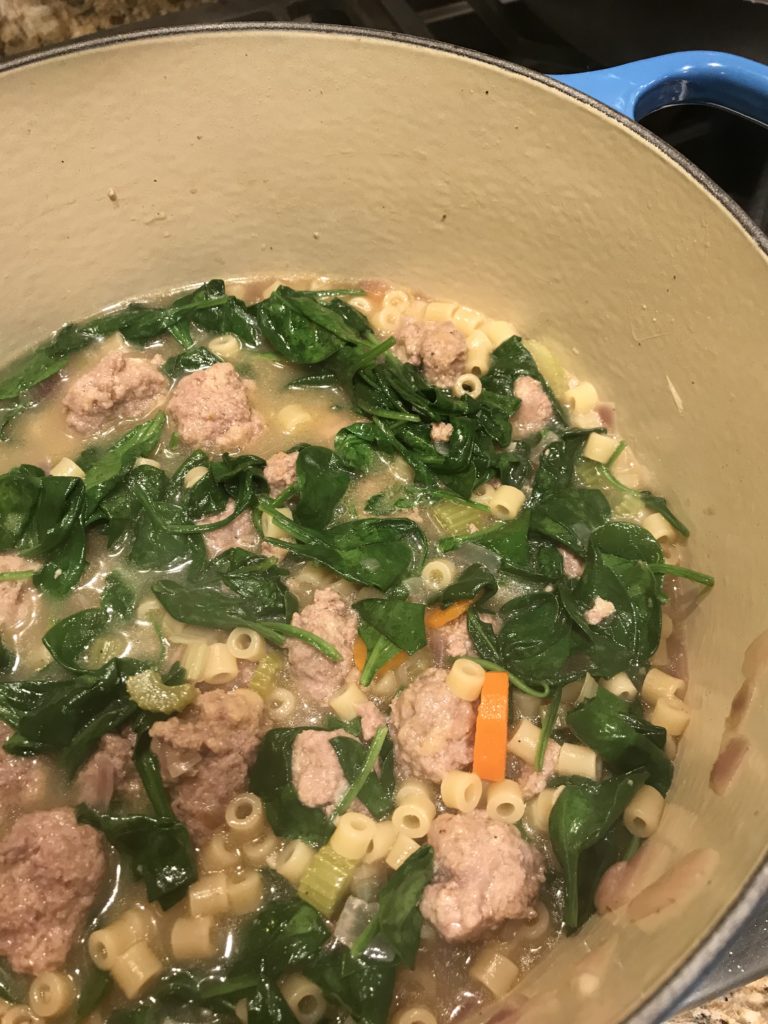
After 5 minutes, added a ton of broth (10 cups!), more than the recipe called for. I also used 100% broth instead of broth and water. I think adding all broth makes for a more flavorful soup. Bring the broth to a boil. Reduce the heat and start adding meatballs. Roll the meat into small balls and drop them in. The beauty is that the balls don’t need to be perfectly round. Just make sure they are consistently sized, about an inch across. When you’re done, add the pasta and stir. Cook for 10 minutes until the meatballs are cooked through and the pasta is tender. Throw in some spinach.
When it’s wilted, you’re done. That’s it. See how simple that was?
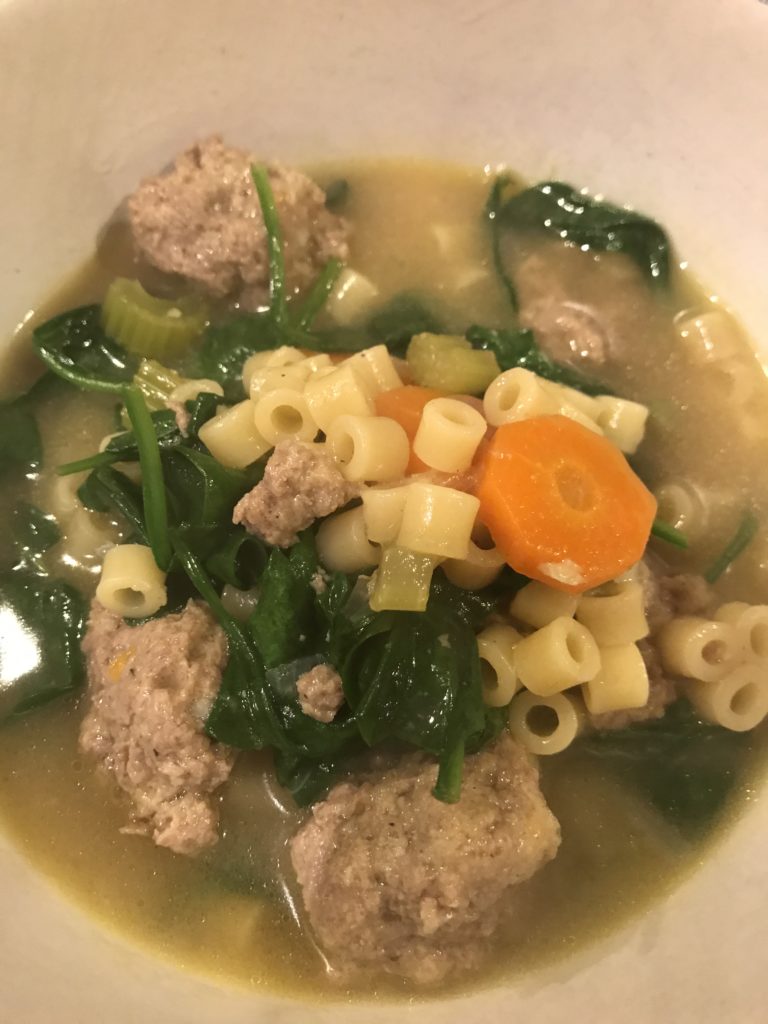
You end up with something that is very reminiscent of Italian wedding soup. It’s hearty, comforting, and perfect for a crisp fall night. And it took you about 30 minutes. Perfect.
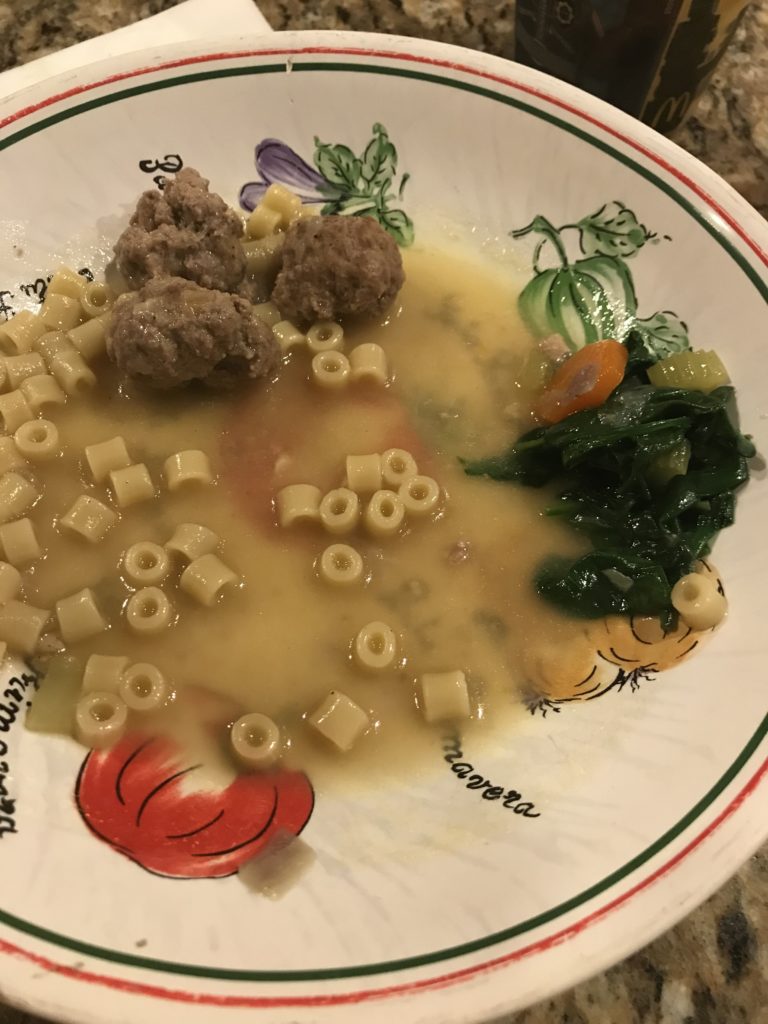
You can also serve it deconstructed with the veggies push to the side. Sigh…
Make the meatballs: In a large bowl, combine meat, egg, garlic, grated cheese, bread crumbs, salt, pepper, and nutmeg. Set aside.
In a deep pot or dutch oven, heat add oil over medium heat for about 2 minutes. Add carrots, celery, onions, and bay leaves. Season with salt and pepper. Cover pot and cook for 5 minutes, stirring occasionally.
Uncover your soup pot and add broth. Increase heat to high and bring soup to a boil. When soup boils, reduce heat. Roll meat mixture into small 1-inch balls and drop them straight into the pot. When you are done adding meatballs, add pasta to the soup and stir.
Cover and simmer soup 10 minutes. When the meatballs are cooked and the pasta is tender, stir in baby spinach. When spinach has wilted, season with salt and pepper to taste, and serve.
The final days of summer are gone. It’s officially fall, but the hot, breezy weather isn’t convincing me to bring my sweaters out just yet. There’s still time to grill.
Keeping with that theme, you must try this easy steak marinate. I chose sirloin steak because it happens to be one of the more “inexpensive” steaks. Beef prices have gone up so inexpensive is a relative term compared to the other pricey cuts of beef. Sirloin is not as tender as filet mignon or marbled like a rib eye, but it’s a dependable, lean hunk of meat. It’s the friend that will never fail you.
This recipe comes to you from The Food Network. I changed a couple things, but that’s because I did not plan in advance and did not have fresh herbs. I was too lazy to run to the store, too. Dried herbs are never as good as fresh, but this marinade is pretty damn good so I think it’s fine to use whatever you have on hand.
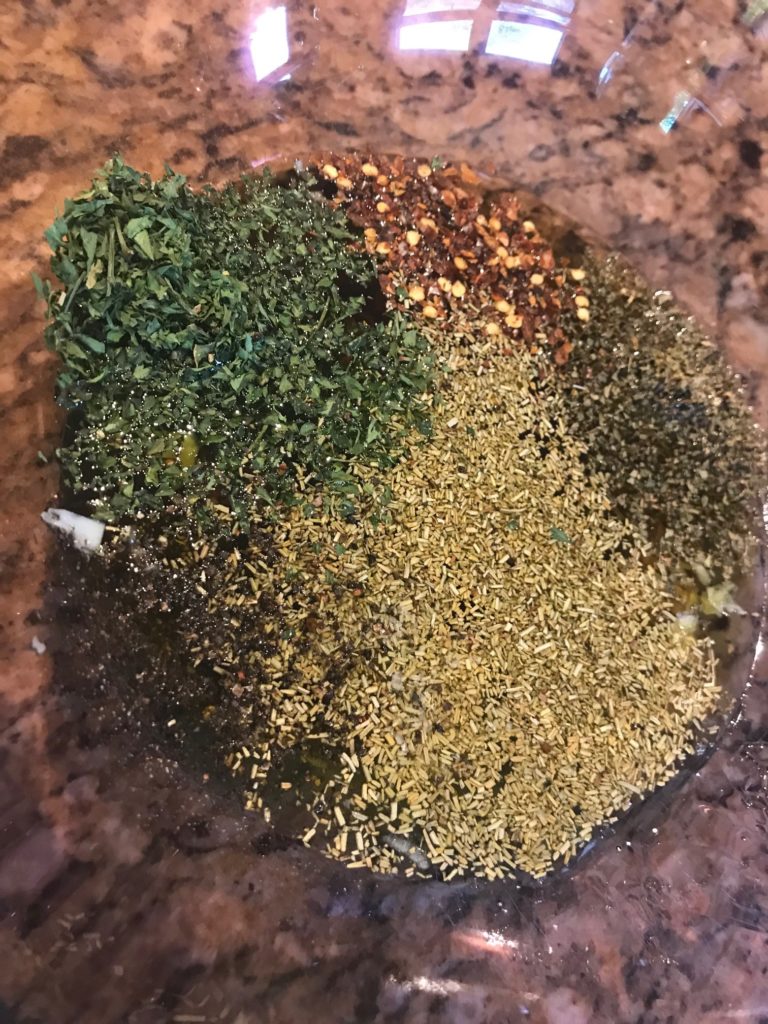
Make your marinade the night before. Combine olive oil, red wine vinegar, grated garlic, a trio of herbs, a little honey, and some red pepper flakes.
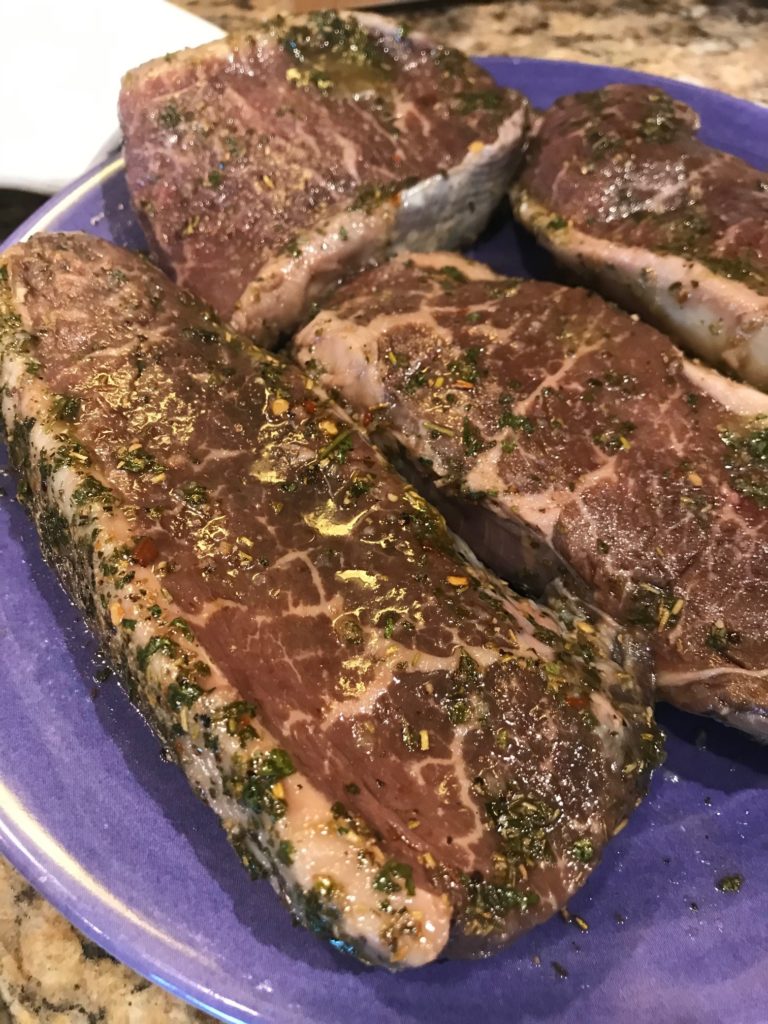
In a gallon size resealable bag, add your steaks. The recipe calls for one large 2-pounder, but that’s crazy. I can’t find that anywhere. I plopped in 4 nice pieces totaling to about 1 1/2 pounds. This is plenty of meat for a small 3-person army with leftovers. Reserve a little marinade if you want to drizzle some over your cooked steaks. Pour the rest of your marinade into the bag, and squish the meat and marinade around until the meat is well coated. Seal it up and stick it in the fridge overnight. I like to put it in a glass pan in case the bag leaks. I hate cleaning my fridge, especially after the exploding soda incident. Let’s not speak of that.
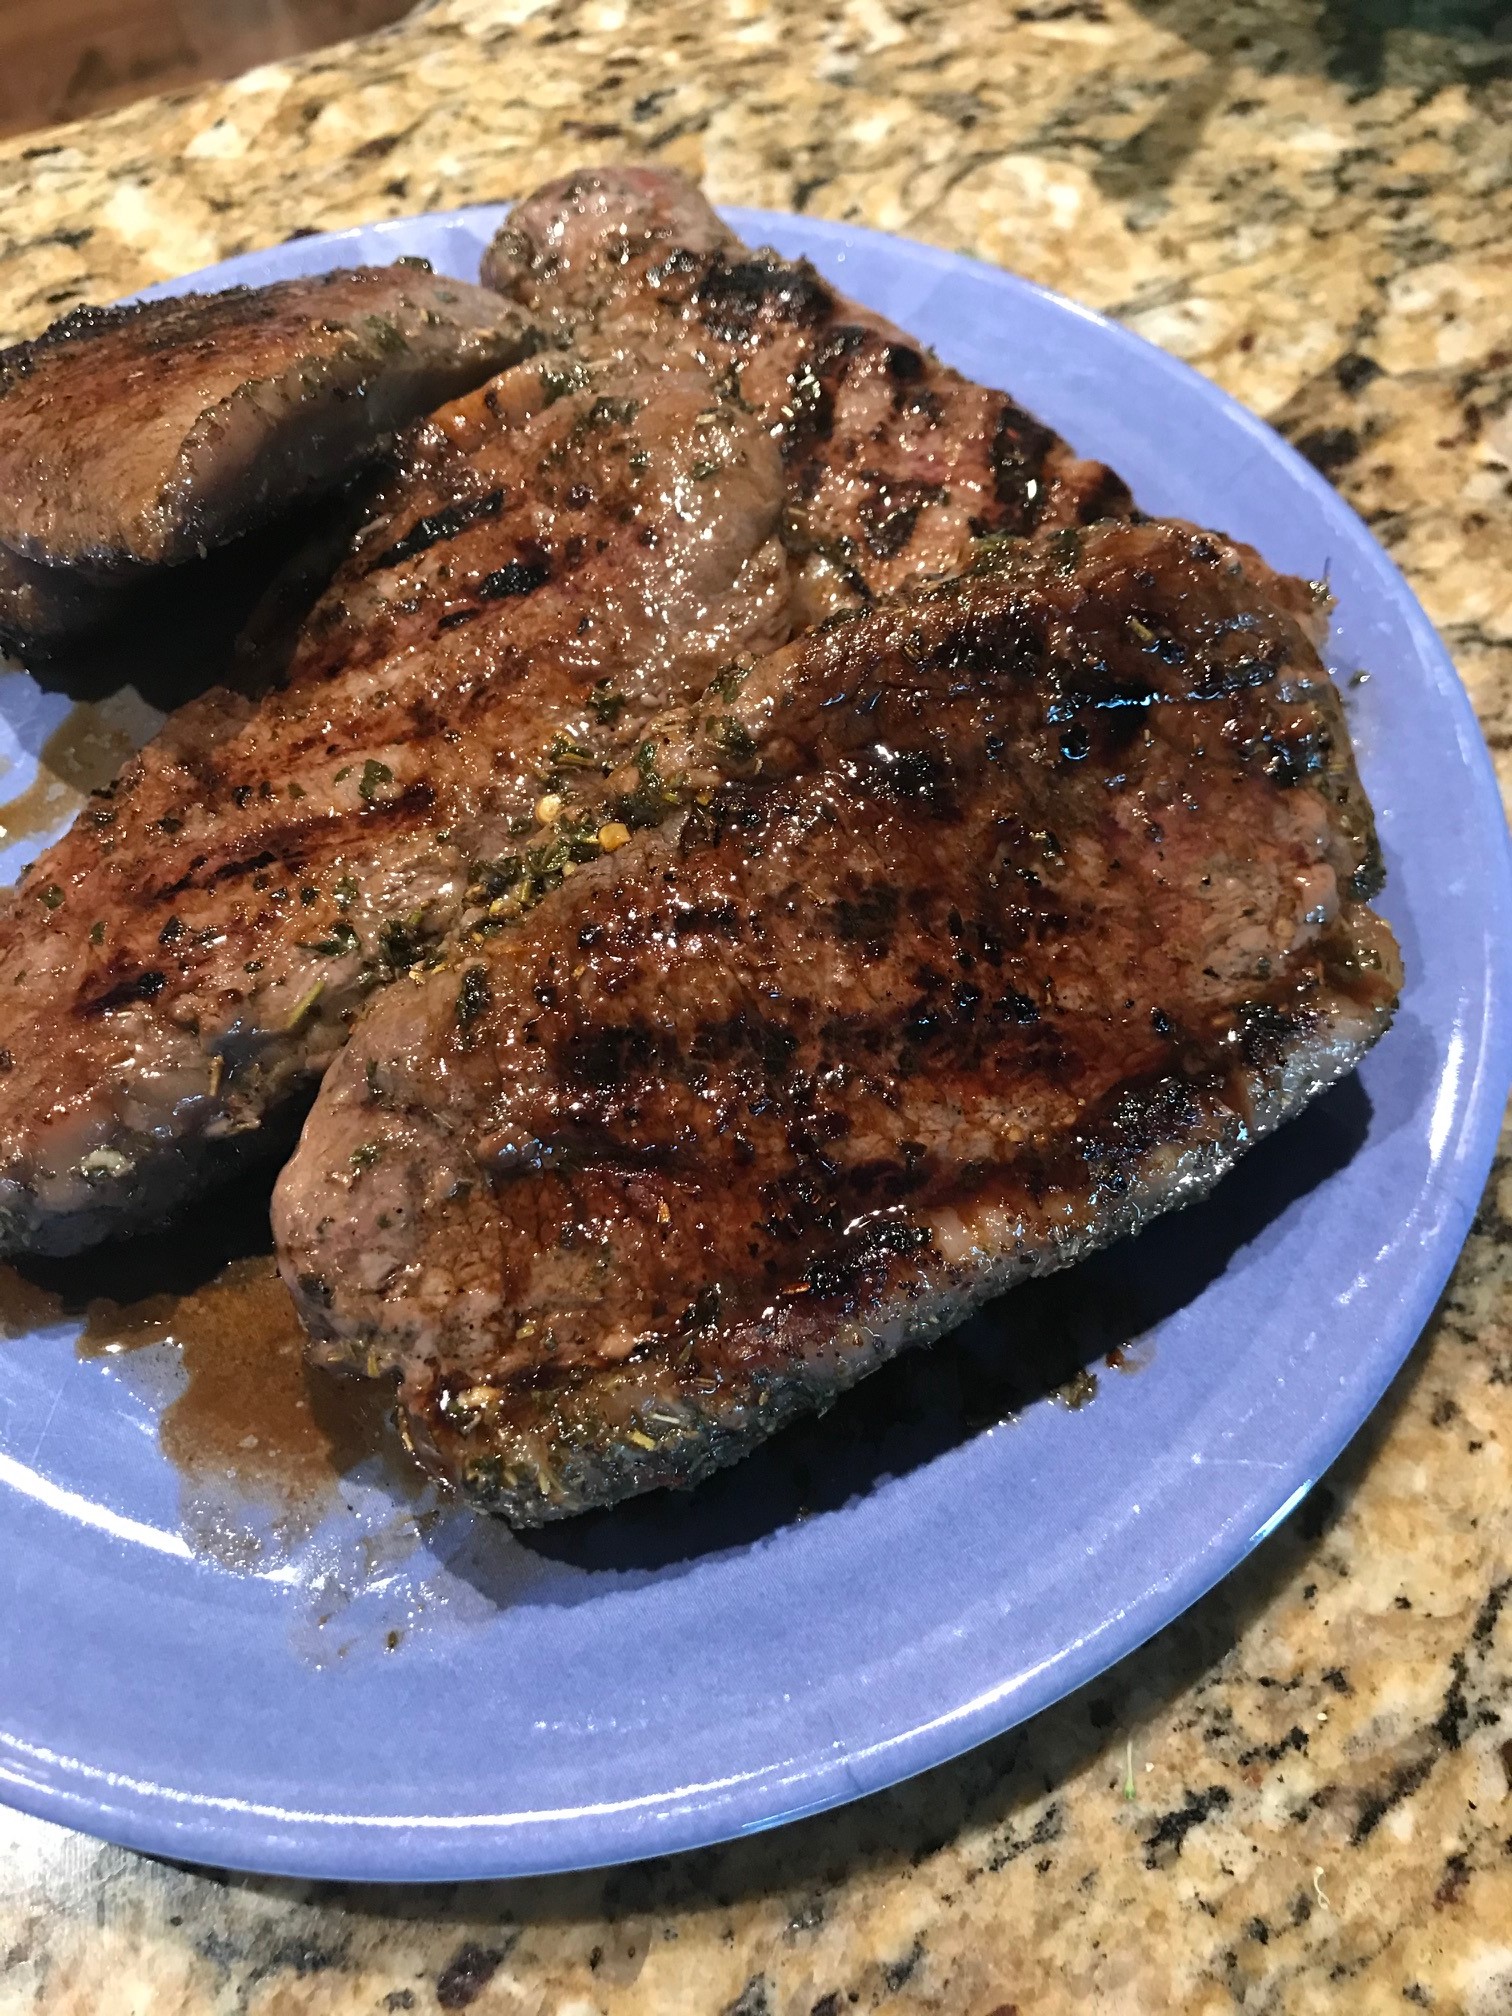
When you are ready to grill, remove the steaks from the bag, dripping the extra marinade off, and place on a plate. Heat up your grill or grilling pan in my case because I didn’t want to send my husband out to grill in the unhealthy smoky air. I’m a nice wife.
What you end up with is perfection. The rosemary, parsley, and oregano give it a delicious herby quality while the sweet honey and garlic/pepper kick rounds it out. Everyone gets along and you end up with summer on a plate.
Whisk the olive oil, vinegar, garlic, rosemary, parsley, oregano, honey, red pepper flakes, and 1/2 teaspoon each salt and pepper in a medium bowl. Reserve 3 tablespoons of the marinade in a small bowl. Cover and refrigerate until ready to serve.
Combine the remaining marinade with the steak in a large resealable bag. Turn the bag several times to coat the meat. Refrigerate at least 4 hours or overnight, turning the bag occasionally.
Preheat a grill or grill pan to high. Transfer the steak to a plate or baking sheet, letting the excess marinade drip off. Season the steak with salt and pepper. If possible, let stand at room temperature for 30 minutes.
Grill the steak until a thermometer inserted into the thickest side reaches 130 degrees F. For a 1 1/2 to 2 inch steak, this is about 16 to 20 minutes for medium rare, flipping every 4 to 5 minutes. Transfer the meat to a cutting board and let it rest 10 minutes. Serve whole or slice the meat to your preferred thickness, against the grain. Serve with the reserved marinade.
Fall is coming up and I want to prepare you with this spin on a chicken noodle soup. I don’t know about you, but I pretty much don’t like canned chicken noodle soup. I know it’s the beloved classic of Americans, but when it’s from a can, the noodles and veggies are mushy. And the chicken? You need a magnifying glass to find any.
I know I just criticized your nostalgic soup so I must be crazy to to tell you to go make some Top Ramen, the crunchy dehydrated nest of god knows what’s in them noodles that you find in every college kitchen. But there’s something sentimental about combining chicken noodle soup with Top Ramen. Reminds me of growing up and then being an “adult” in my first apartment, trying to make ends meet. It’s hot, comforting, and full of noodle goodness.
This recipe comes from Delish, and I’ve thrown in some new twists. Feel free to customize this to your preference with your favorite veggies, or use turkey instead of chicken.
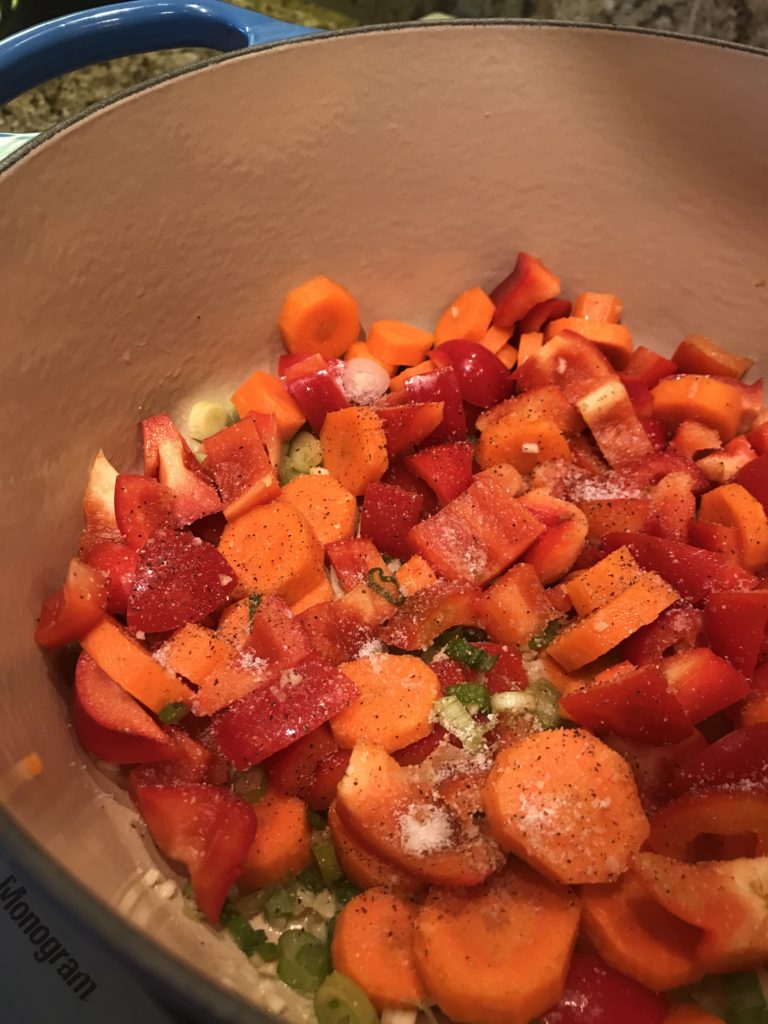
Prep your ingredients. Chop up a couple red peppers and carrots. If you don’t like those, try using celery, broccoli, or bok choy. If you’re a veggie hater, skip it all. Next, thinly slice green onion and mince a few cloves of garlic. Season a couple chicken breasts with salt and pepper. Grab a 4-cup box of low-sodium chicken broth, a couple packages of ramen noodles (throw away the seasoning packets!). Chop some cilantro, cut a lime into wedges, and half another lime to have handy.
Next, heat up some olive oil in a Dutch oven or large soup pot, and saute the chicken breasts until cooked through. Remove when cooked and chop into cubes to the size you prefer. You can skip this step by shredding a rotisserie chicken, but I didn’t have one and I wasn’t about to get into my car to buy one. A word of advice. Always have ground beef, chicken breasts or thighs, and bacon hanging out in your freezer for “emergencies.” Yes, I do have bacon emergencies, but that’s a story for another time.
In the same pot, heat up a little more oil, and toss in your veggies and garlic. Season with salt and pepper and cook until they are softened, but not squishy. Remember, this is not canned soup.
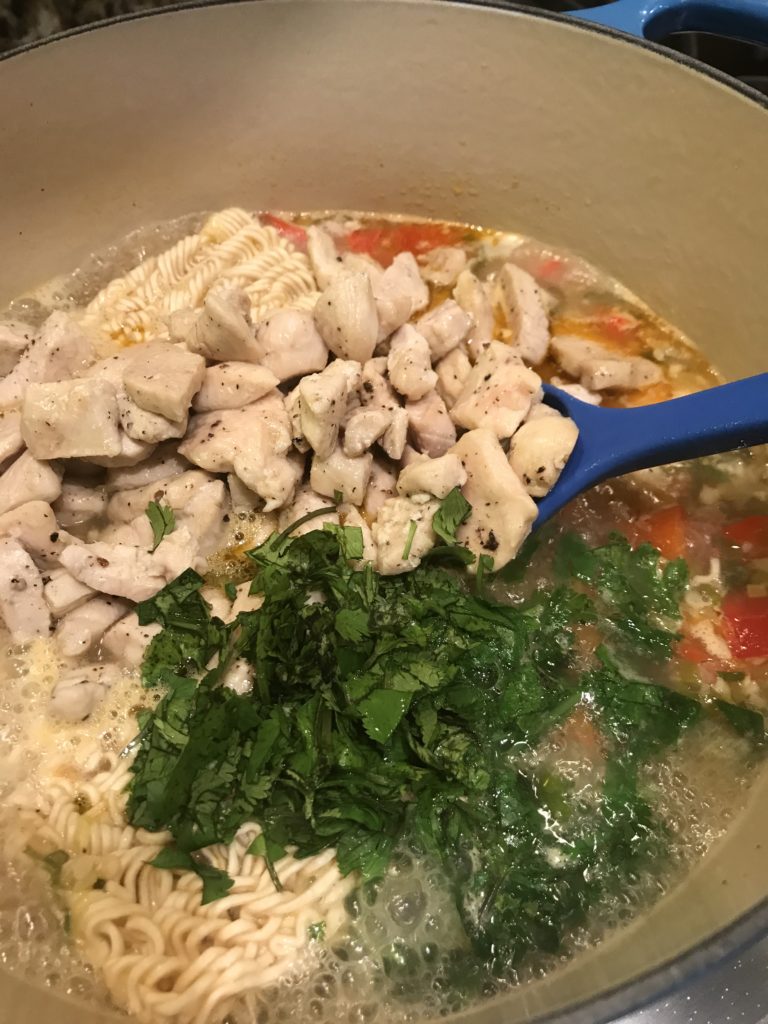
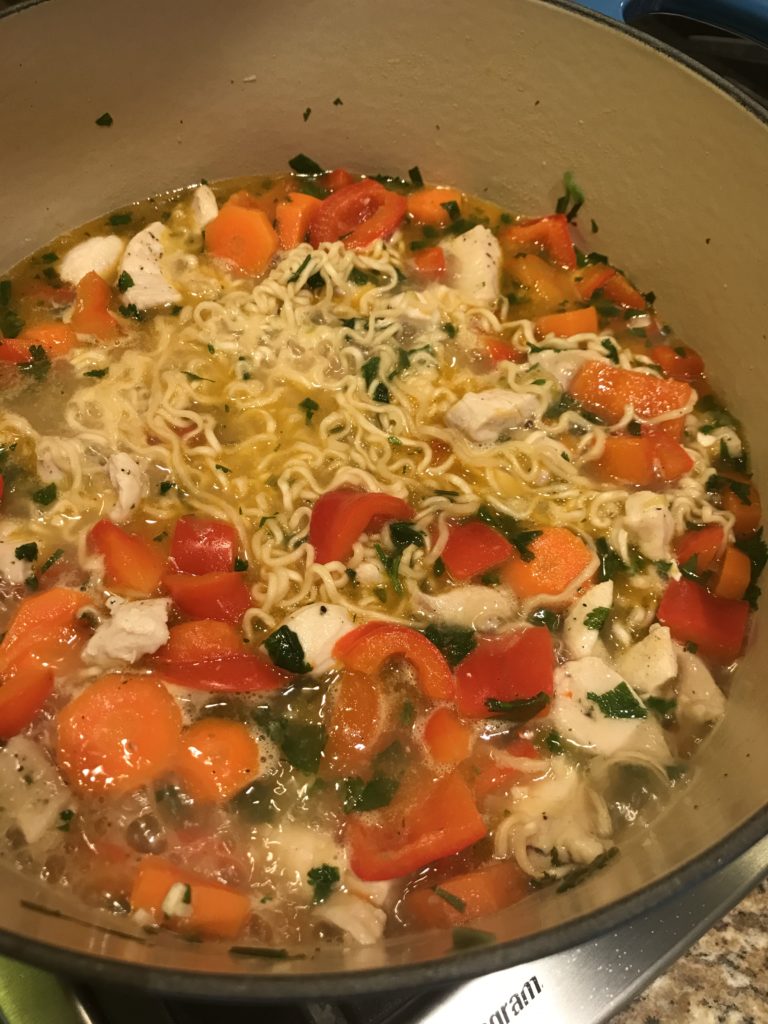
Add chicken broth and simmer. Add your ramen and cook according to the package, about a couple of minutes. Add the cooked chicken and cilantro. Squeeze a lime over it.
Mix it up.
And that’s it. Serve in a bowl with lime wedges (or not).
Sit back and enjoy the perfectly cooked veggies with pieces of chicken you can actually see. Slurp up the noodles that your mom scolded you about when you made those sucking noises. Be amazed at how the lime juice improves the taste of the broth, which adds acidity and a little flavor. This soup brings on happiness.
Season chicken breasts with salt and pepper. In a Dutch oven or large soup pot, heat 1 tablespoon of olive oil. Saute chicken until cooked through. Remove from pot, chop into cubes, and set aside.
In the same pot, heat another tablespoon of olive oil. Add peppers, carrots, green onions, and garlic. Season with salt and pepper. Cook until soft for about 6-8 minutes.
Add chicken broth and bring to a boil. Turn down to simmer. Add ramen noodles and cook according to package, until tender, for about 2-3 minutes. Stir in cooked chicken, cilantro, and lime juice. Simmer until heated through. Serve in a bowl with lime wedges.
Someone told me I cook a lot of chicken. I’ve never noticed, but I do. I love chicken. What’s not to love? It’s inexpensive and easy to work with. Thighs happen to be my new favorite meat because they are completely forgiving and the hoarders have mostly left them alone. But I do love beef so let’s branch out a bit.
I had a bag of brown lentils that I bought when the shelves were bare of canned lentils and most beans (hoarders!). I never used them because I found canned lentils a few weeks later that I used for another recipe. So I felt obligated not to waste these lentils and use them. But I’m actually really unfamiliar with lentils. It turns out that lentils are the easiest thing to make. They’re a legume and a cousin to the bean. You don’t need to soak them overnight like beans plus they are loaded with fiber and other good stuff. I thought lentils were just another bean, but not so.
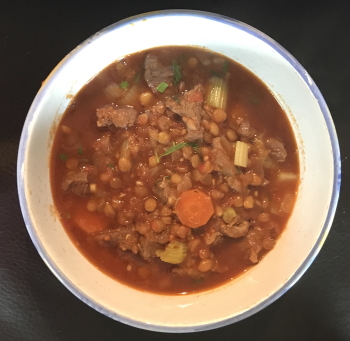
With my trusty dried lentils, I made Beef and Lentil Stew from A Spicy Perspective. I made this during early summer, but I plan to make it again this fall when I need something super comforting.
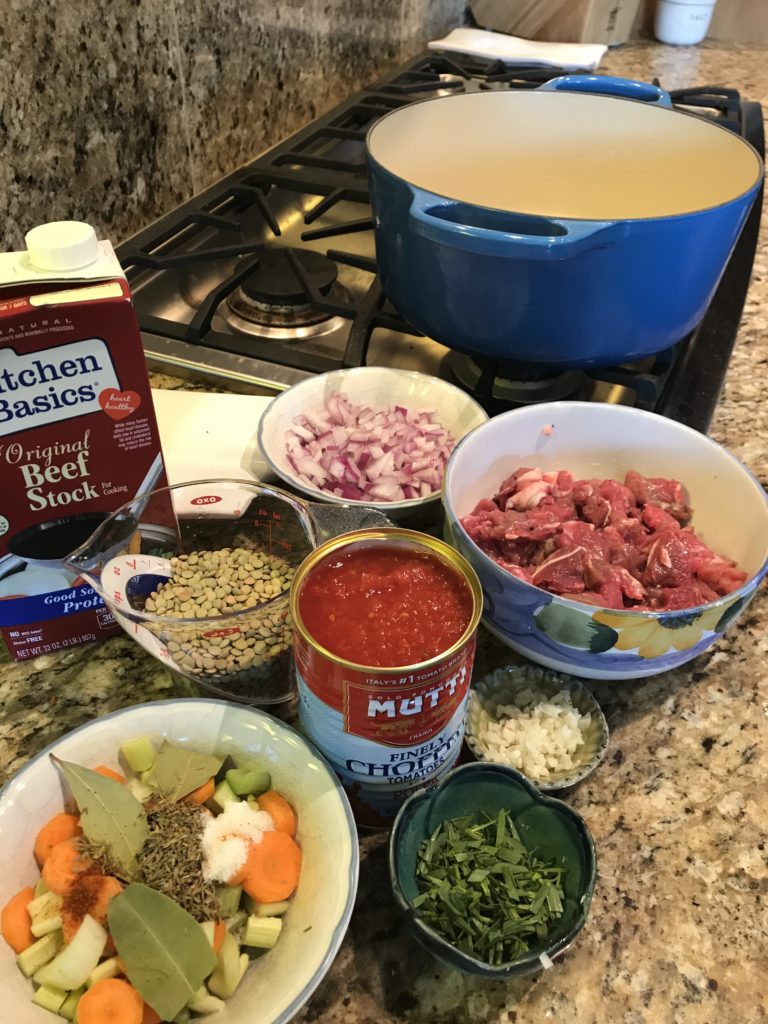
I changed the recipe up a little based on what I liked and had in the pantry. Start by gathering and prepping your ingredients.
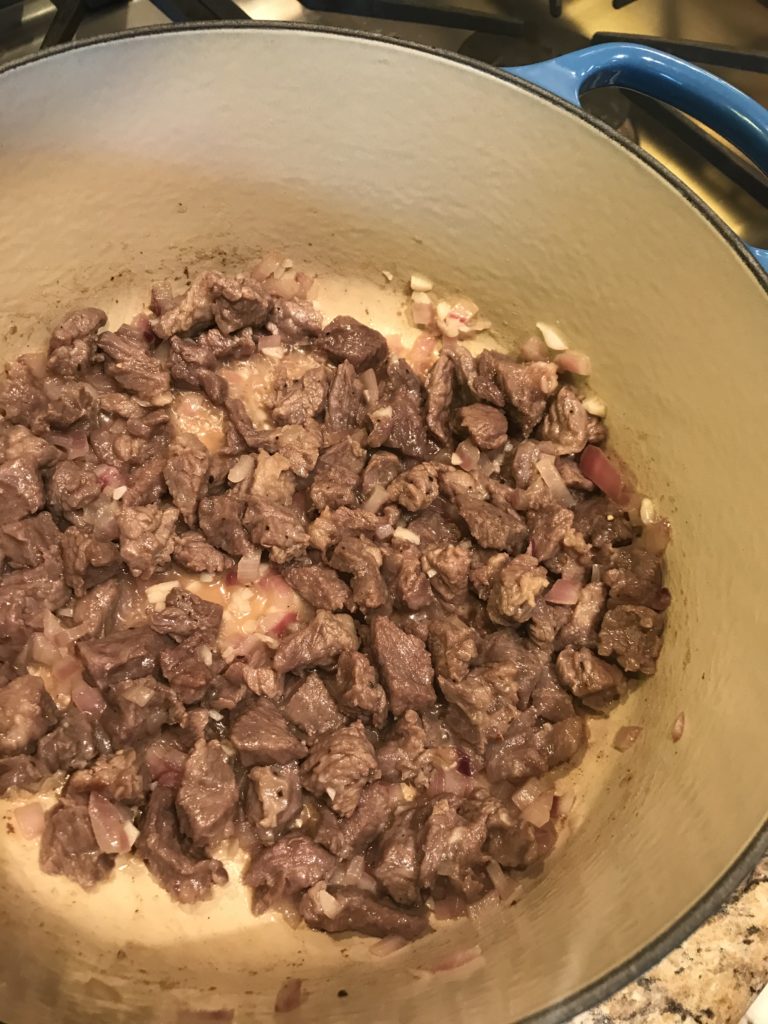
In a large pot (like a heavy Dutch oven), saute beef chuck and onions together until the onions are soft. Then throw in some minced garlic and cook for another minute or so. Season the meat mixture with some salt and pepper and cook until beef is browned.
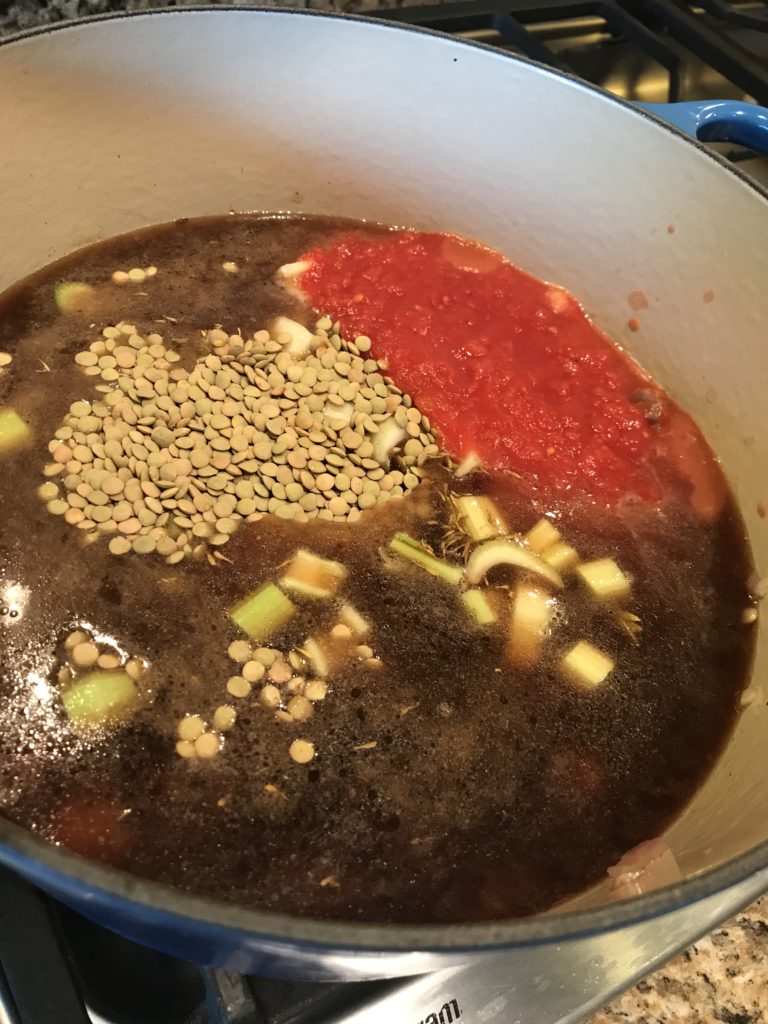
Add your veggies, those lentils, beef stock (not broth), and seasonings. I used a half a cup more stock than the recipe called for because I wanted a slightly thinner stew, but mostly these cartons have 4 cups in them and I didn’t want to keep track of a half of cup of stock.
Bring to a boil, reduce heat, and then simmer for at least an hour. Curl up with your favorite beverage and go watch an episode of Tiny House Nation. Episode 3 of season 1 on Netflix was particularly good. Just saying. You’ll even have time to spare.
The stew is ready when the beef and lentils are tender. Fish out those bay leaves if you can. Add some tarragon, salt, and pepper. You’re done.
This stew is fall in a bowl. The soft texture of the lentils with the hearty chunks of beef makes it both luscious and substantial. The veggies round out the dish, giving you all your food groups. Treat yourself to dessert, which is perfectly acceptable after eating this healthy meal.
Prepare your ingredients, such as cut beef into cubes and slice vegetables.
Heat the oil in a large Dutch oven or large pot over medium-high heat. Saute the beef and onions for 3-5 minutes until the onion are soft. Add garlic. Season with salt and pepper. Continue cooking until beef is browned.
Add the carrots, celery, lentils, tomatoes, beef stock, bay leaves, thyme, 1 teaspoon salt, and cayenne pepper.
Bring to a boil. cover, reduce heat, and simmer, for about 60-75 minutes until the beef and lentils are tender. Remove the bay leaves and stir in the tarragon Add salt and pepper to taste.
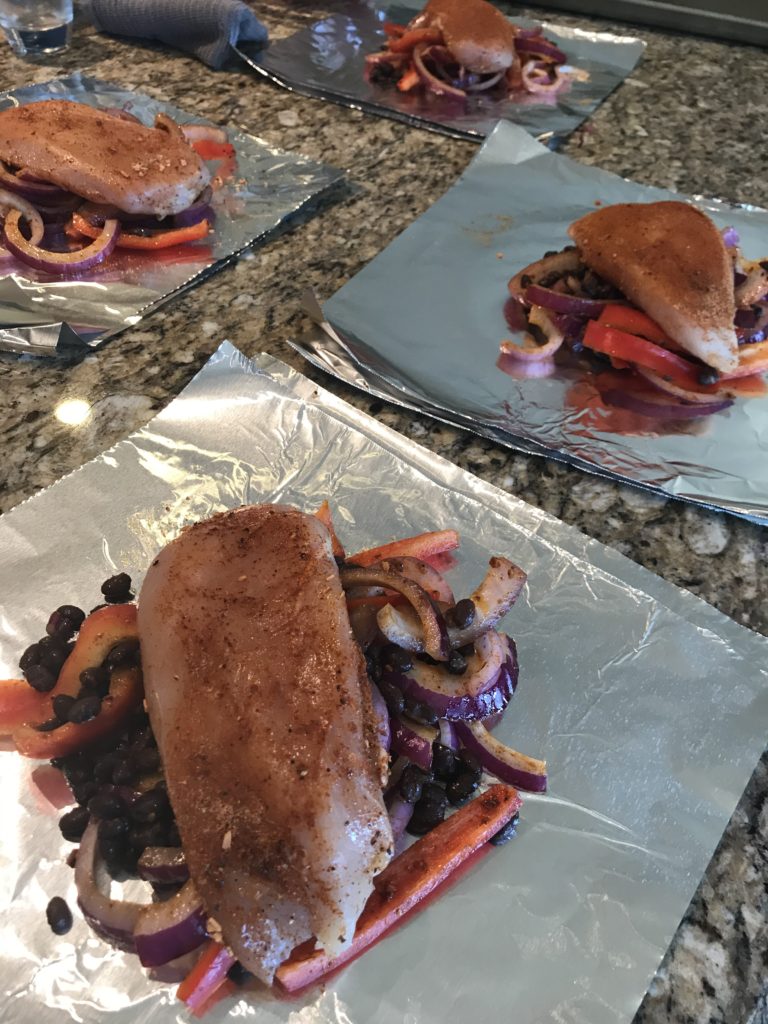
Last week, I shared with you Pineapple BBQ Chicken Foil Packets. Lo and behold, I’m still on my foil packets kick. I love Mexican food so let’s make fajitas! I often order fajitas when I go to a Mexican restaurant because I can’t make them at home. Although I do try, no way can I duplicate that sizzling pan experience. Sorry to tell you, but don’t expect this recipe to make up for that. On the other hand, you do get a lot of good flavor without a lot of work that satisfies your cravings. Like the last foil packet recipe, you can cook it on the grill or in the oven. The air quality is still bad here (California is on fire right now) so I’m opting for the oven.
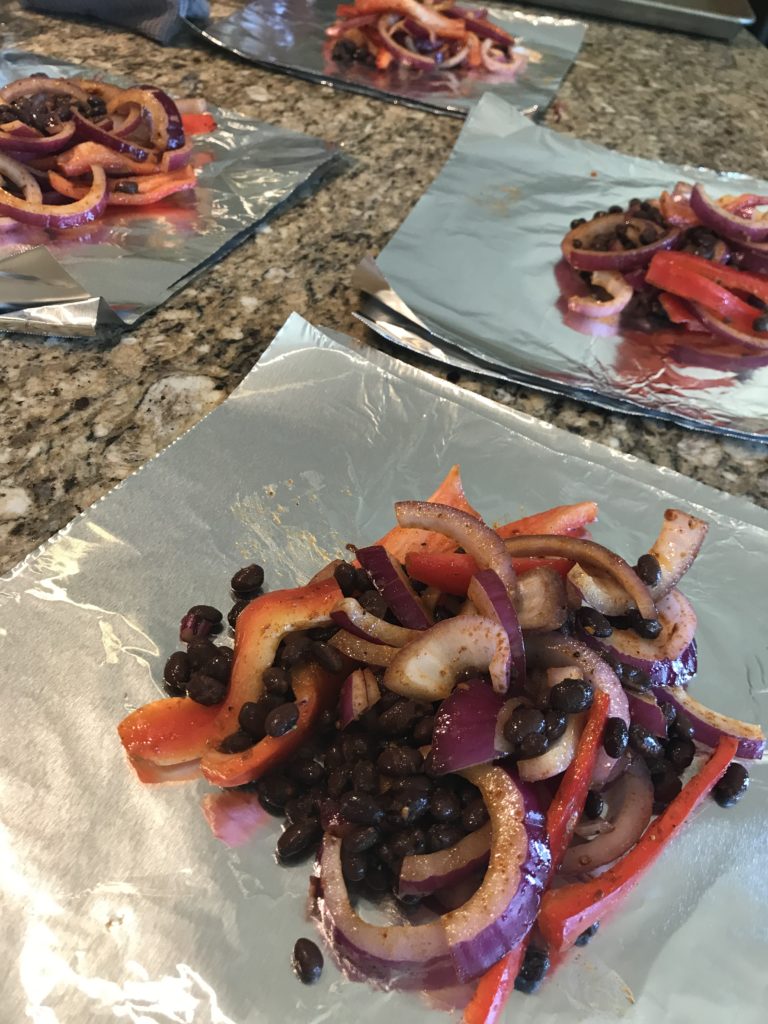
This is a pretty easy recipe. Many thanks to the Kitchn. Slice up red bell peppers (the original recipe calls for green….too bitter!) and red onions. You can use any color pepper or onion. Place them in a large bowl. Rinse and drain a can of black beans, and throw that in. Make sure the beans are well drained. You don’t want to accidentally add any extra liquid or you’ll end up with a drippy mess. You don’t want soggy fajitas.
Add olive oil, taco seasoning, and some salt and pepper. The original recipe doesn’t call for salt, but I think it needs it. Taste your taco seasoning. Not salty enough? Add some salt, mix, and taste it again. It’s really important to taste your food as you cook so the seasoning is how you like it.
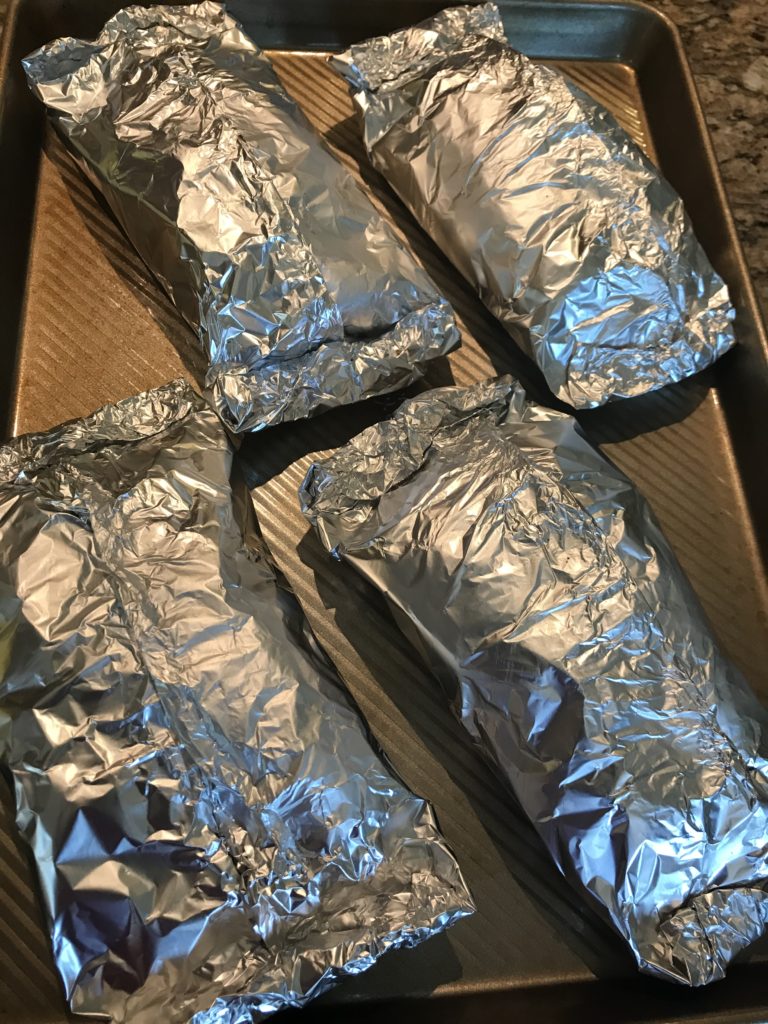
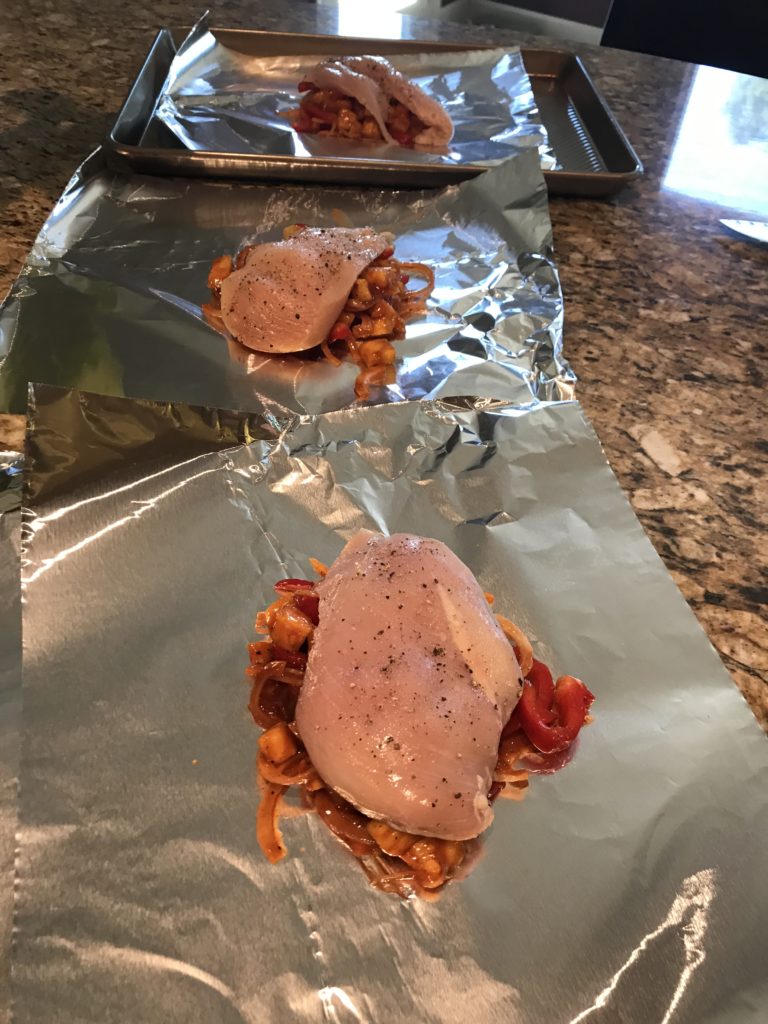
After tossing that all together, divide it into four piles on sheets of foil.
Need some help on this? Here’s some advice from my previous post:
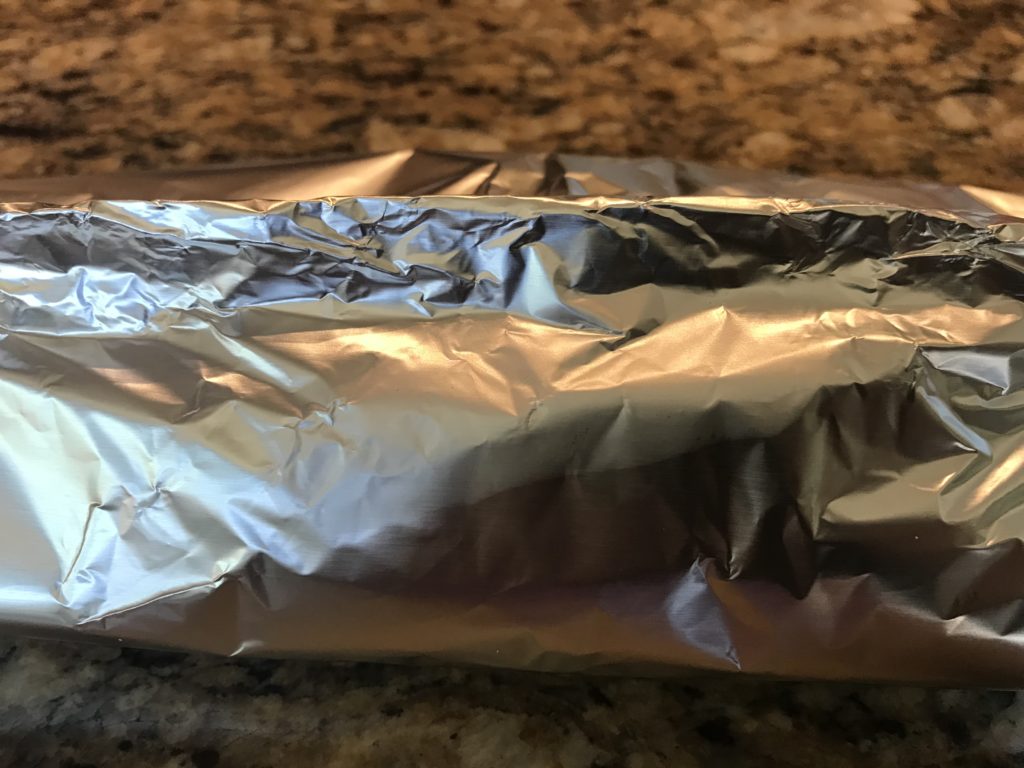
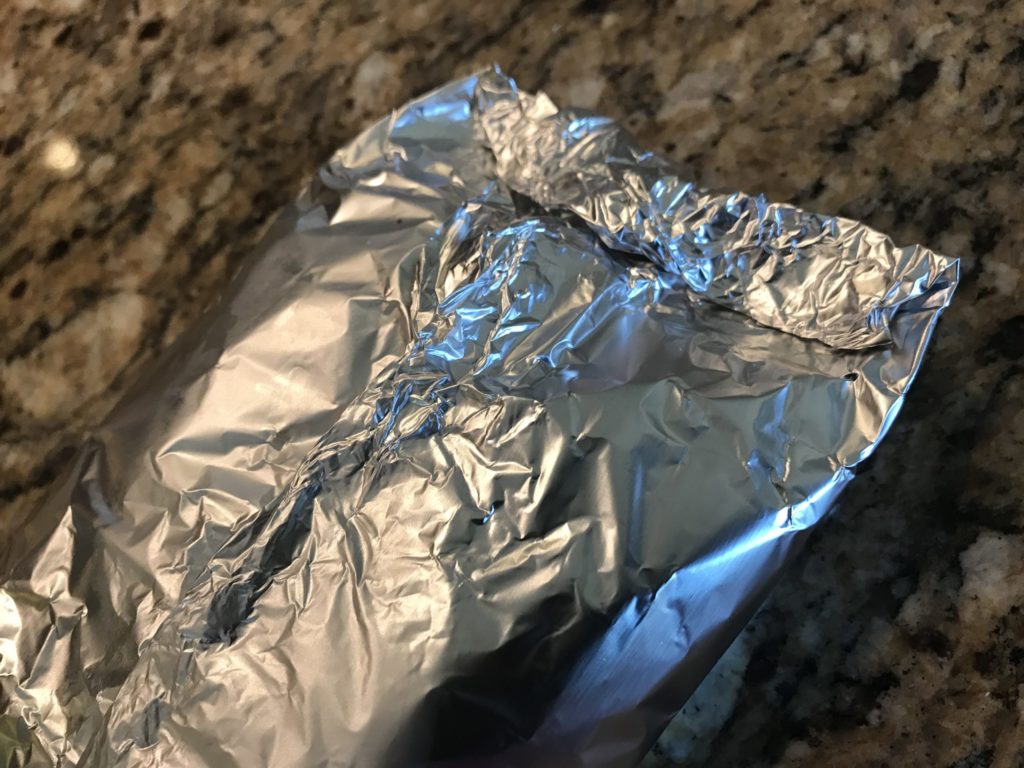
Now the fun part. Make four large sheets of heavy-duty foil about the size of a small, quarter-sized baking sheet. You could make one sheet and try that out first, and if it’s the right size, make three more of the same size. I took a gamble and eye-balled it, but it worked. You just want to make sure you have about 2″ around the sides for the crimping. If it turns out you made your sheets too small, just make a larger one and place it under the original sheet. It’s all good. There’s no precise science to this. And if you don’t have heavy-duty foil, just double line your packets to prevent leaking.
Season 4 6-ounce chicken breasts with taco seasoning, salt, and pepper. It’s really important that you use breasts as close to 6 ounces or the chicken and veggies won’t be done at the same time. If you can’t find 6-ounce pieces, cut up larger breasts into smaller pieces of approximately 6 ounces.
Next, place each chicken breast on a pile of veggies.
Fold the sides and then the edges. Need some help? Check out the tbsp. for directions and pictures. Here’s what mine looked like:
Grill or oven bake for about 20-25 minutes. Slice chicken into strips and serve with tortillas. I like making a taco, and add grated cheese and guacamole. Super tasty and not a lot of work.
Grilling method: Heat an outdoor grill to medium-high, direct heat. Oven method: Preheat oven to 425F.
Slice red bell peppers and red onions, and add to a large bowl. Drain and rinse black beans. Add beans to the bowl. Add olive oil, 1 tablespoon of taco seasoning, salt (to taste), and 1/2 teaspoon of the black pepper. Toss to combine.
Prepare 4 (10-inch long) sheets of aluminum foil. Use heavy-duty foil or double sheets to prevent leaking.
Divide the vegetable mixture among the 4 sheets of foil, leaving a 2-inch border on all sides.
Season chicken breasts with the remaining 1 tablespoon of taco seasoning, salt (to taste), and the remaining 1/2 teaspoon black pepper. Place a breast on each vegetable pile.
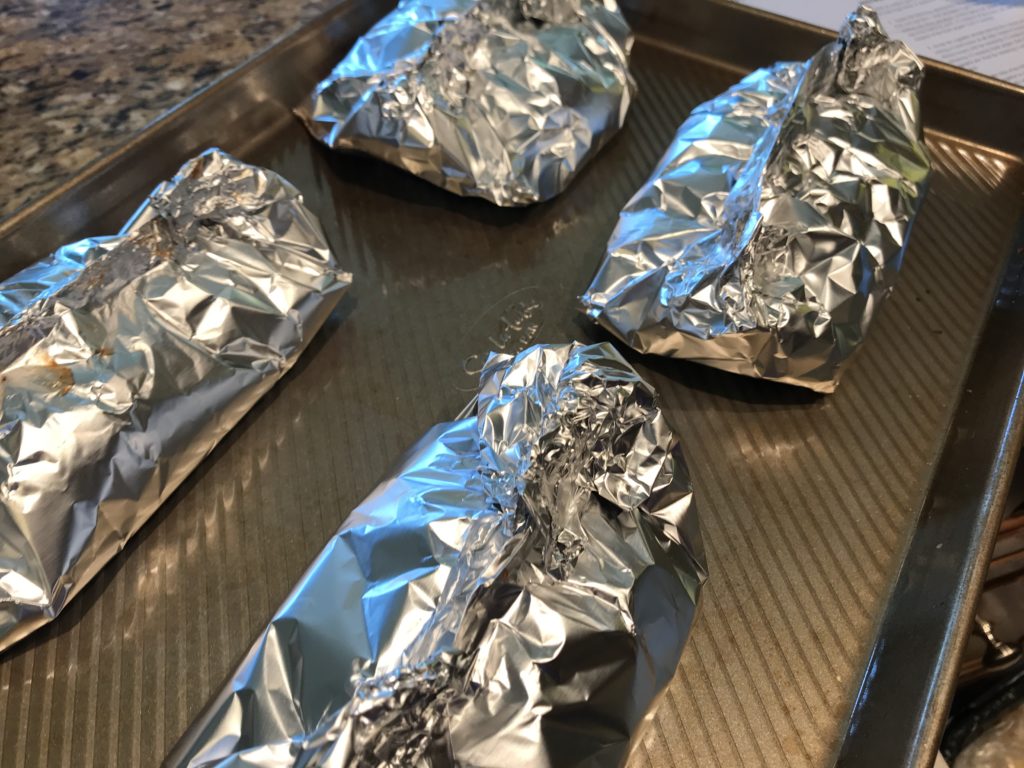
Fold the sides of the foil to meet over the center. Crimp the edges together to create completely sealed packets.
Grilling method: Place the packets directly onto the grill grates, cover, and grill until the chicken is cooked through and the vegetables are tender, 20 to 25 minutes. Oven method: Place packets on a rimmed baking sheet and roast for 20 to 25 minutes.
Let cool for 10 minutes before opening the packets and serving. Serve with tortillas and your favorite fixings.
It’s the end of August. School started a couple weeks ago, which typically marks the end of summer. With the boy in school, it’s impossible to go on a vacation, which is hard because Labor Day seems to be my end of summer. The weather is still hot and I’m ready for a last trip, even if it’s just a quick getaway to Tahoe. Alas, none of that is going to happen this year so one must make do with what one has.
This is where the pineapple comes in. The pineapple? Yes, the pineapple. The pineapple is synonymous with tropical, fun, vacation, and relaxation. It can be eaten plain. It can be controversial (on pizza). It makes a great foo-foo drink (pina colada). And frankly, it’s one of the cutest fruits around. Rejoice the pineapple!
Next, there’s barbecue, another symbol of summer. I’m not going to go into the discussion of barbecue versus grilling. That’s for another day. Today I’m just writing about that delicious, sweet, and tangy saucy stuff. It’s like summer in a bottle. Work with me here.
Camping. I love it. Some of you hate it and I still like you, but for those campers out there, the foil packet is a treasured item. Take some meat. Take some veggies. Shake some salt and pepper over it. Wrap it up. Throw it on the fire or grill. Voila! Dinner!
So I was pretty happy when I found this recipe to help with this staycation: Pineapple BBQ Chicken Foil Packets. And it’s super easy.
First, heat up the grill. I’m including this part of the recipe for you grillers out there, but I decided to oven bake mine because I didn’t feel like standing in front of the grill when it’s a million degrees. I compromised by heating up my air-conditioned house with a 425F oven. First world problems.
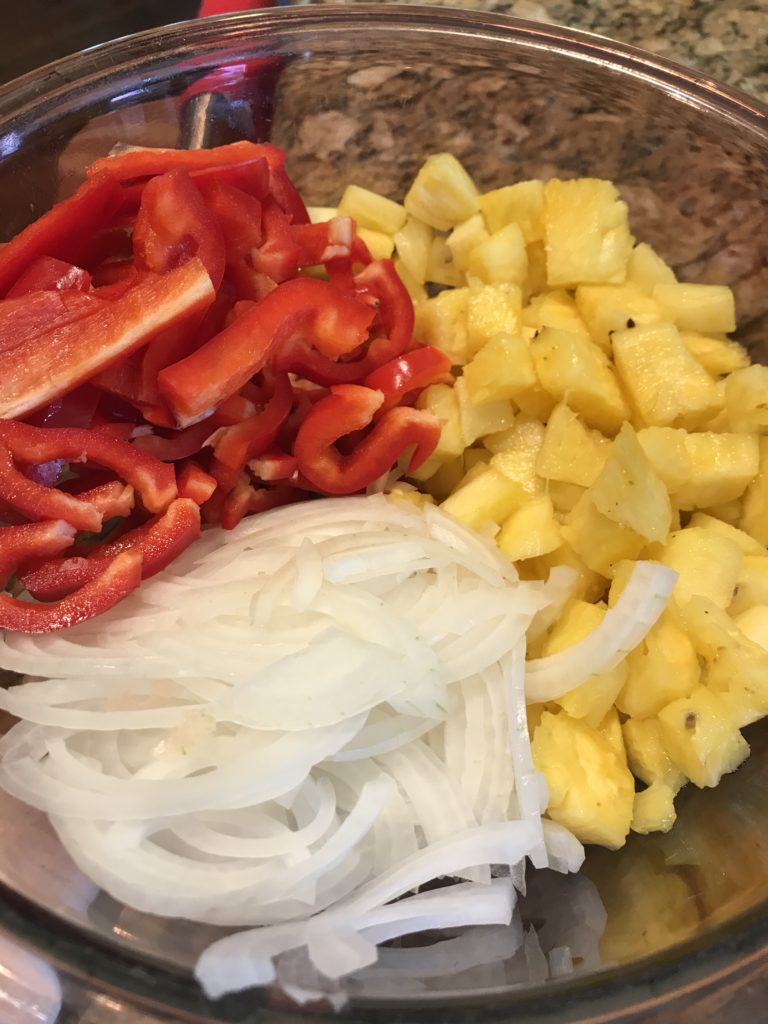
Cut your pineapple (yay!) into chunks. I cheated and used pineapple my grocery store already cut up for me. I think cheating is perfectly acceptable. You can used canned pineapple too. Or you can cut up a whole pineapple. The choice is up to you.
Slice up your veggies: onions and bell peppers. The original recipe (thank you Kitchn!) called for red onions and green bell peppers. I was all out of red onions, which was a shocker because that never happens around here. I have a constant supply for my big-ass salads. (To clarify, the salads are big, not my ass.) But I did find some white onions leftover from our tacos the other day. Next, I was supposed to use green bell peppers. Ummm. Just no. They are bitter and not tropical at all. You want a red pepper. You can sub for yellow or orange too. Just don’t use green unless you really like them.
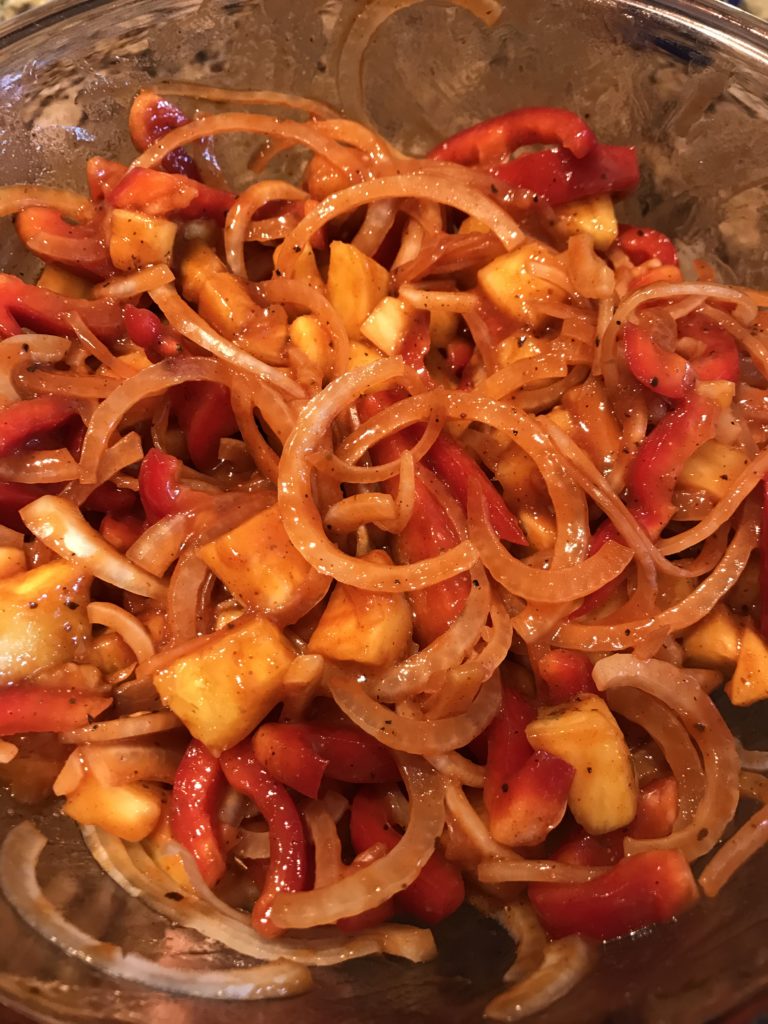
Place your fruits and veggies in a bowl and pour in a cup of your favorite barbecue sauce. My favorite lately is Sweet Baby Ray’s Barbecue Sauce, and I’m not getting any money for saying that. Then, throw in some salt and pepper, and mix it up.
Now the fun part. Make four large sheets of heavy-duty foil about the size of a small, quarter-sized baking sheet. You could make one sheet and try that out first, and if it’s the right size, make three more of the same size. I took a gamble and eye-balled it, but it worked. You just want to make sure you have about 2″ around the sides for the crimping. If it turns out you made your sheets too small, just make a larger one and place it under the original sheet. It’s all good. There’s no precise science to this. And if you don’t have heavy-duty foil, just double line your packets to prevent leaking.
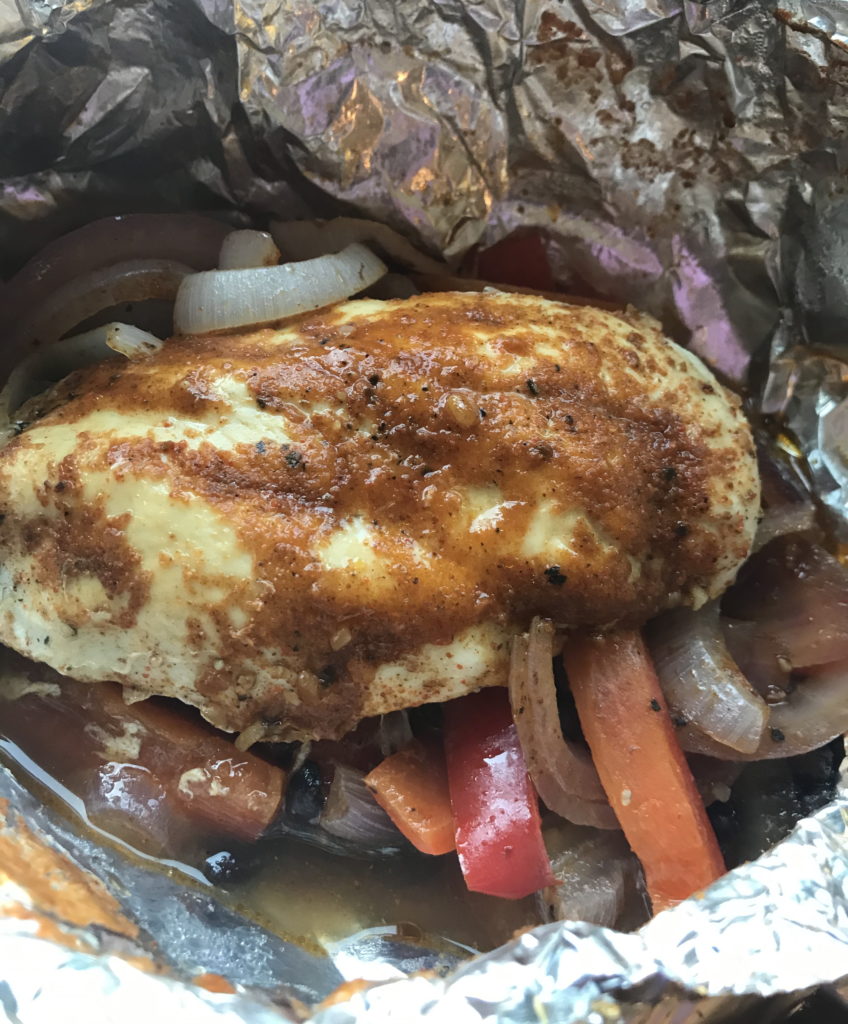
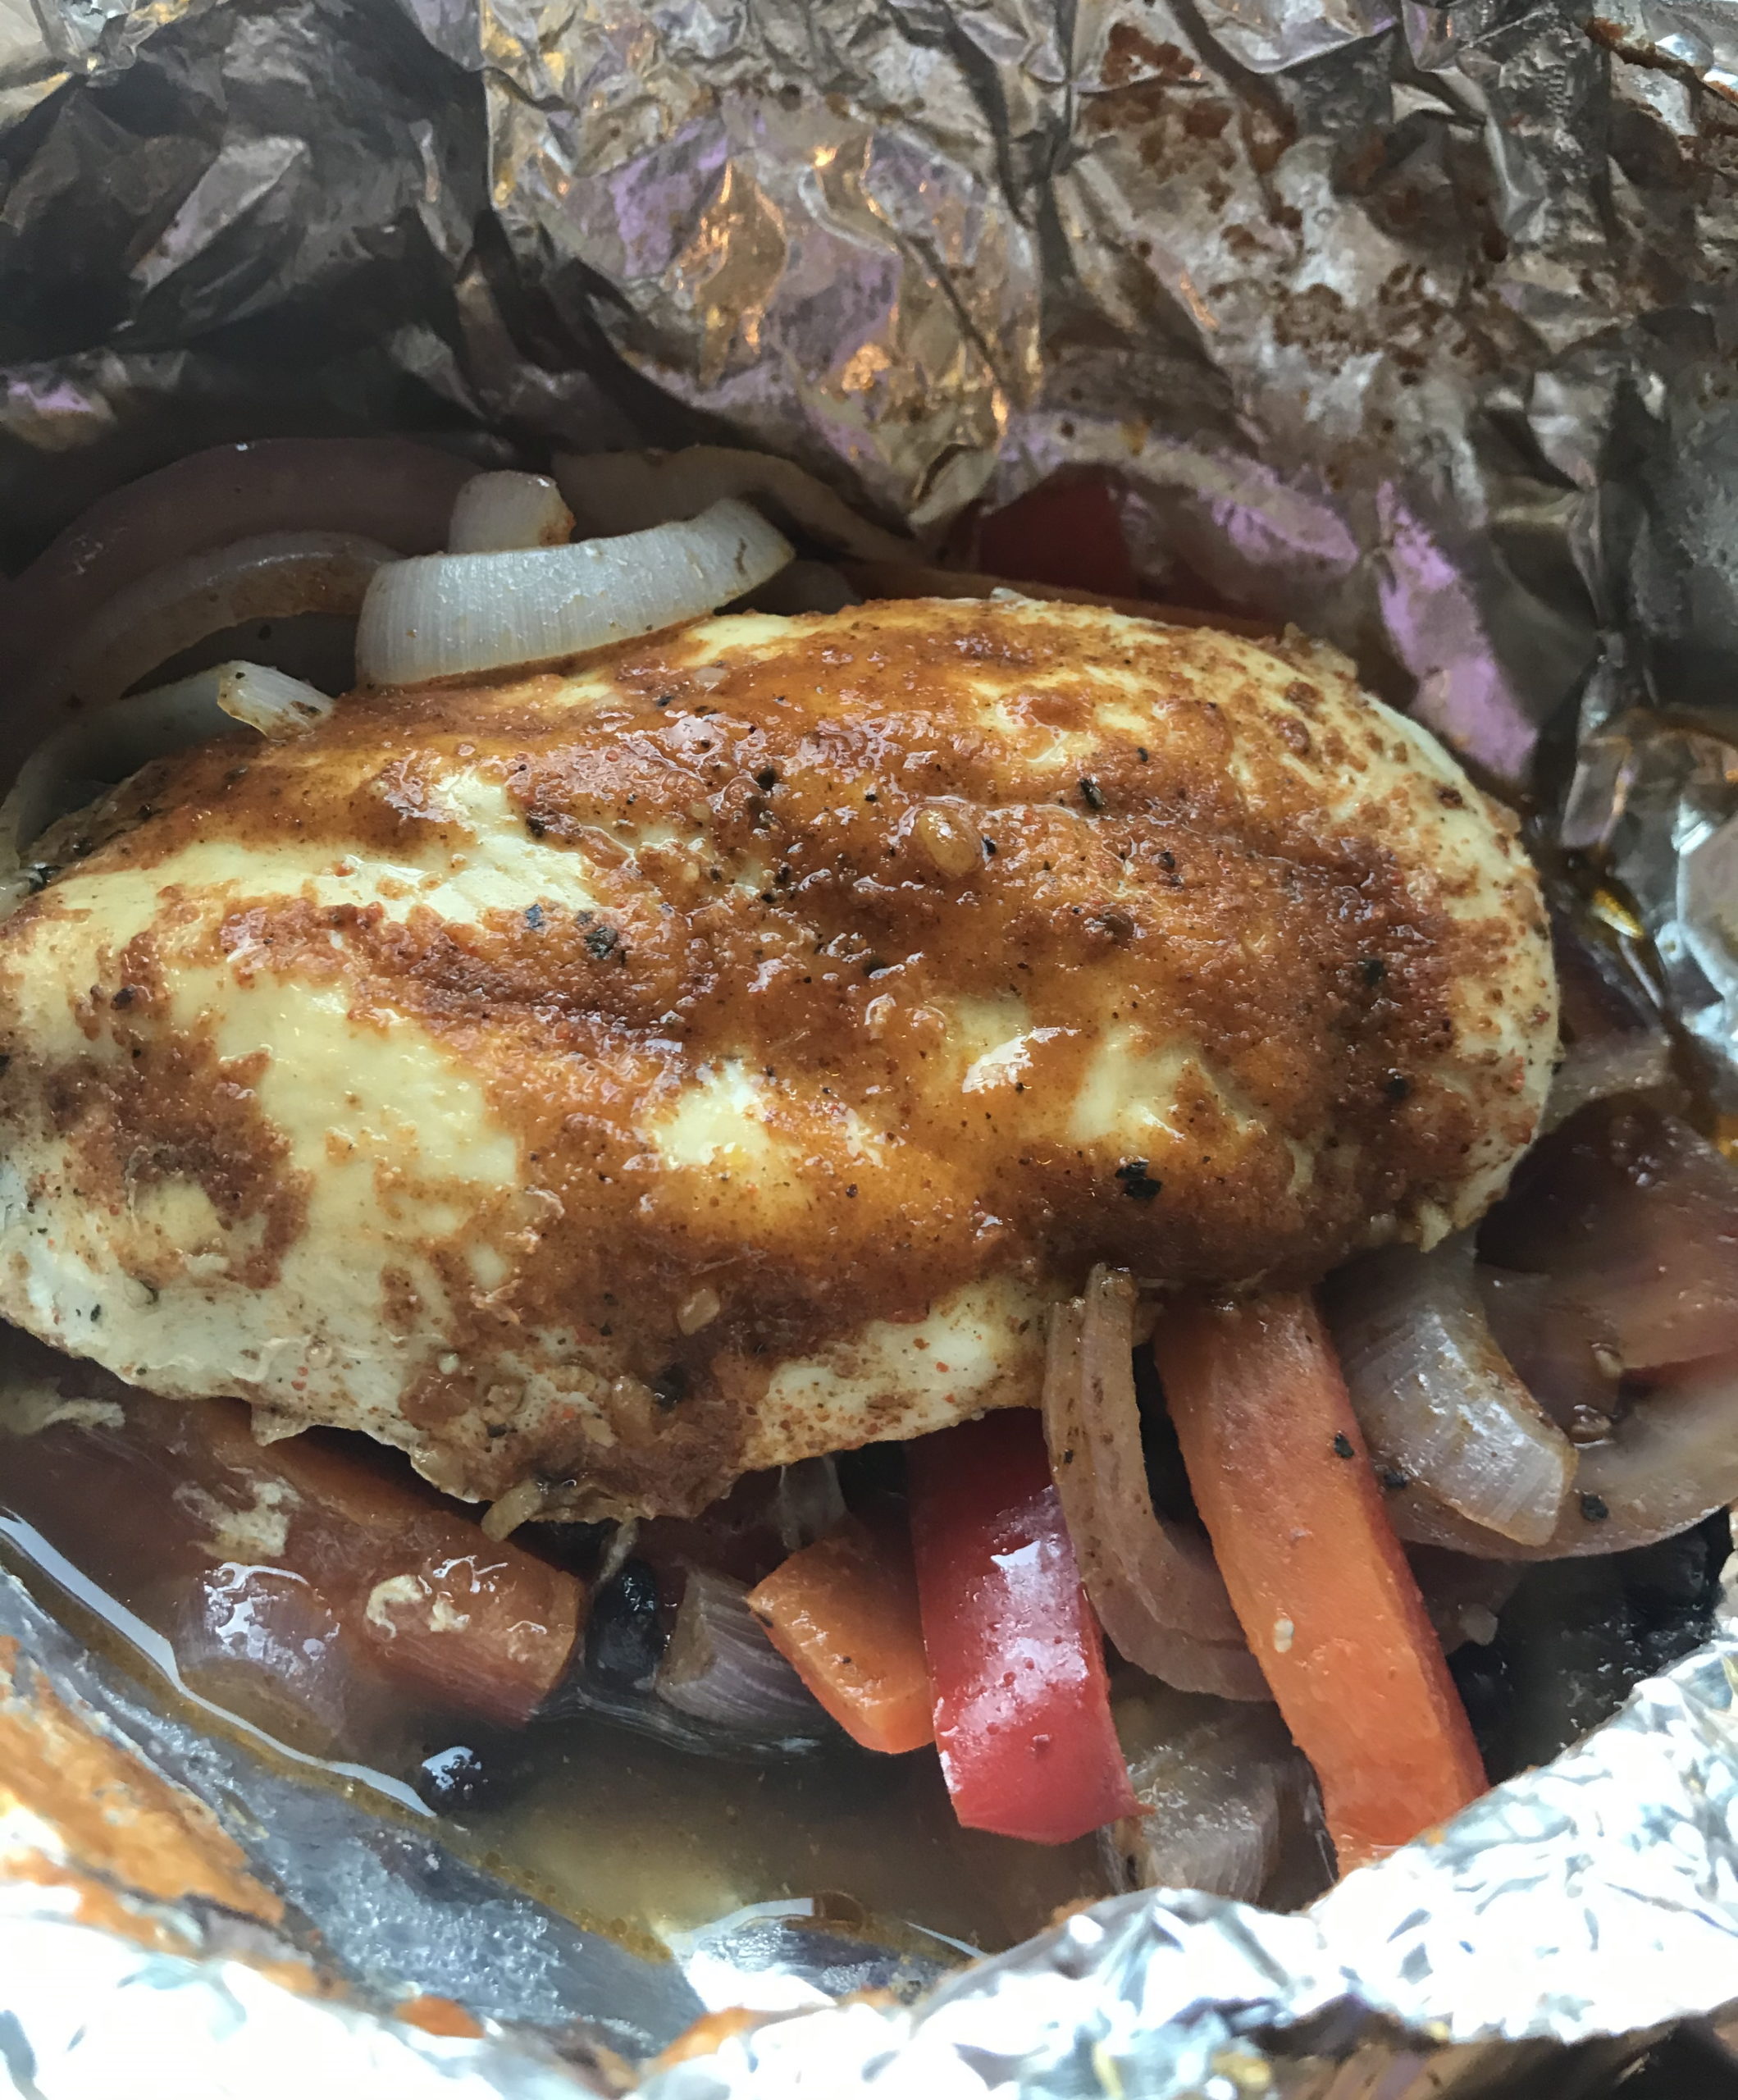
Scoop four equal servings of the pineapple mixture on each sheet. Take four boneless, skinless chicken breasts seasoned with salt and pepper, and place it on the pineapple mixture. Pour 1/4 cup of sauce on top of the chicken. Spoiler alert! This is a very saucy dish. I think I would have used less sauce in the pineapple mixture or just brush a little sauce on the chicken. For many of you, you’ll serve this over rice and the quantity of sauce is perfect. Not so much for the rest of you.
Wrap up your chicken and pineapple mixture. Fold the long sides to the middle and crimp. Fold up the ends to seal. I found a really good article on the tbsp. that explains exactly how to do this, with pictures and everything. Mine are not perfect, and that’s ok.
Place your packets on the grill or in an oven (on a sheet pan) for about 20-25 minutes until the chicken is cooked and the veggies are tender. I used my trusty meat thermometer to make sure the internal temperature chicken was 165F. Just poke through the top of the packet to check. You don’t need to unwrap it. Yes, you will let some of the steam escape, but overall, no harm is done.
After it’s cooked, let the packet rest for about 10 minutes, and then open the packets CAREFULLY to avoid getting a wave of unpleasant, hot steam in your face or burning your fingers. Serve all that goodness over rice or skip it. Deliciousness. The pineapple makes it sweet, but not too much. I think the milder white onion (instead of strong red) along with the red pepper (instead of bitter green) is a much better combination that complements the pineapple perfectly. The sauce gives it a tang to mellow the sweetness out. It’s summer wrapped in a packet.
Heat an outdoor grill to medium-high, direct heat. For oven cooking, preheat the oven to 425F.
Place chunked pineapple, sliced onion, and sliced red pepper in a large bowl. Add 1 cup of the barbecue sauce, 1/2 teaspoon of the kosher salt, and 1/2 teaspoon of the black pepper. Toss to combine.
Prepare 4 sheets of aluminum foil about the size of a quarter sheet pan, approximately 10 inches. Use heavy-duty aluminum foil or double wrap.
Divide the vegetable mixture among the 4 sheets of foil, leaving a 2-inch border on all sides. Season 4 boneless, skinless chicken breasts with the remaining 1/2 teaspoon kosher salt and remaining 1/2 teaspoon black pepper. Place a breast on each vegetable pile. Pour a 1/4 cup of barbecue sauce over each chicken breasts.
For each packet, fold the long sides of the foil to meet over the center, and then fold and crimp the short ends to create a sealed packet.
Grill cooking: Place the packets directly onto the grill grates, cover, and grill until the chicken is cooked through and the vegetables are tender, 20 to 25 minutes.
Oven cooking: Place on a rimmed baking sheet and roast at 425F for 20 to 25 minutes.
Let cool for 10 minutes before opening the packets and serving. When served, garnish with parsley (optional).
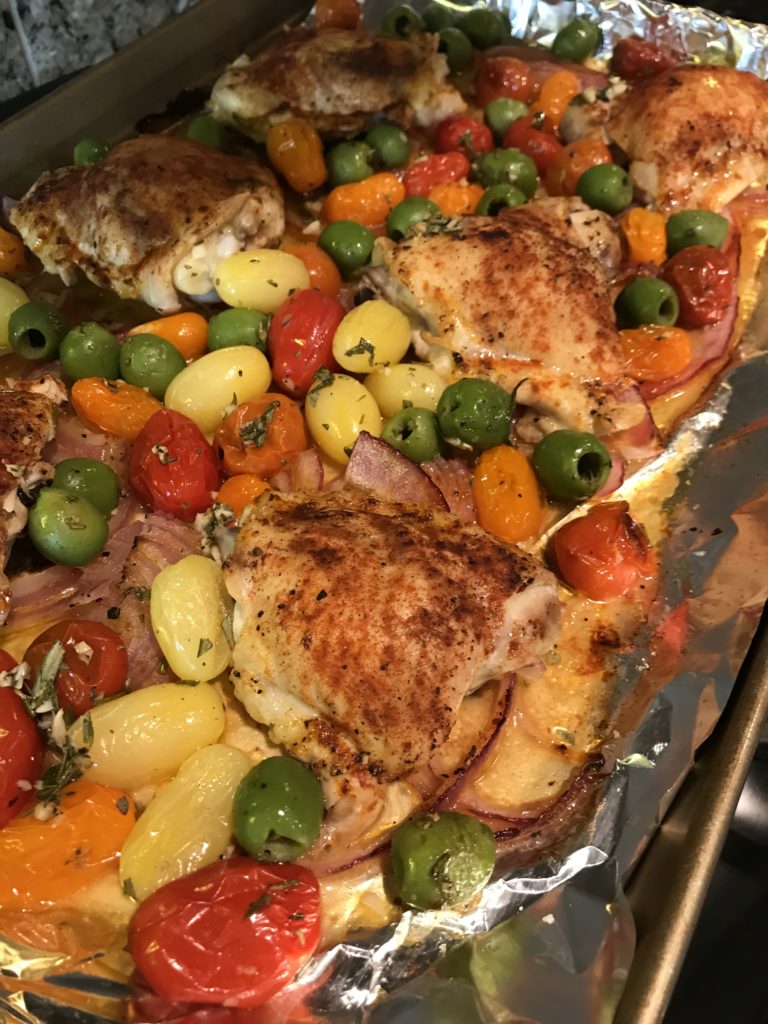
But sometimes easy recipes are bland and boring. To get around this, try to find a recipe with your favorite meat/protein (duh) and that one flavorful ingredient that will make it stand out. For me: olives.
I know olives aren’t everyone’s thing, and if you hate them, don’t make this recipe, but I happen to love olives so here we are. Olives are tangy, make great snacks, and are practically a health food. They come in all different varieties. Green. Black. Kalamata. Garlic stuffed. Blue cheese stuffed. Castelvetrano. Woah, what?
I don’t claim to be an olive connoisseur. I’m really quite ignorant and had only recently discovered the Castelvetrano olive, the olive that I had no idea I loved. While making this recipe, I was popping them into my mouth and was a little concerned I’d be spoiling my appetite for dinner!
This delicious recipe comes from Valerie Bertinelli on The Food Network. If you haven’t watched her show, Valerie’s Home Cooking, give it a try. She’s funny without being annoying. One of my pet peeves: chefs screaming at you in excitement…darling, nothing in cooking is that exciting, trust me. But Valerie’s also educational without being condescending. I’ve learned a lot from her. Best of all: her recipes just work, like this one.
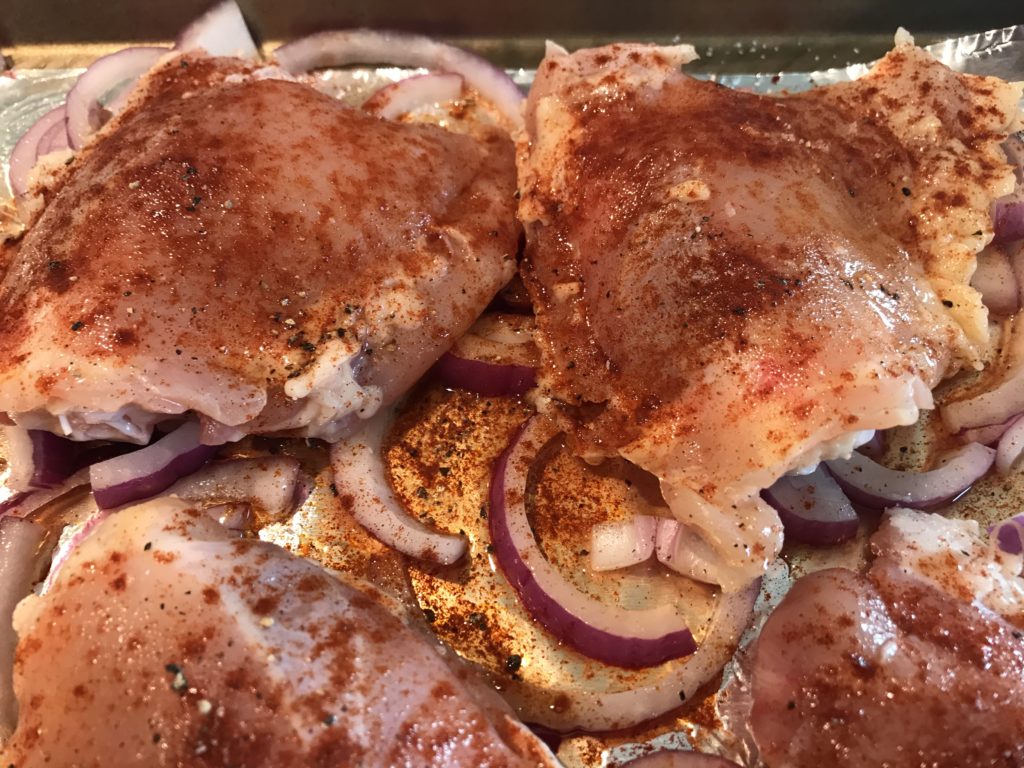
I changed the recipe a little because I can’t stand skin-on chicken so I removed that before baking. It’s completely up to you to leave it on or not. I also used red wine vinegar instead of sherry vinegar because that’s what I had.
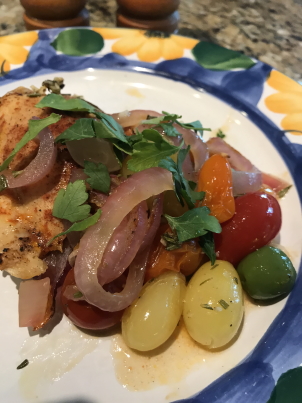
Slice up an onion and toss it in olive oil on a baking sheet. Throw some chicken on that and season with smoked paprika, salt, and pepper. Drizzle some vinegar over that and then roast in the oven for 15 minutes. No, not quite done yet.
Take your tomatoes, olives (yum), rosemary (try to use fresh…you’ll thank yourself), and garlic plus olive oil and more salt and pepper. Throw that onto the chicken and roast for another 15 minutes. Done. Seriously.
The rosemary and garlic make the chicken special, but the tangy olives makes it amazing. Then you have those fresh roasted tomatoes that reminds you it’s summer. It’s really an awesome meal you have. Serve it low carb or with some bread or pasta.
Toss the onions with 1/2 tablespoon of the oil on a large rimmed baking sheet. Arrange the chicken thighs on top and sprinkle them all over with the smoked paprika, salt, and pepper. Drizzle the vinegar onto the baking sheet, and then roast in the oven about 15 minutes.
Meanwhile, toss the cherry tomatoes, olives, rosemary and garlic with the remaining 1 tablespoon oil, a big pinch of salt and pepper to taste. Add the mixture to the baking sheet with the roasted chicken and continue to roast until the chicken is golden brown and cooked through, 10 to 15 minutes more.
Sprinkle with the parsley and serve the chicken with the vegetables and juices from the baking sheet.