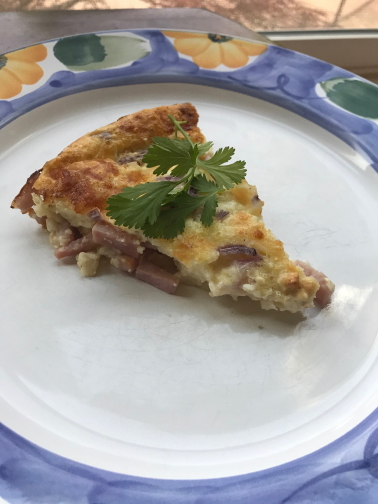
This recipe is embarrassingly simple. It’s like I’m cheating when I make it. If you don’t feel like cooking, make this. All you need is a cutting board, a bowl, and a pie pan. And a box of Bisquick. There. I admitted it.
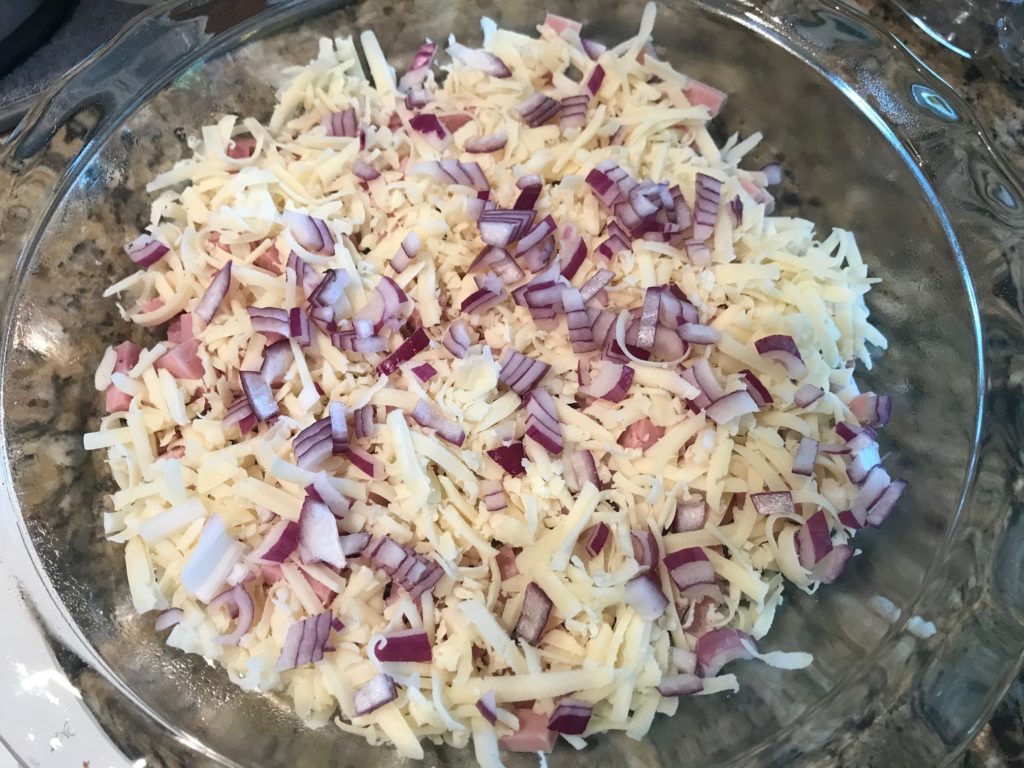
Here’s the simple formula. You need 1 1/2 cups of cooked meat with 1 1/4 cups of shredded cheese. I prefer ham and Swiss cheese, but you can easily substitute your favorite meat and cheese combination like ground beef and cheddar, cubed chicken and jack, and so on.
Grab your ingredients. Dice up some ham. Shred some cheese. Chop up some some onion. Throw this in a pie plate.
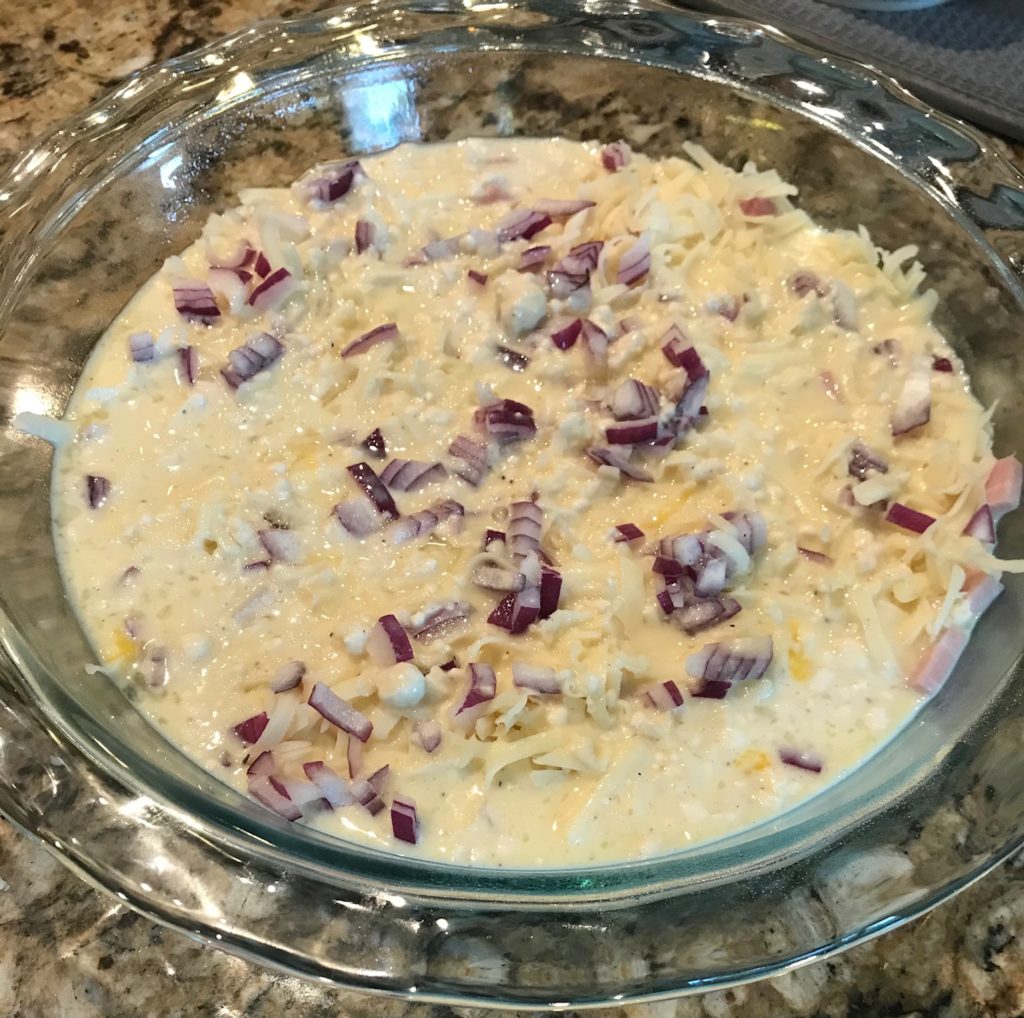
In a bowl, mix up your Bisquick mix, milk, and eggs. Season with salt and pepper. Pour this into the pie pan.
I’m blushing as I write this. This is barely cooking.
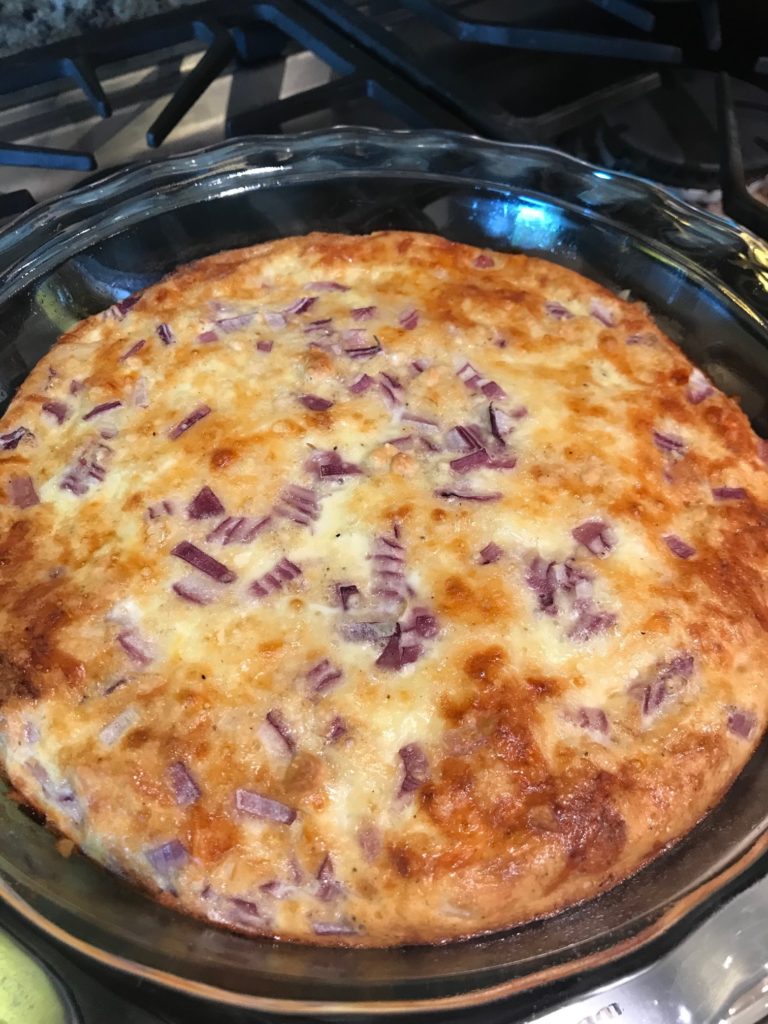
Stick it in the oven at 400F for about 35 minutes until barely browned. And that’s it.
This doesn’t sound very exciting, but sometimes you just want to use what you have in your pantry and call it done. Did I mention it’s delicious and you will make this over and over again?
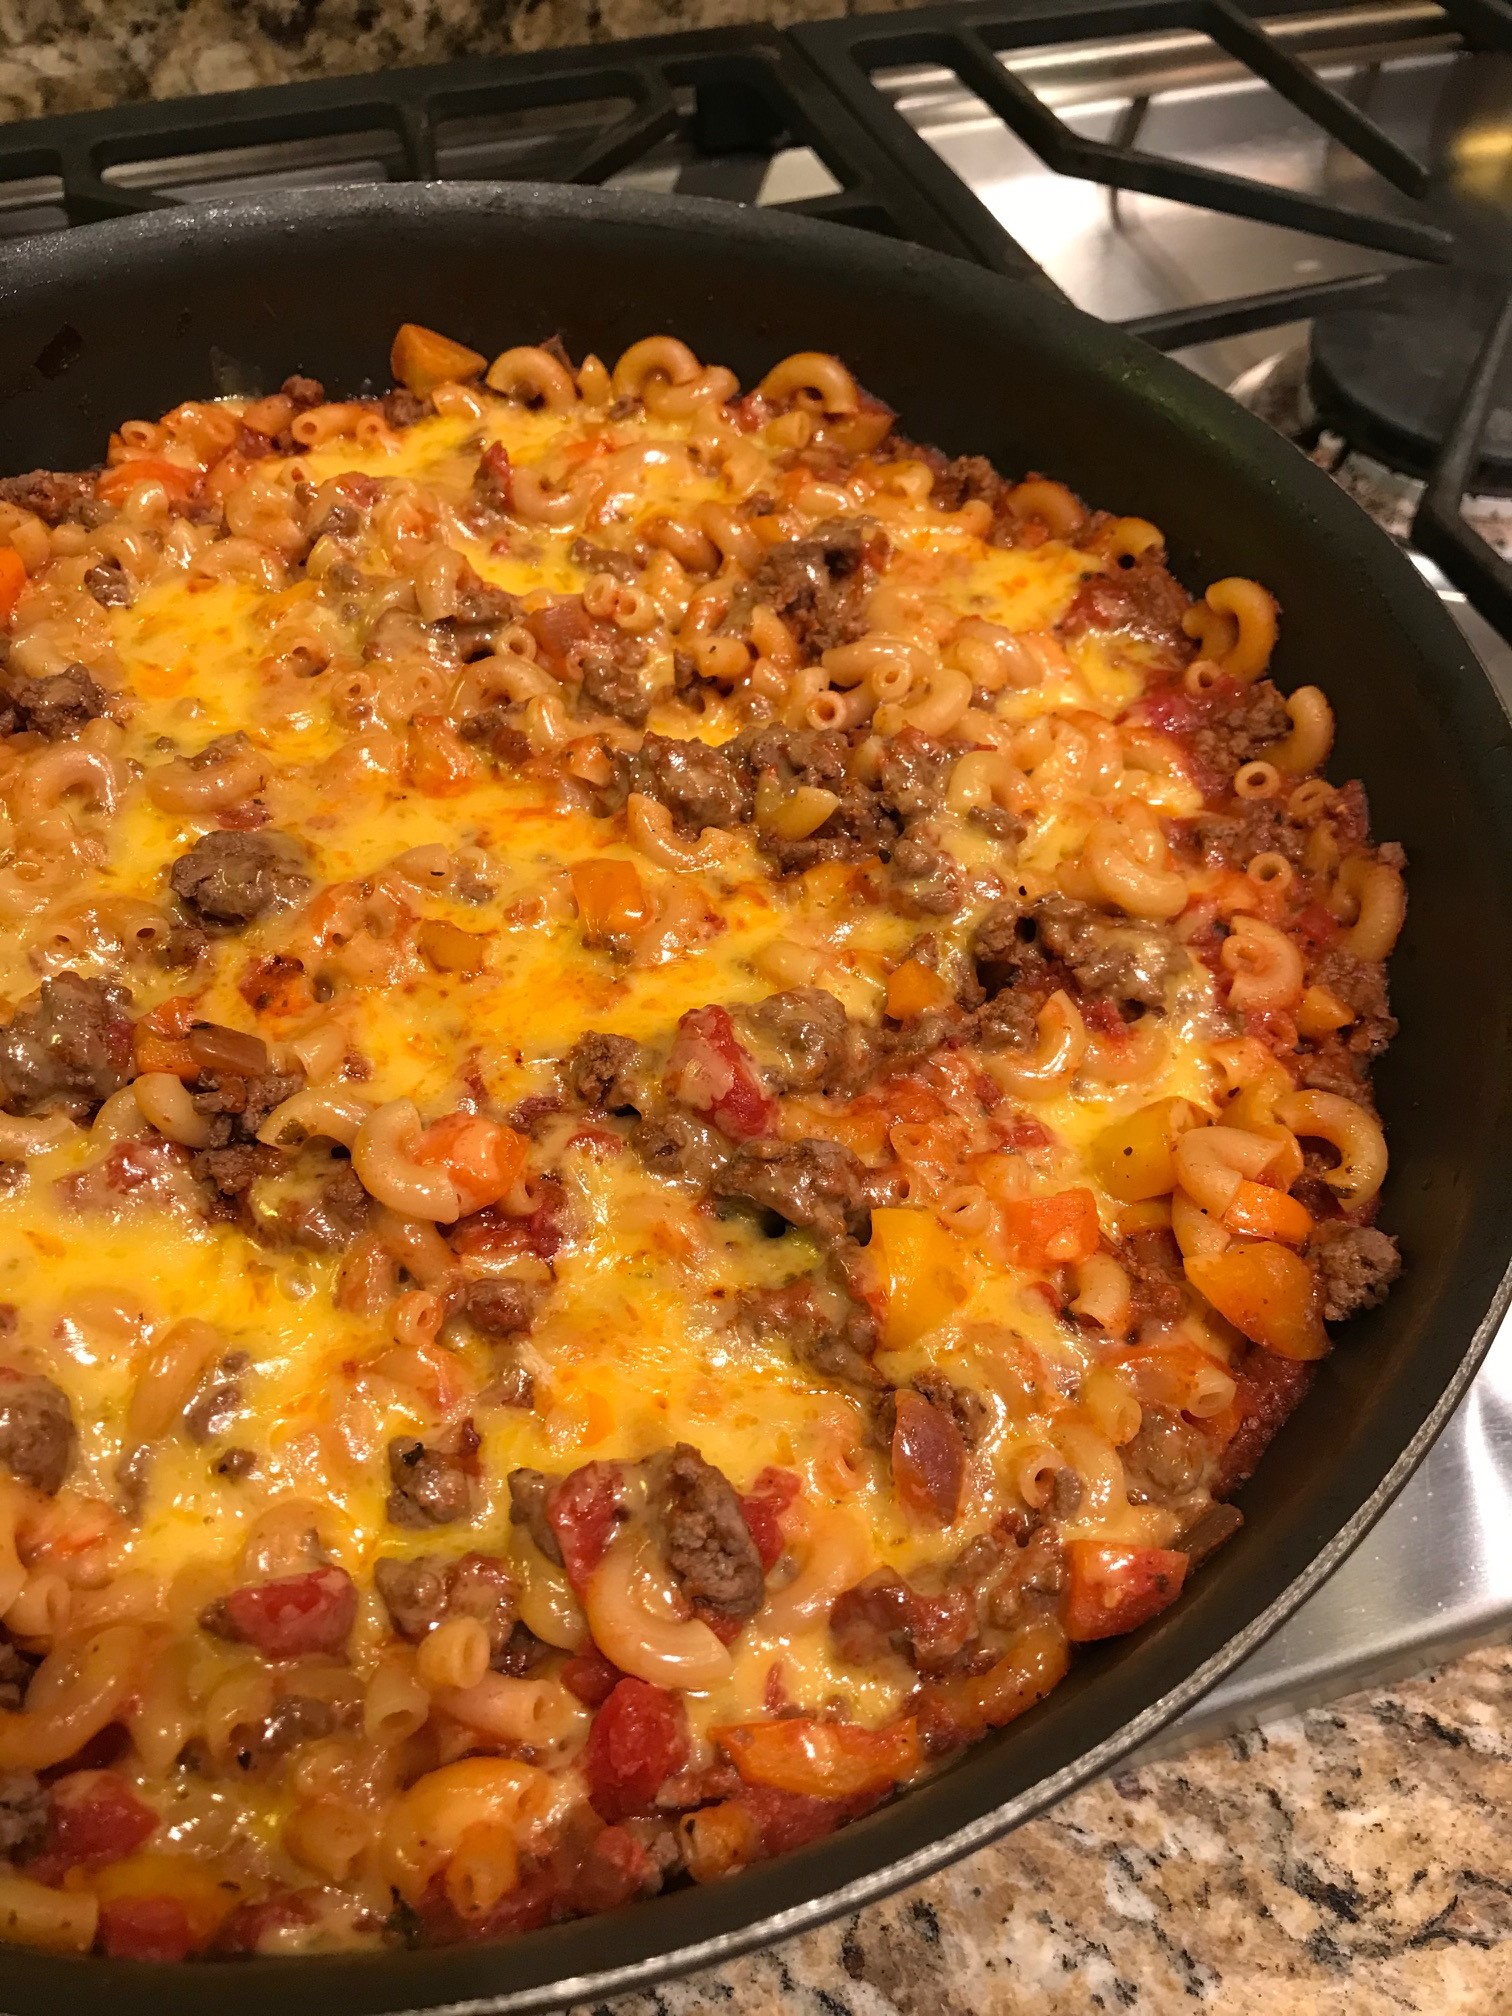
Pasta is one of the ultimate comfort foods that you can make in so many different ways. I like to make a big batch of meat sauce and freeze it for future spaghetti dinners. Or make a bunch of meatballs (Ina Garten’s are the best) and freeze those to serve with jarred sauce and noodles. Along those lines, Cheesy Beef and Macaroni is a delicious and easy weeknight pasta dinner that everyone will love. It’s definitely not fancy. This one skillet dish makes plenty so you can freeze some for another night or just have some leftovers for lunch. This recipe comes from the Kitchn, but I changed it a bit. First off, I split the recipe. You are welcomed to make the full recipe, but I have no idea how it would fit in the 12-inch skillet that the recipe specifies. In fact, I used a 12-inch skillet and it barely all fit.
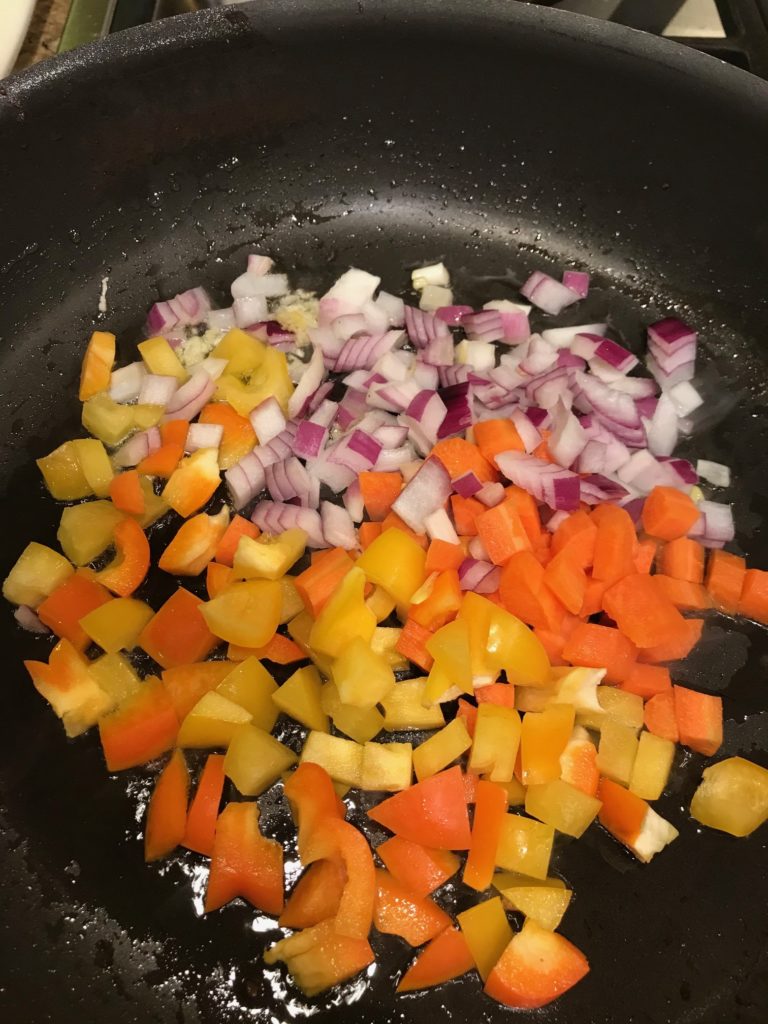
Gather all your ingredients. You need to chop up a few veggies: red pepper, carrots, and onions. Mince a few cloves of garlic. Grab ground beef, olive oil, a can of crushed tomatoes, and a bottle of Worcestershire sauce. Measure out your herbs and spices. Shred some cheese or buy it prepackaged. Pretty basic stuff.
Brown the ground beef, season with salt and pepper, drain the fat, and set it aside. A lot of recipes, including this one, don’t have you season the meat, but I think it’s a really important step. Salt brings out the flavor in meat. Use about a 1/2 teaspoon of salt per pound of meat. Throw in a little pepper to balance it out. I’ve found that if you season early on, you probably don’t need to add more salt later.
Add some oil and throw in your veggies and garlic. You’ll cook those until they are slightly soft for about 5 minutes. By the way, this is a sneaky way to add some veggies to your meal.
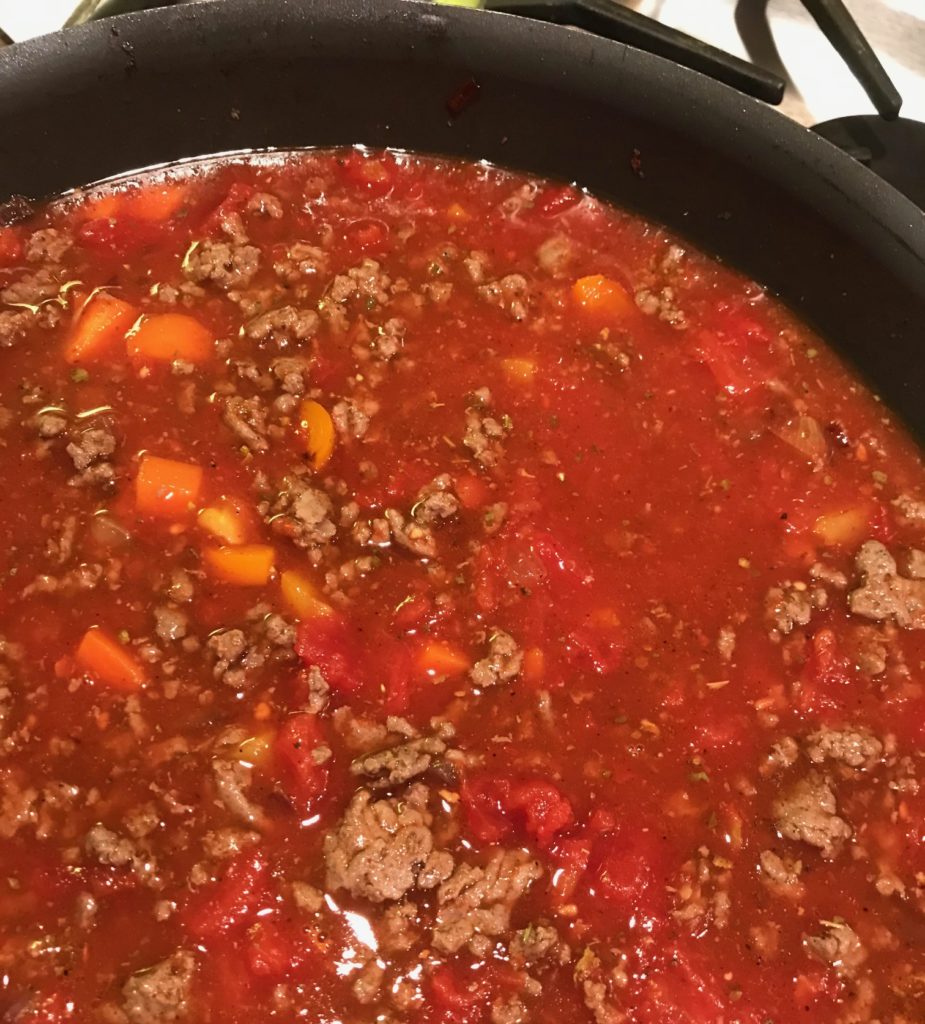
Put the beef back into the skillet and add your herbs, spices, tomatoes, Worcestershire sauce, and 2 cups of water. Let that come to a simmer.
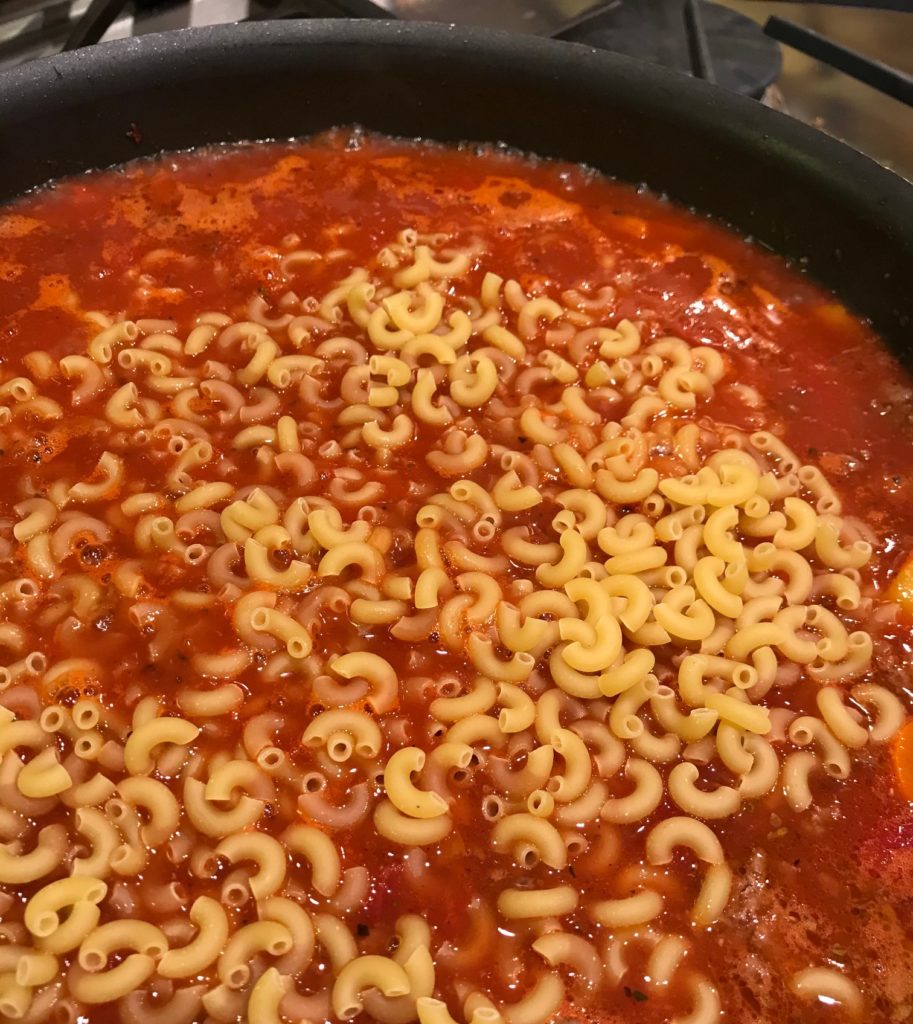
Once it’s simmering, add the pasta. I love this kind of meal because it doesn’t require you to boil the pasta separately. Oh, and let me remind you that I halved recipe and the ingredients are as close to the top as they should get. How ginormous was their skillet?!
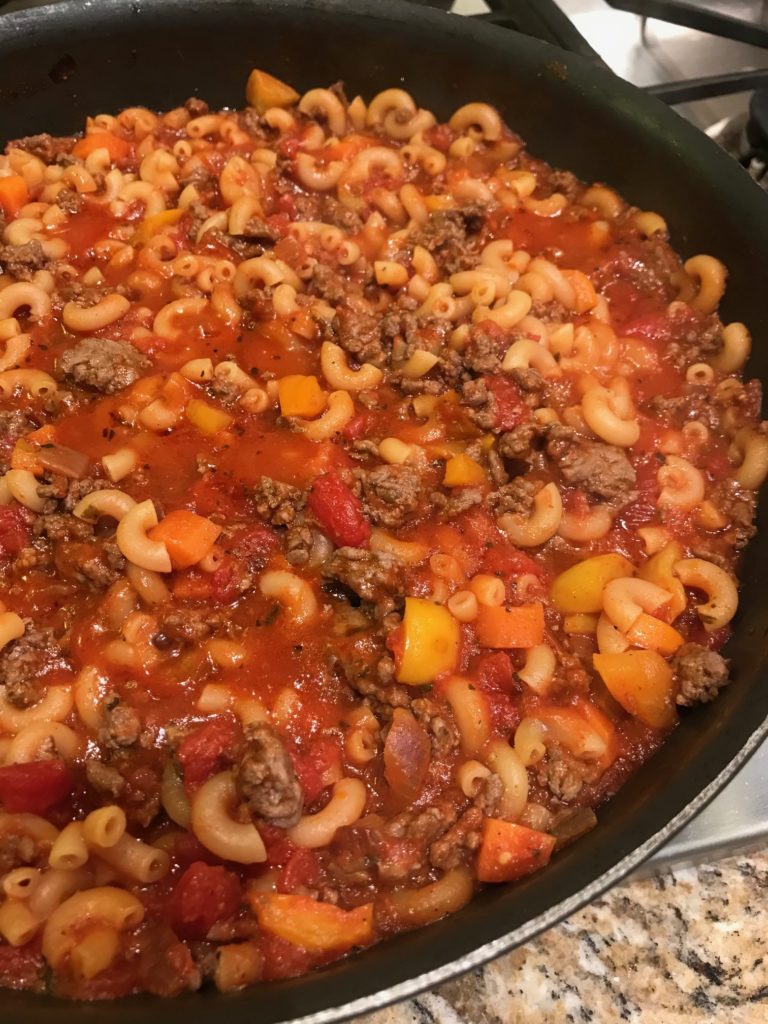
Cook until the pasta is tender, which is about 10 minutes.
Throw some cheese on top and let it melt. I used a cup of cheese. At the time I thought I could have used more because I was expecting this dish to be more cheesy like mac and cheese, but the amount of cheese was perfect.
And that’s it! Like I said, not fancy, but a little fancier than your typical spaghetti and red sauce. Super comforting and delicious. Really easy to make in no time. You only use one skillet so clean-up is quick. Win-win.
Heat a 12-inch skillet over medium-high heat. Add beef seasoned with 1/2 teaspoon salt and 1/4 teaspoon pepper. Crumble and cook until browned, about 5 minutes. Set beef aside.
Wipe out the skillet. Heat oil over medium heat. Add bell pepper, carrots, onion, and garlic. Cook until almost tender, about 5 minutes.
Return the beef to the skillet. Add the basil, oregano, tomatoes with their juice, Worcestershire sauce, chili powder, and 2 cups of water. Season with salt and black pepper to taste. Increase the heat to high and let come to a simmer.
Add elbow macaroni, stir, and cover the skillet. Reduce the heat to medium and let simmer, stirring occasionally, until the macaroni is tender and most of the liquid has been absorbed, for 8 to 10 minutes. Taste for seasoning, adding more salt and black pepper as necessary.
Sprinkle the cheese on top. Cover the skillet and cook until the cheese is melted, about 1 minute. Serve from the skillet.
The first time I made this recipe was an utter failure and I don’t think it was me. There. I said it. My son liked it, but I don’t know why. It was so dry. Where’s the sauce? Where’s the cheese? It was full of peas, which he managed to remove with the precision of a surgeon. This was pretty much the top worst five “edible” recipes I’ve ever made.
Determined to make it right, I changed the recipe so drastically that I don’t consider it to be the same recipe anymore. I struggle to give the original recipe owners any credit because it might actually be bad publicity for them. I hope that’s not too harsh. My Catholic guilt is seeping through about the whole affair.
Ok, I’m over it. Make this. It’s super tasty and an easy weeknight dinner.
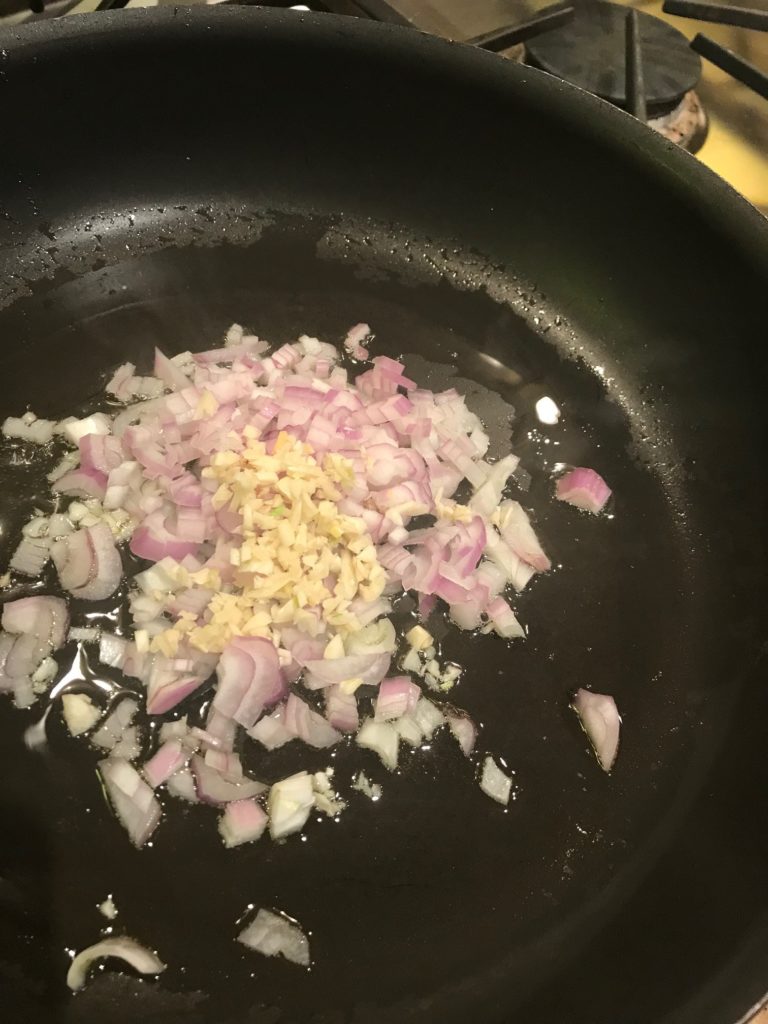
First prep your ingredients like mincing up a shallot and a few cloves of garlic. Dice your ham into bite-sized cubes. Shred your Swiss cheese. Sneak a few bits for yourself.
Heat up a pan with some olive oil, and cook the shallot and garlic until soft.
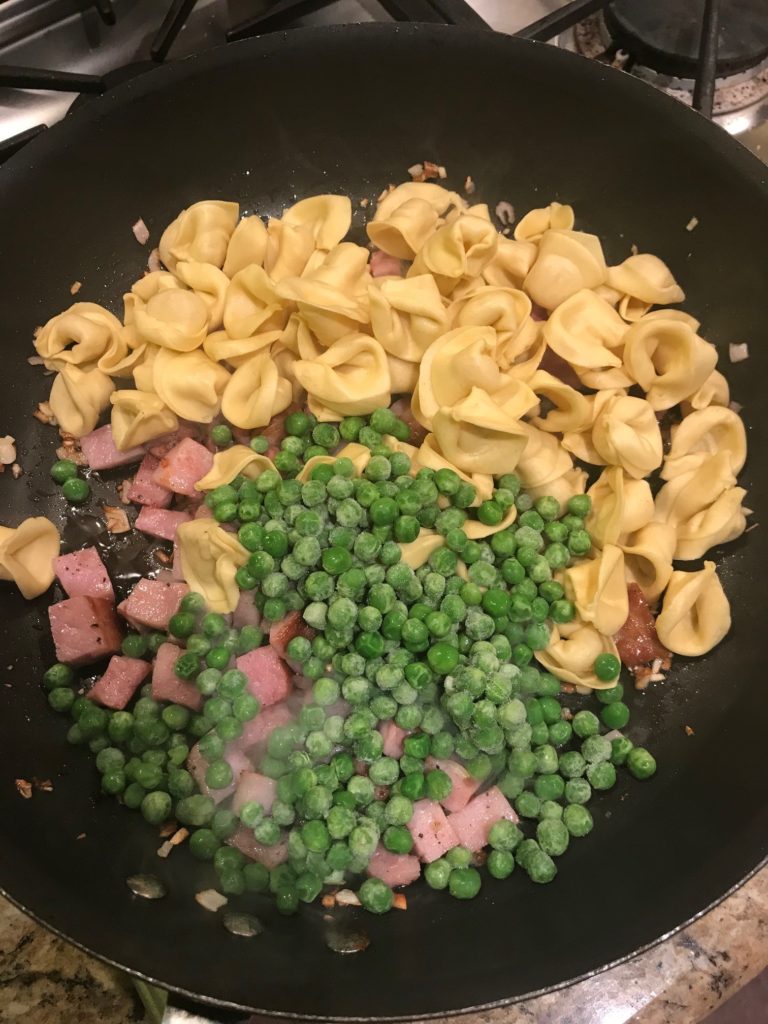
Add ham and cook for several minutes, stirring half way through, until browned on a couple sides. Add some pepper, and then add fresh tortellini and frozen peas.
The original recipe didn’t specify fresh tortellini and had you use twice as much. They also called for 2 cups of peas. I love peas, but way too many peas.
After you’ve stirred it up a bit, add broth and cover. The original recipe called for less broth and not cover. Adding sufficient liquid and covering it is essential to making sure the tortellini is cooked through.
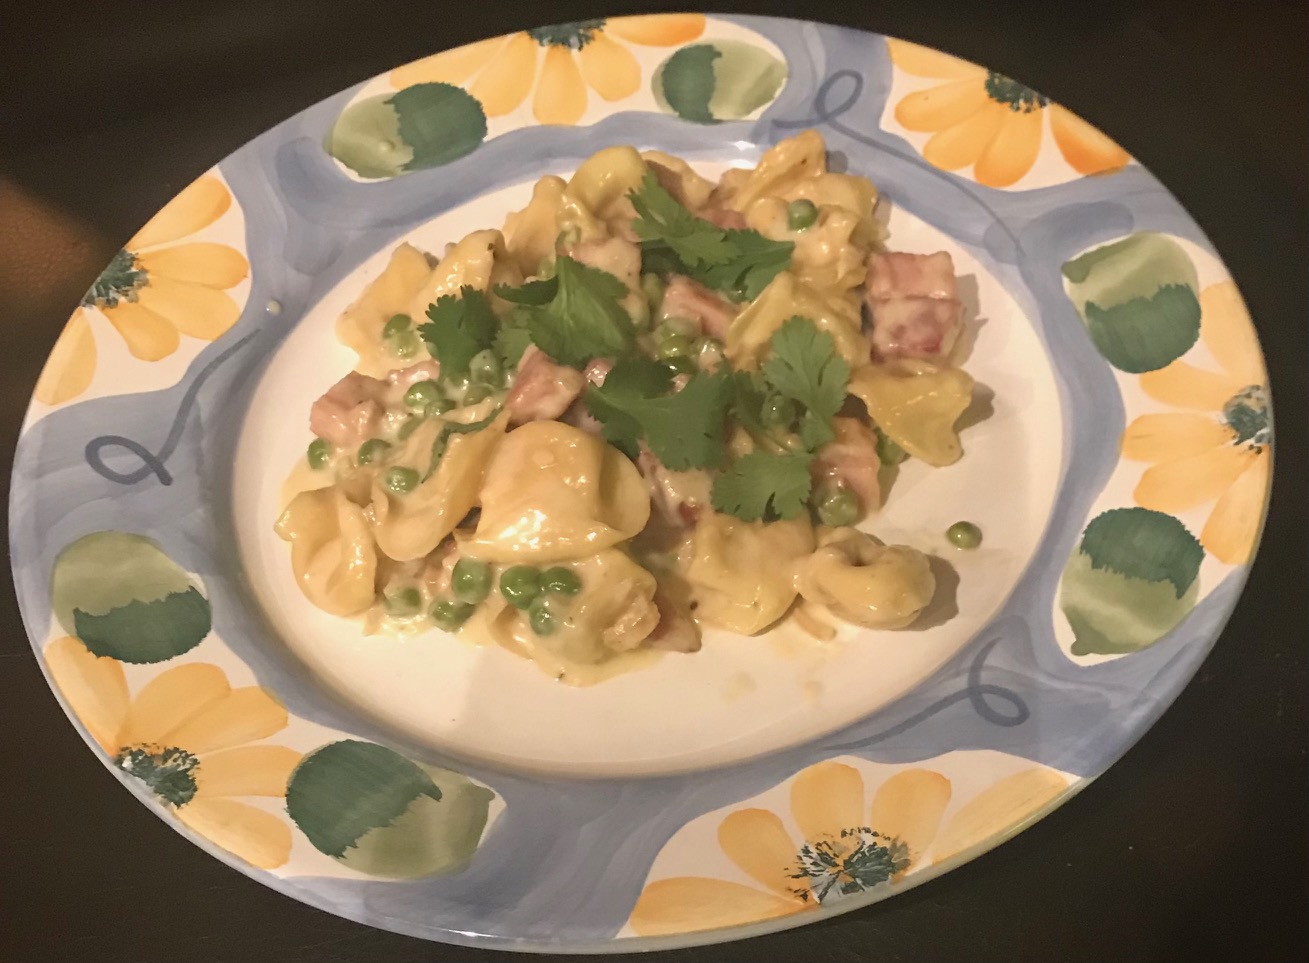
After this mixture has simmered for about 10 minutes (cook for however long your tortellini package tells you to cook it for), add cream and cheeses.
Here was another major flaw of the original recipe. Not enough cream and cheese. I know. Start your diet tomorrow. But seriously, if you want a cheesy sauce, you have to do it right.
After it’s all mixed up, serve and garnish with a little parsley to make it look pretty.
My family agreed this was 100% better than the first attempt. I’m pleased and you will be too.
In a large skillet over medium-high heat, heat olive oil. Add shallot and garlic. Cook until soft, 3 minutes. Add ham and cook until browned, stirring once half way through, 6 minutes.
Season with pepper. Add fresh tortellini and frozen peas. Stir until mixed and then add chicken broth. Simmer until tortellini are al dente, about 10 minutes (or what the package recommends).
Add heavy cream and both cheeses. Stir until creamy. Serve and garnish with parsley.
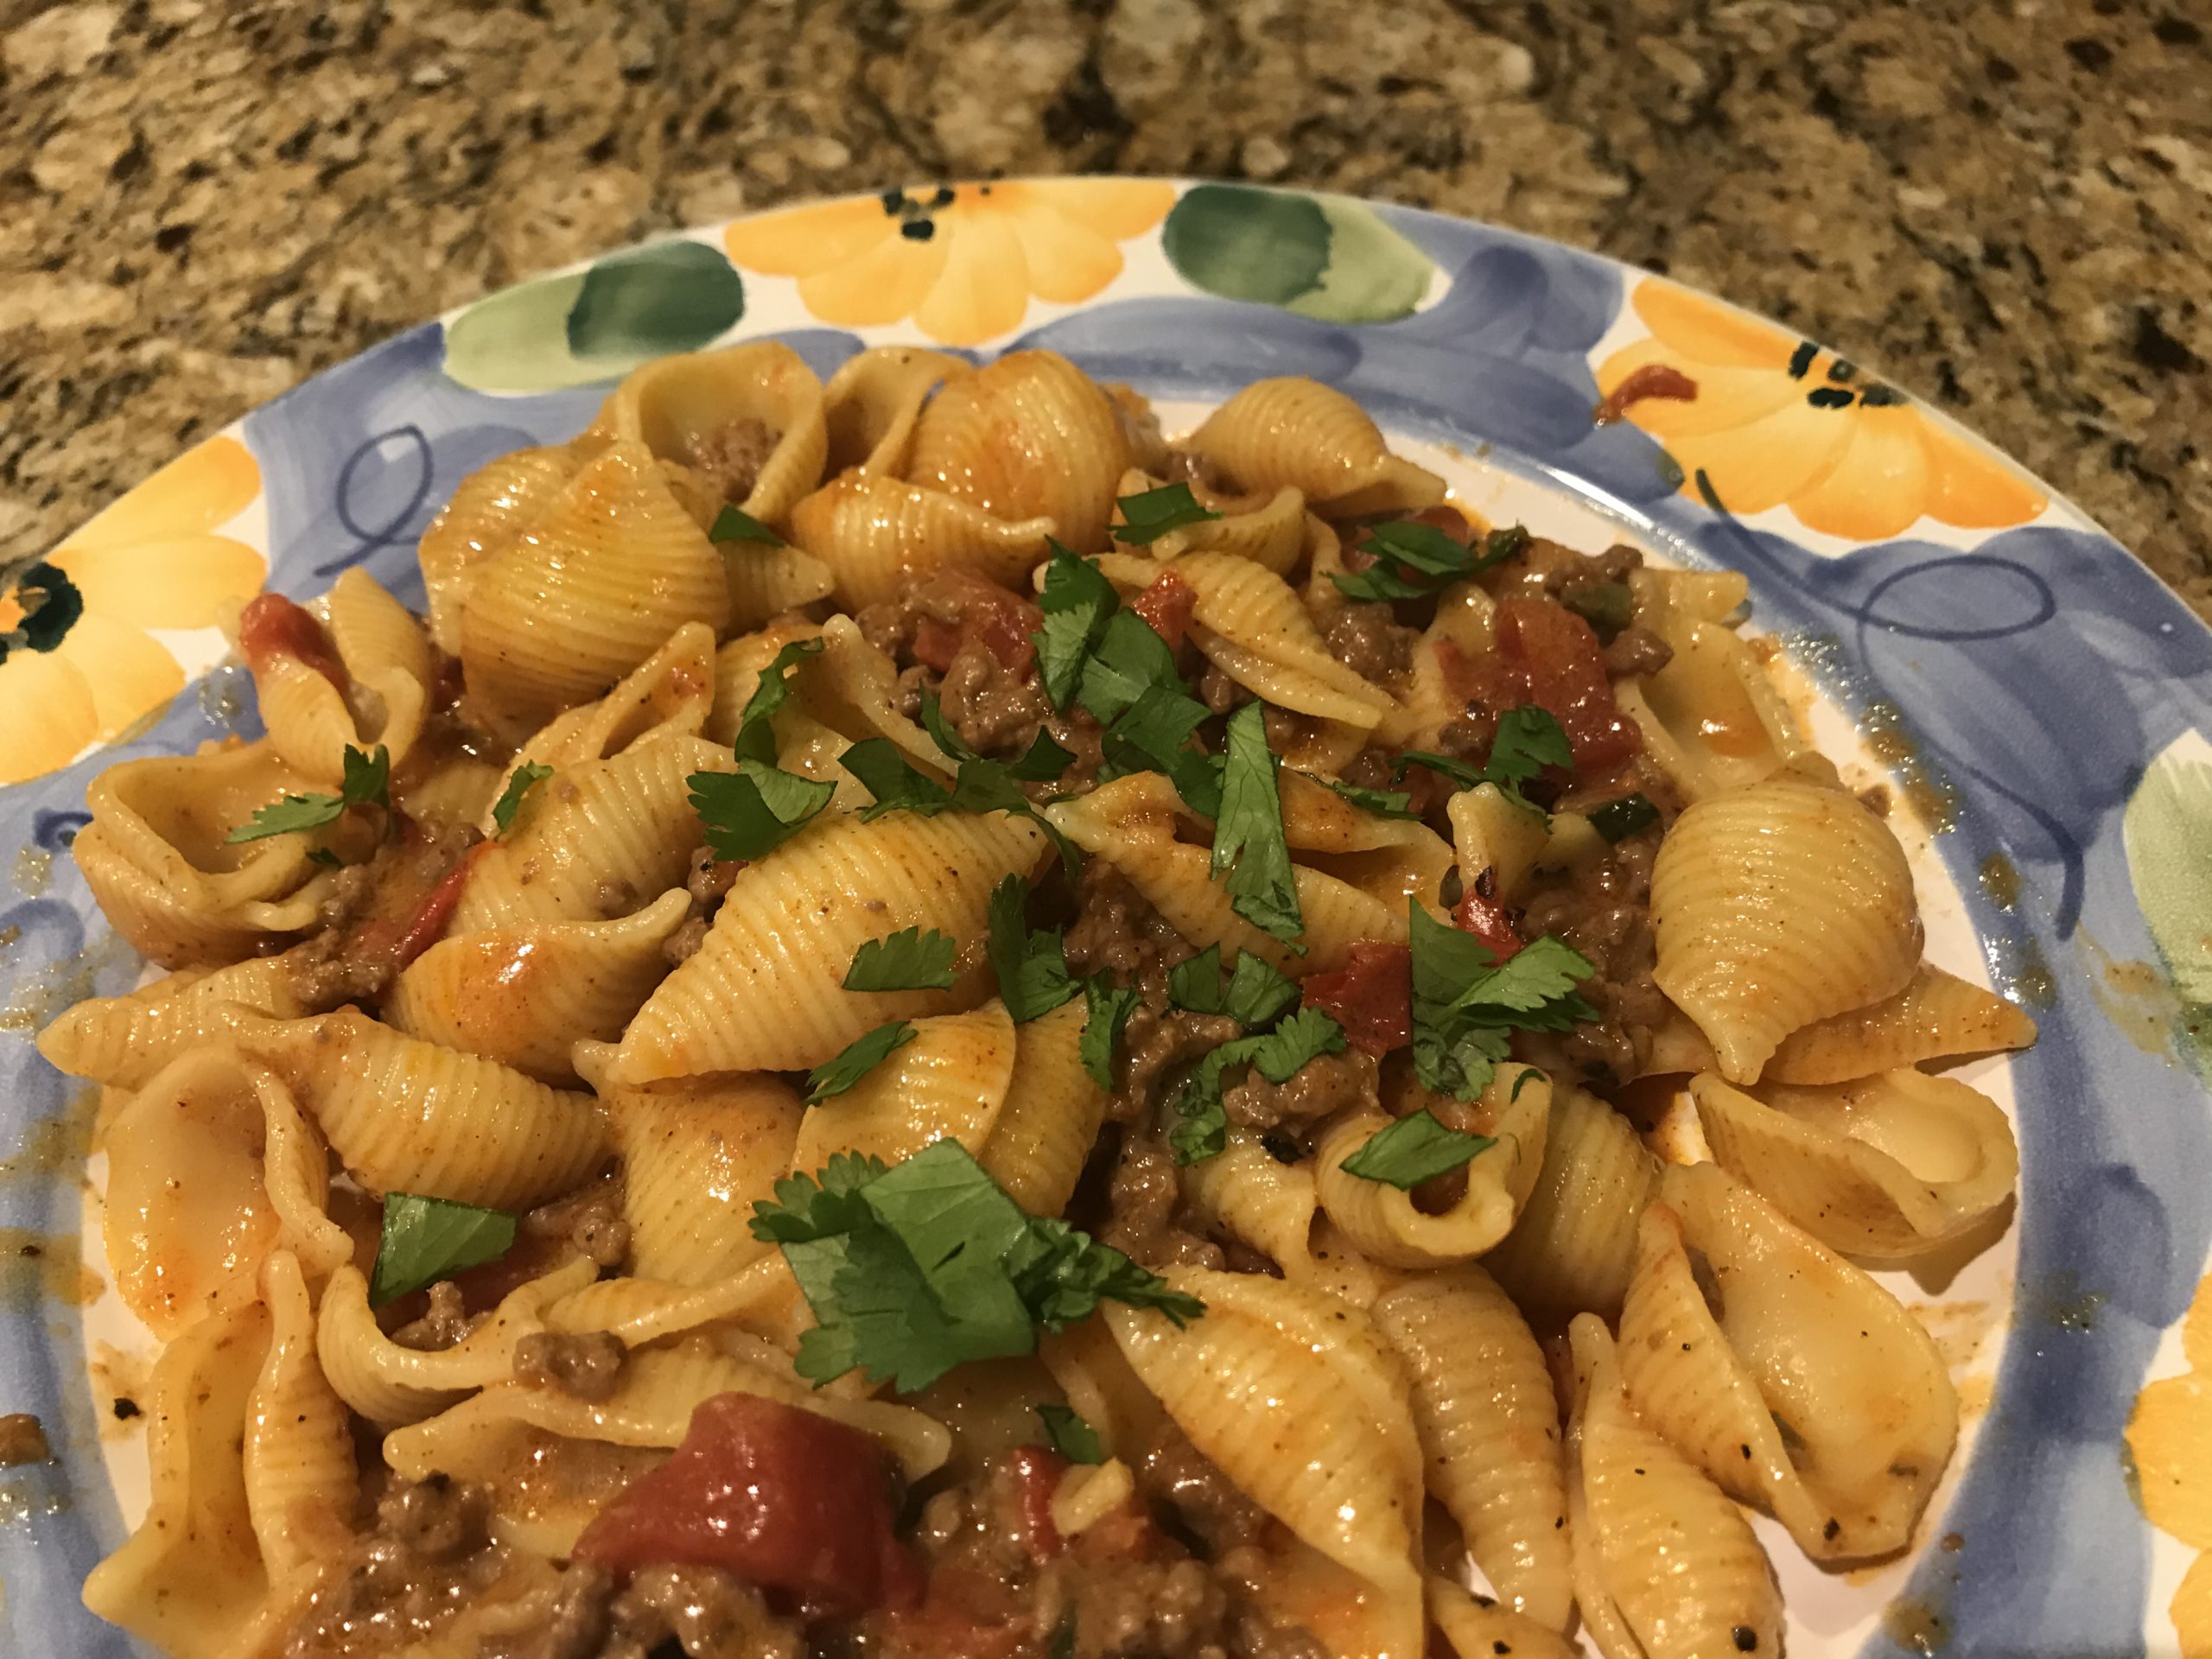
Last week, I combined two wonderful foods: taco and soup. Today, I’m sharing a taco + pasta recipe from Delish. I’m starting to see a theme here. Maybe next week I’ll invent taco ice cream. Kidding. That sounds awful.
At first I thought this was a mac n cheese recipe with taco meat, but far from it. It’s definitely cheesy, but the main star is still the pasta sauce, which happens to have a lot of cheese in it. Better yet, it’s absolutely delicious and super easy to make. You seriously can whip this up in 30 minutes on a weeknight and everyone will love it. What’s not to love? There’s cheese. There’s taco-ness. There’s pasta. Win-win.
First, boil some pasta until al dente, and it’s really important not to overcook your pasta because you’ll cook the pasta some more in the sauce later. When you drain the pasta, be sure to save some of the pasta water too. You can use any type of pasta. The original recipe uses macaroni, but lately, I’ve been using pasta shells because it has pockets to trap the sauce inside and I like that.
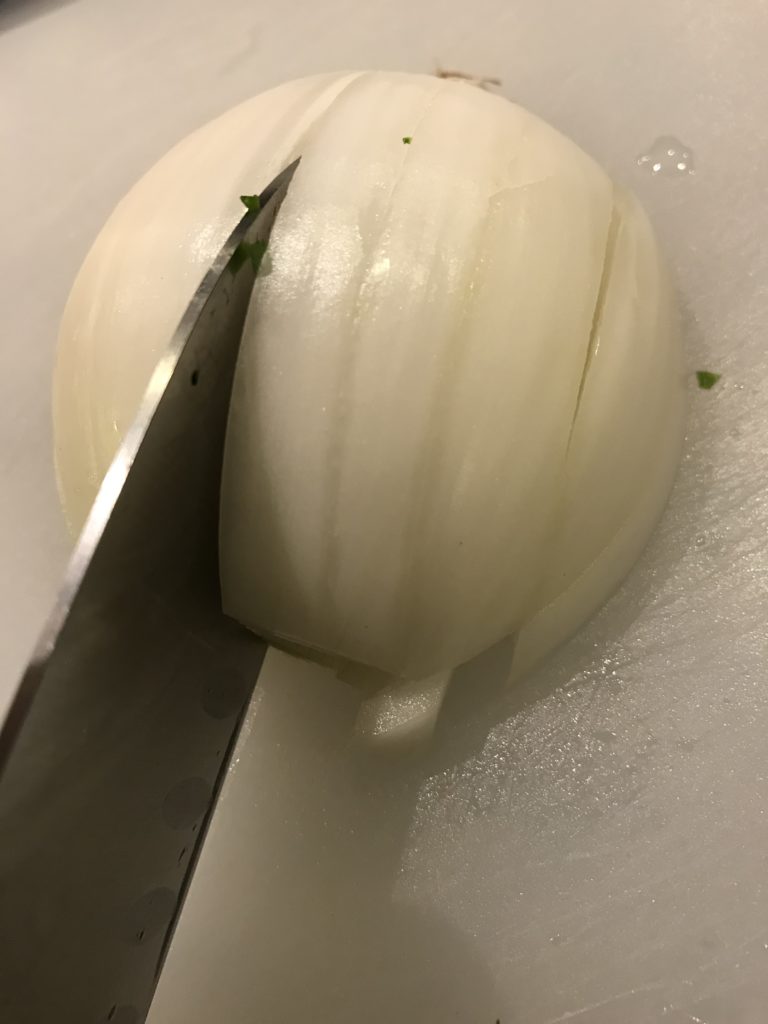
Now for a little lesson on chopping an onion. If you know about this trick, skip ahead. Otherwise, this will be life changing for you. I don’t know what I used to do before other than nick my fingers and end up with unequal pieces of stuff. Unfortunately, the onion will still make you cry, but let’s just pretend they are tears of joy.
Cut off the non-root end of the onion and then peel the skin off. Next, cut it in half through the root. Flat side down, cut in half towards the root.
Now, slice the onion lengthwise.
Finally, cut across and admire your handiwork.
After you’re done patting yourself on the back for you perfectly chopped onion pieces, you can apply your new trick to a jalapeño. If you want a spicier dish, include the membranes when you chop up the pepper.
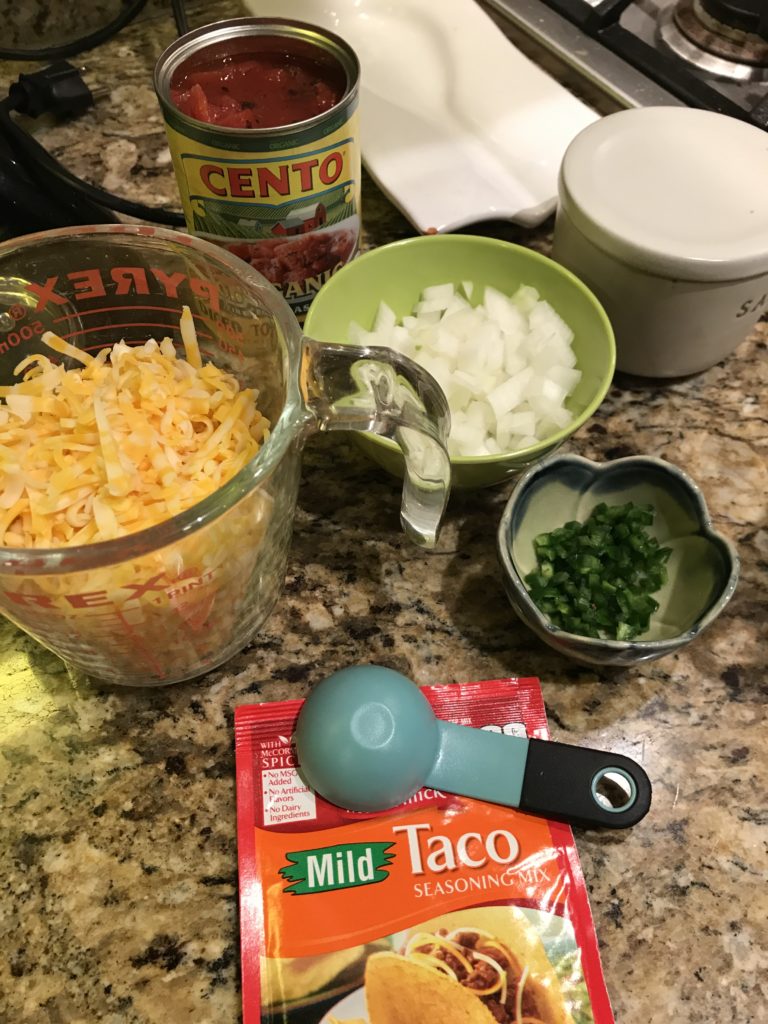
Gather the rest of the ingredients and arrange them next to the stove you can dump them in the pan as you go.
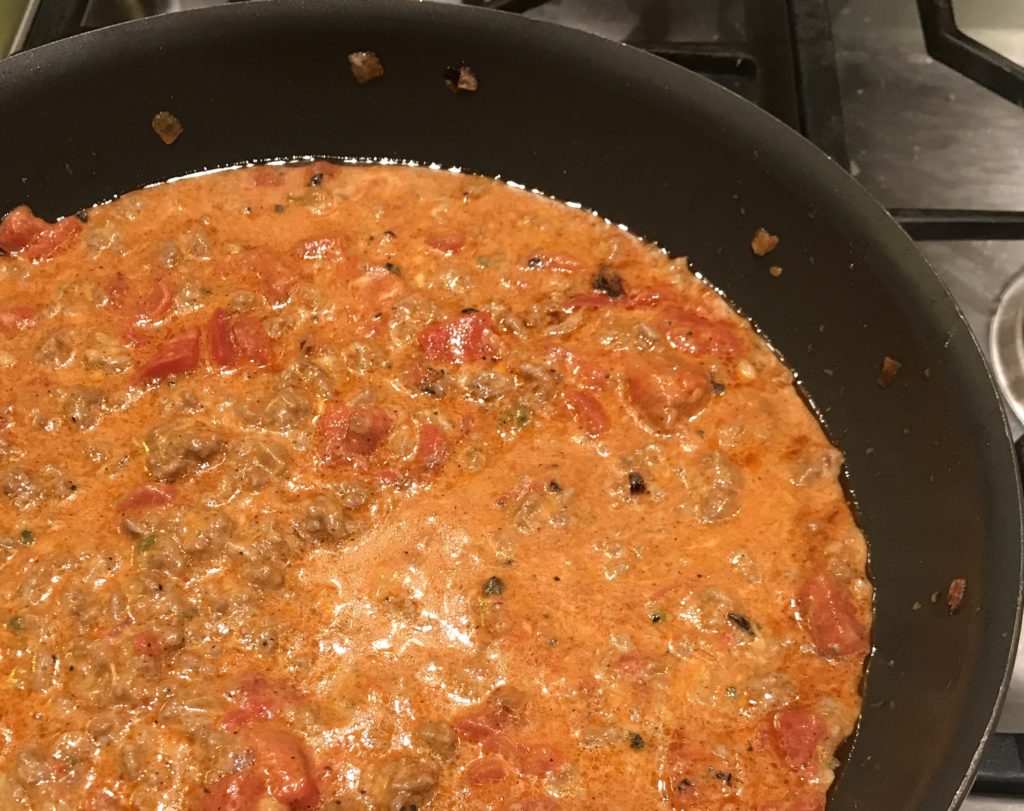
Saute the onion and jalapeño. Add your ground beef. When that’s cooked, throw in your taco seasonings. Next, add the canned tomatoes. Fire-roasted are best, but you can use any type of canned diced tomatoes. Hopefully your pasta is done by now because you need some of that reserved pasta water too.
Drop in the grated cheese and let it melt. Stir.
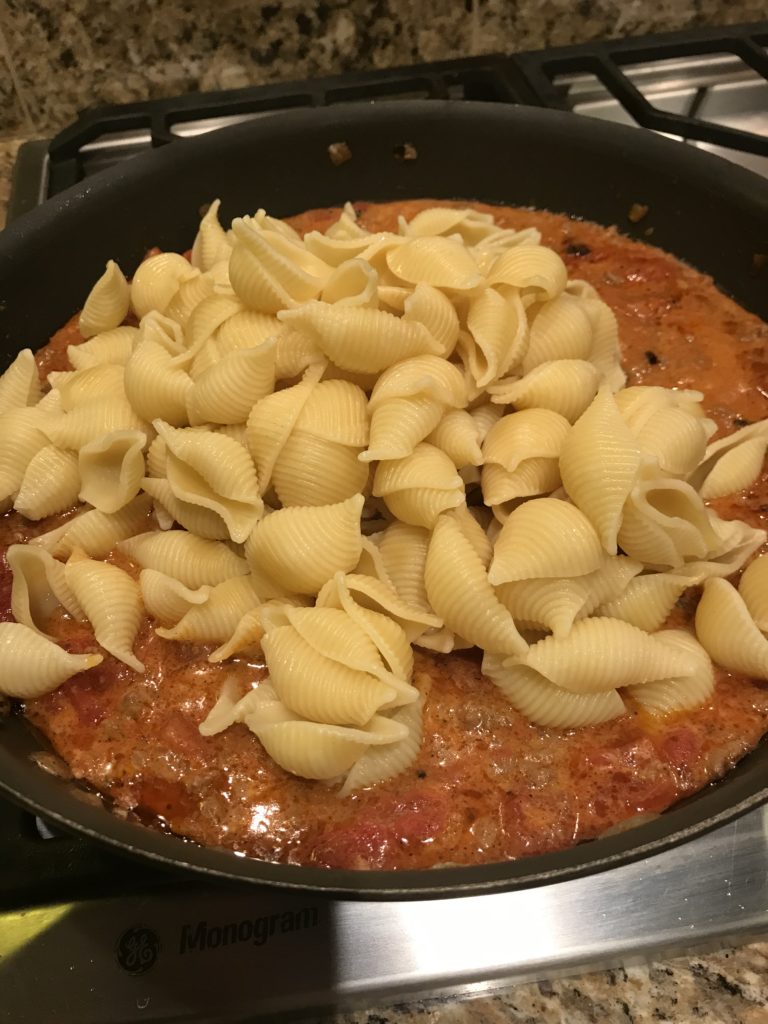
Dump the cooked pasta in.
Stir it all up until the pasta is well coated and combined with the sauce. Dish it out, garnish with cilantro, and eat!
As you can see, it’s not mac and cheese, but your familiar and comforting pasta and meat sauce, enhanced with a bunch of cheese and taco seasonings. It makes great leftovers, but you might not have any. Instead, you’ll breakdown, have seconds, and soon it’ll be all gone.
Boil a large pot of water. Salt the water and then add the pasta. Cook according to package directions until al dente. Drain, saving at least 1/4 cup of the pasta water. Return pasta to the pot.
In a large skillet over medium heat, heat olive oil. Add onion and season with salt. Cook until tender, 5 minutes.
Add jalapeño. Cook 2 minutes more.
Add ground beef and cook until no longer pink, 6 minutes. Add taco seasoning. Drain fat.
Add canned tomatoes and 1/4 cup reserved pasta water. Stir.
Add cheese. Let it melt in while stirring occasionally for about 2 minutes.
Add cooked pasta and toss until completely combined.
I love Parmesan chicken. It’s one of my favorites, but one that I’ve never made well. I usually end up ordering it at restaurants, wishing I could replicate it at home. I think I figured out the problem. I had the wrong recipe.
The two biggest flaws: breading is soggy and doesn’t stick. Other recipes have you dip the chicken in a wash of egg or milk, roll it around in bread crumbs with Parmesan cheese, and then hope all would go well. Wrong. There’s a lot of science behind this recipe, but if followed, you’re guaranteed to make perfectly breaded, crispy chicken with cheesy goodness on the outside, and moist chicken on the inside.
First, let’s thank Ina Garten, the Barefoot Contessa, for this recipe. She makes the best food. Fancy yet comforting. Her recipes are solid and reliable. BTW, I split the recipe because it’s just the three of us, and find that reheating the leftovers isn’t that successful. You lose the crunchiness that makes it so good.
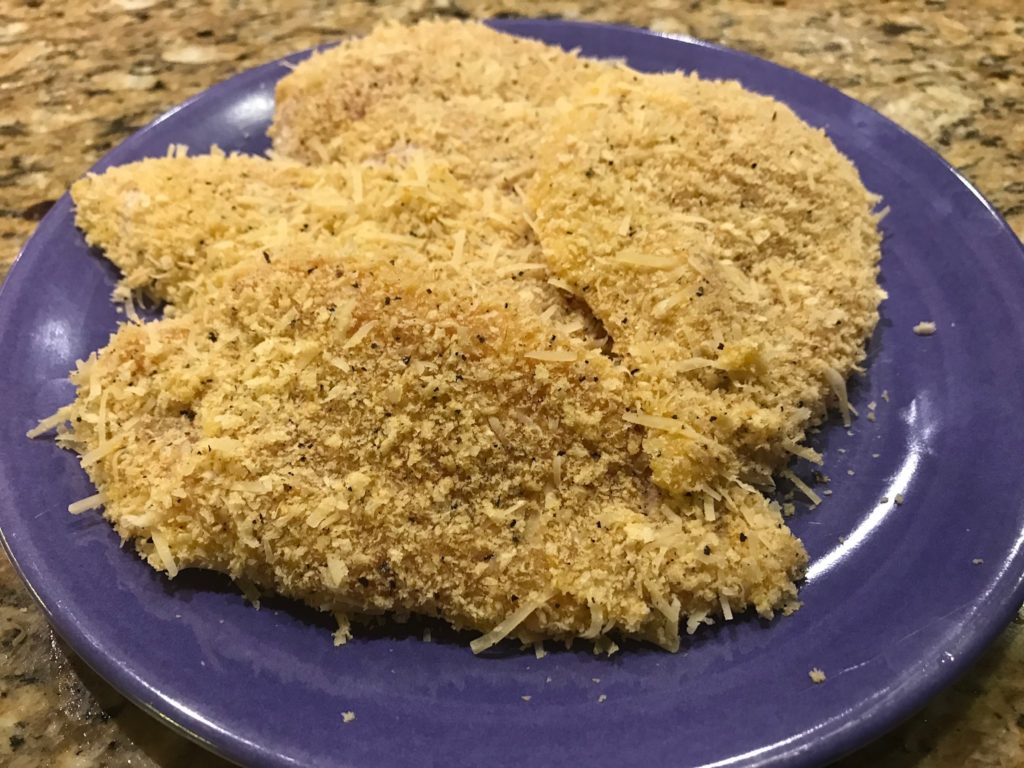
Purchase thin chicken breasts or pound them yourself to about 1/4-inch thick. I like to cover the chicken with wax paper and pound it with a mallet. The wax paper protects the chicken from tearing., but frankly, if I can find chicken already sliced thin, I buy that instead.
You’ll need three dishes to coat the chicken. One reason why the breading falls off is because most recipes skip the important flour dredge. This is a mixture of flour, salt, and pepper. I think it helps the egg wash, which you dip the chicken into after the flour, stick to the chicken, which you absolutely need for the last layer, a mixture of dry bread crumbs and cheese. Each layer builds on each other. When you are done coating your chicken, everything should stick to the chicken rather than slide off. This method is fool-proof, and I mean that in the best possible way. I would be the first to screw it up. And with other recipes, I have. Many times over.
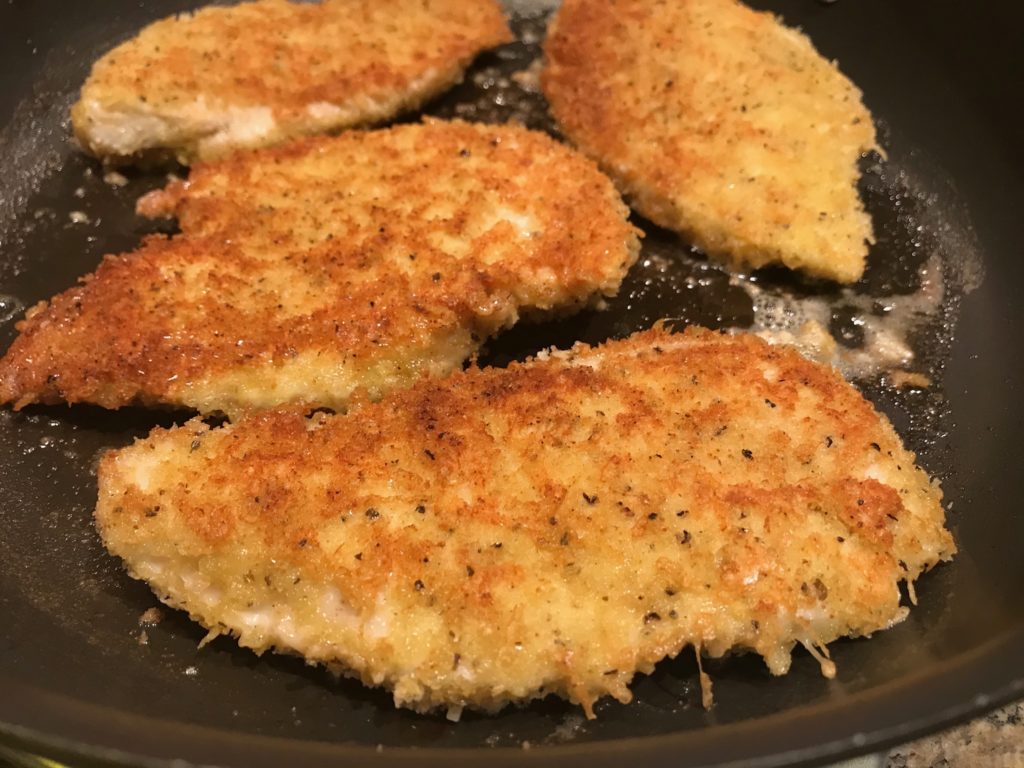
When you cook it, you don’t need a super hot pan. Heat up the pan with butter and olive oil to medium-low heat. The lower heat setting helps the chicken brown nicely while not drying it out. Cook on each side for about 2-3 minutes. Carefully, try lifting a corner of the chicken. If the chicken sticks to the pan, do not flip it over! Wait another 30 seconds and try again. Be patient and gentle. When it looks like the chicken is not glued to the pan, slip the spatula under the chicken and flip it in one motion. Sometimes I use my fingers to guide and balance it to the correct side. Now would be a good time to show you a video of this. If only I had such technology. Just try to imagine it instead. If you can’t, just flip it. It’s all good.
When it’s all toasty brown on one side, it should look gorgeous like this.
I’m pretty proud of myself here. It’ll be this way for you too.
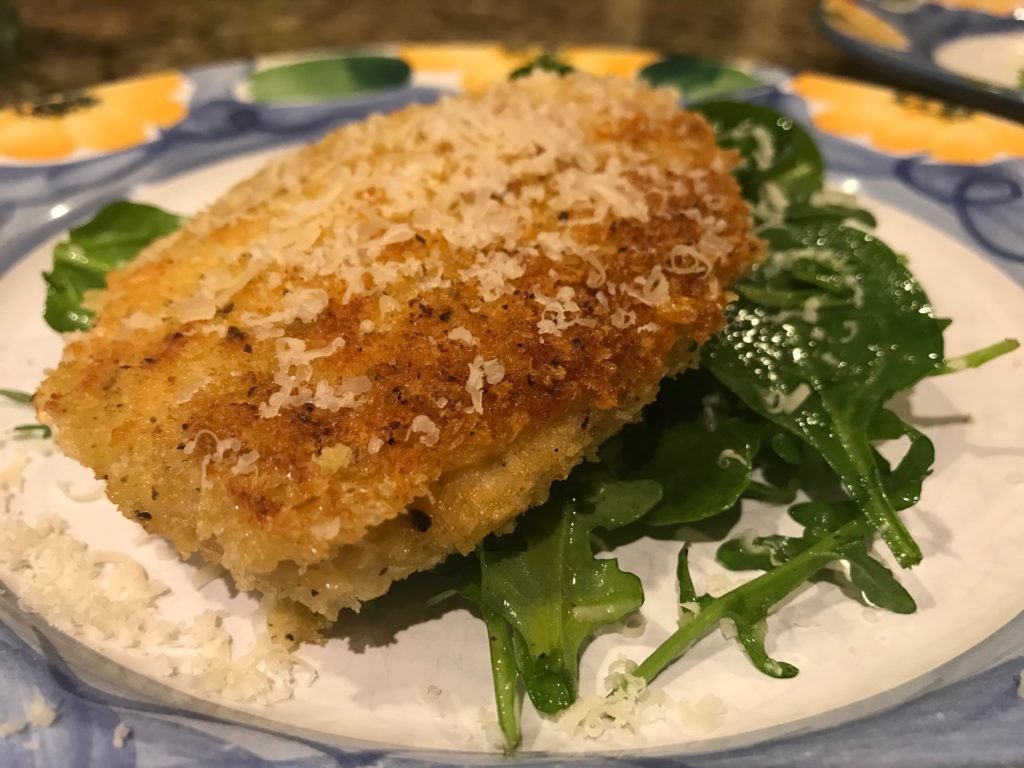
Meanwhile, make the lemon vinaigrette for the mixed green salad. I don’t think a salad is really necessary and found the dressing to be a bit too acidic for my taste, but my husband loved it. It does compliment the richness of the cheese, but I’m a ranch girl. I would put ranch on everything if I could.
When the chicken is golden on both sides, it’s ready. I placed the chicken over the greens, but the recipe instructs you to place the greens on the chicken. Either way. I wanted my greens a little wilted so under the chicken they went. I shredded plenty of extra Parmesan cheese on top. Like ranch, one cannot have too much cheese.
This makes a super impressive, fancy looking dinner that really didn’t take much time at all.
1/2cupfreshly shredded Parmesan cheeseplus extra for serving
2tablespoonbutter
2tablespoonolive oil
salad greens for 6washed and spun dry
Lemon Vinaigrette
1/4cupfreshly squeezed lemon juice
1/2cupolive oil
1/2teaspoonkosher salt
1/4teaspoonblack pepper
Method
Using a meat mallet, pound the chicken breasts until they are 1/4 inch thick.
Combine the flour, salt, and pepper on a dinner plate. On a second plate, beat the eggs with 1 tablespoon of water. On a third plate, combine the bread crumbs and 1/2 cup grated Parmesan cheese. Coat the chicken breasts on both sides with the flour mixture, then dip both sides into the egg mixture, and dredge both sides in the bread-crumb mixture, pressing lightly.
Heat 1 tablespoon of butter and 1 tablespoon of olive oil in a large sauté pan. Cook 3 chicken breasts on medium-low heat for 2 to 3 minutes on each side, until cooked through and golden. Remove from pan and set aside, covered to keep them warm. Add more butter and oil to the pan, and cook the rest of the chicken breasts.
Make the vinaigrette in a small bowl by whisking together the juice, olive oil, salt, and pepper. Toss the salad greens with vinaigrette.
To serve, place a mound of salad on each plate and then place a chicken breasts on each salad. Shredded additional Parmesan cheese on top.
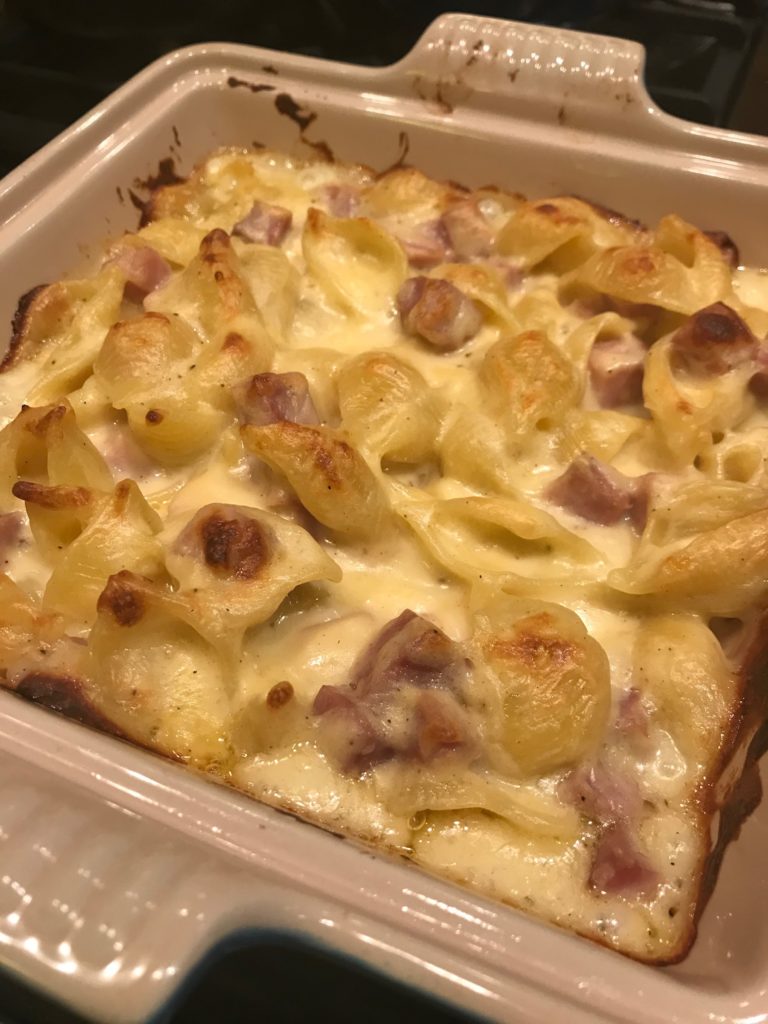
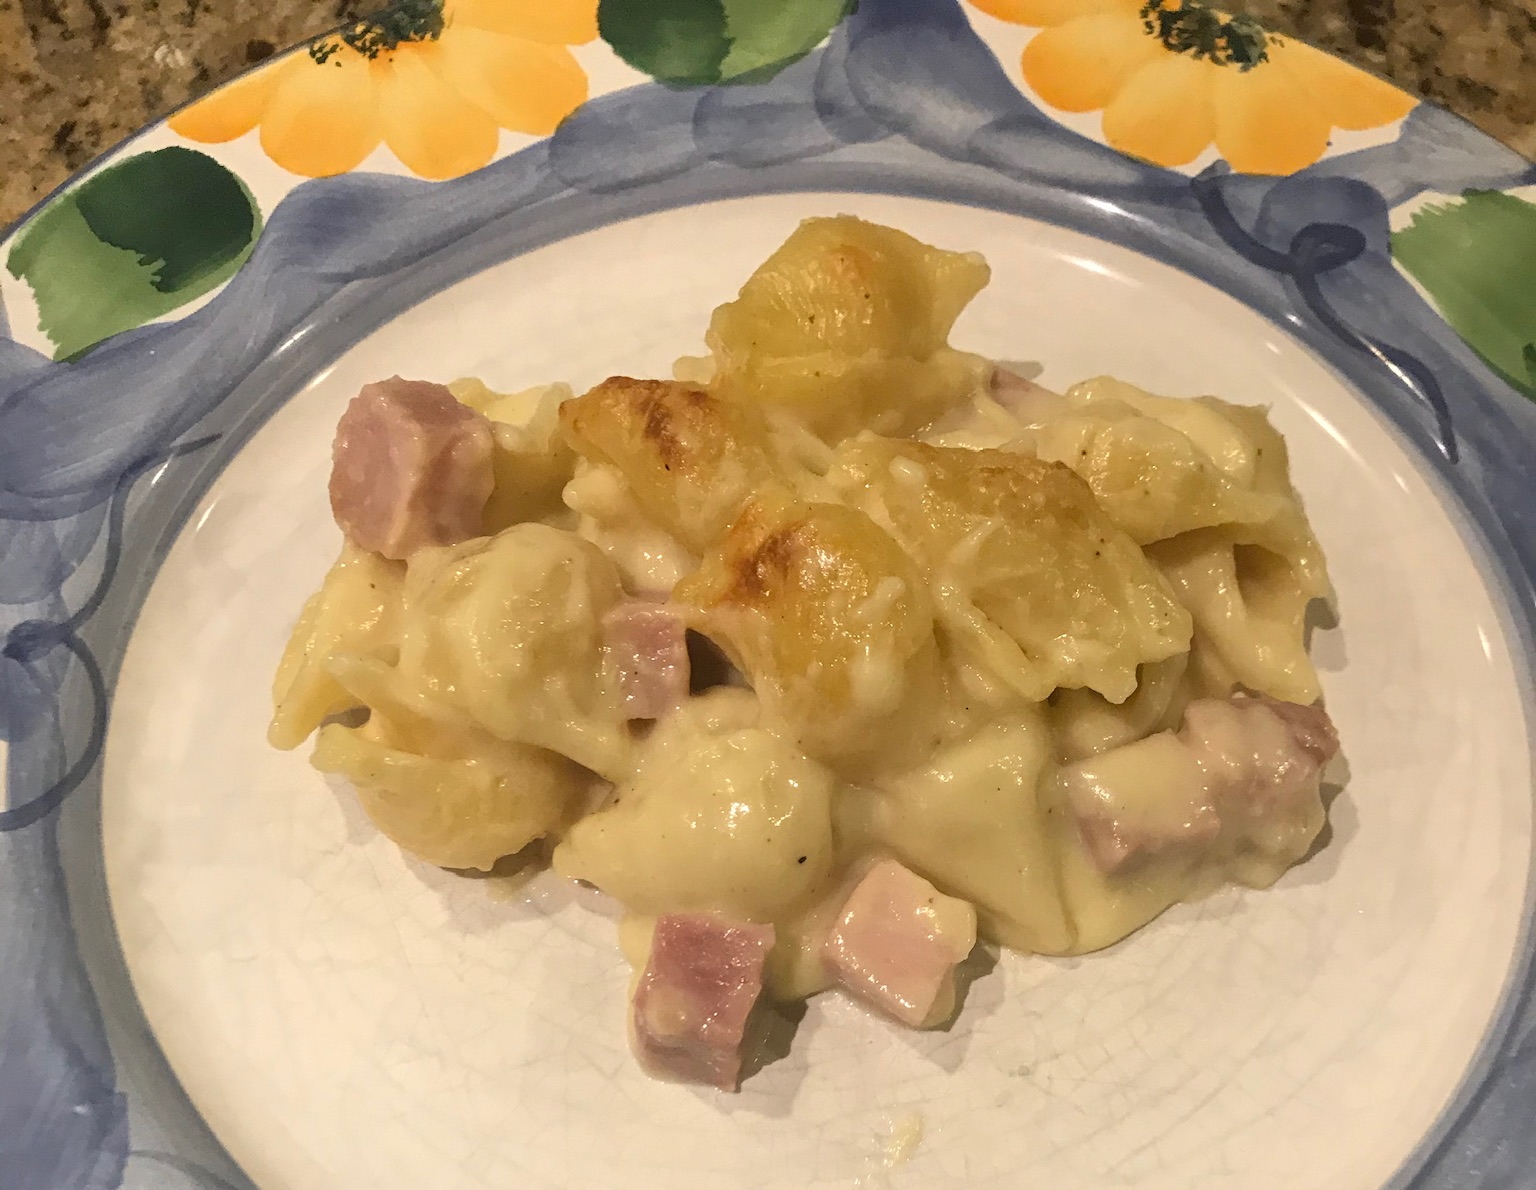
I love mac and cheese. Pasta. Cheese. Gooey deliciousness. What’s not to love? To make a more hearty meal, add a protein or mix it up a bit. Use tortellini instead of macaroni or shells. Top with a cracker crumble. Throw in some chicken and broccoli. That makes it healthy, right? Other add-in ideas: meatballs, bacon (mmmm…bacon), spicy sausage, veggies, pesto, or even tuna. I decided to take it up a notch by throwing in some diced ham.
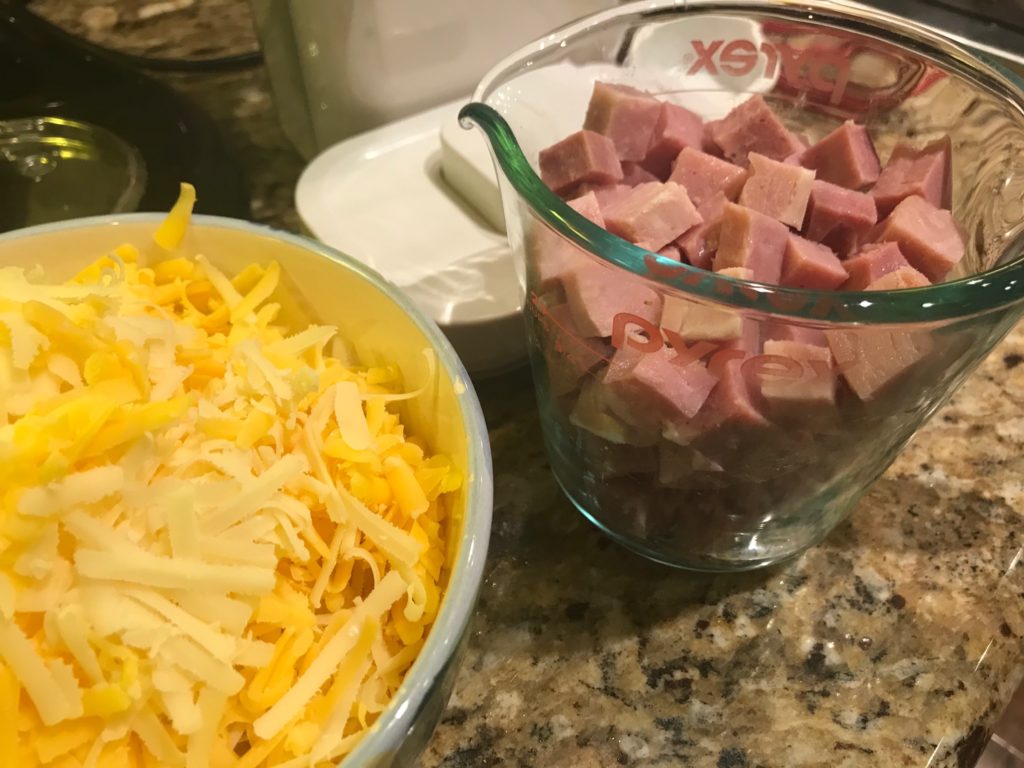
I have a super yummy recipe when I don’t want to make boxed mac and cheese. You can use any kind of cheese that melts easily, like American (which does have its place but not today), but this is fancy mac and cheese so you swap out the American for a more grown up cheese: Gruyere. Gruyere is a type of Swiss cheese that doesn’t taste anything like that strong, holey Swiss cheese. Instead, it’s sweet, salty, and nutty without being overpowering. It’s also really creamy and melts easily so it’s perfect for fondue, grilled cheese, and of course, mac and cheese.
Making homemade mac and cheese is not hard, but is a little more time consuming that the box. The “hardest” part is making the actually sauce, but it’s a lot easier to make than you think. You won’t mess up. It won’t come out lumpy or burnt if you follow a few simple steps. I promise.
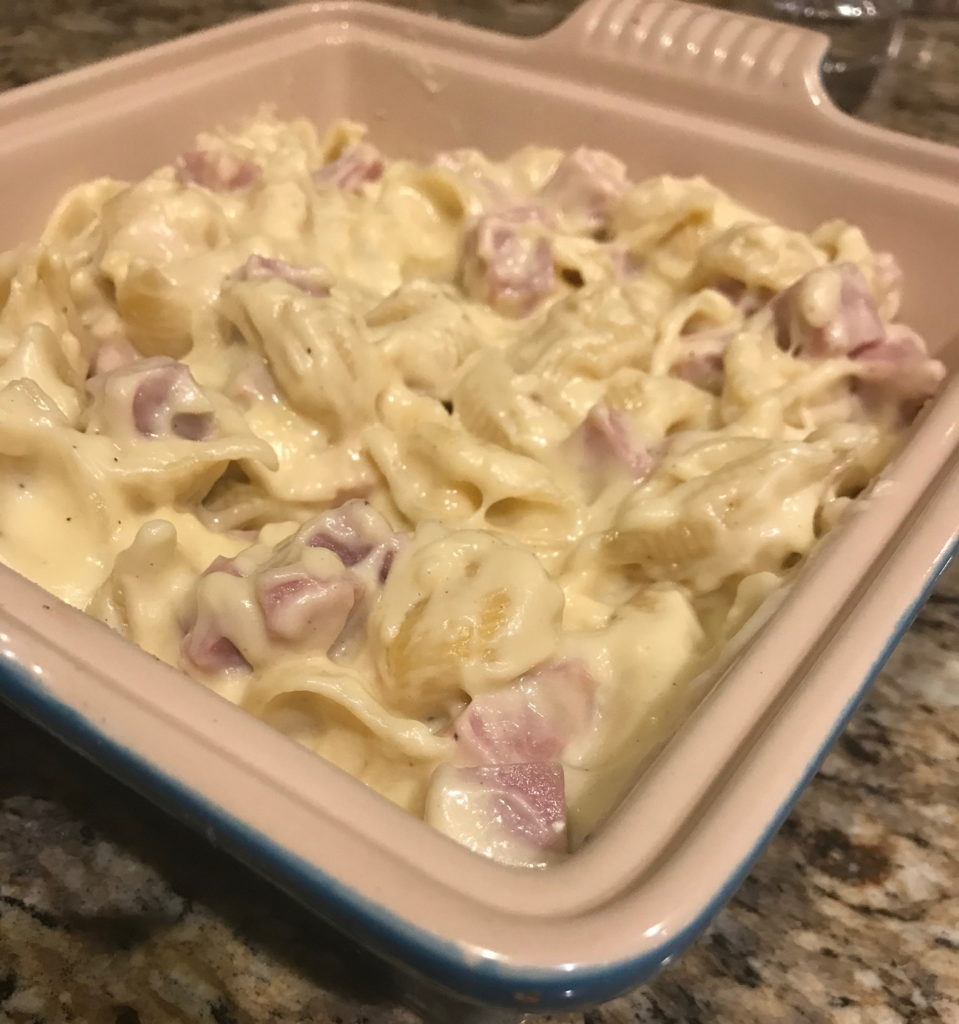
Do your prep work. Shred a bunch of cheese and dice your ham into bite-sized pieces.
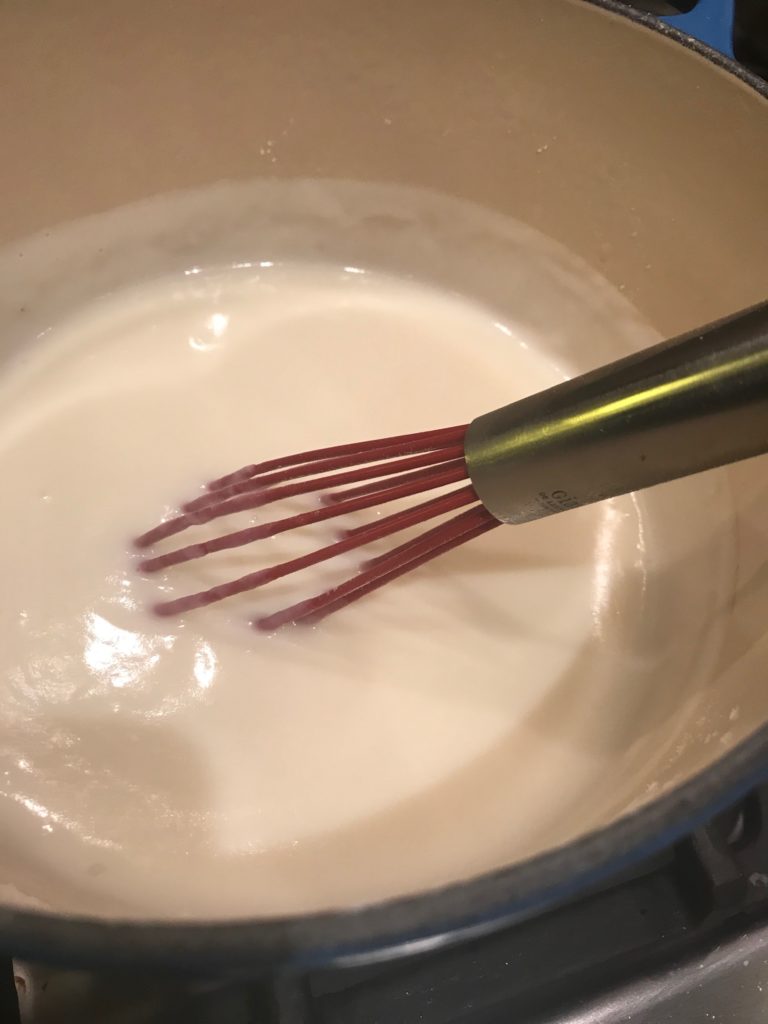
While you’re cooking your pasta (to slightly under al dente because it’ll continue to cook a little in the oven), make your sauce. Heat up some milk. When it’s ready, it should be hot, but not boiling. If you can stick your little finger in it and it’s a little uncomfortable, but not burning, it’s perfect. It’ll also coat the spoon and pan a little. It took about three minutes for me on medium heat.
The key is not to heat it on high and or it might scorch the bottom of the pan. If that happens, just start over and be patient. It’ll do the right thing if you don’t rush it.
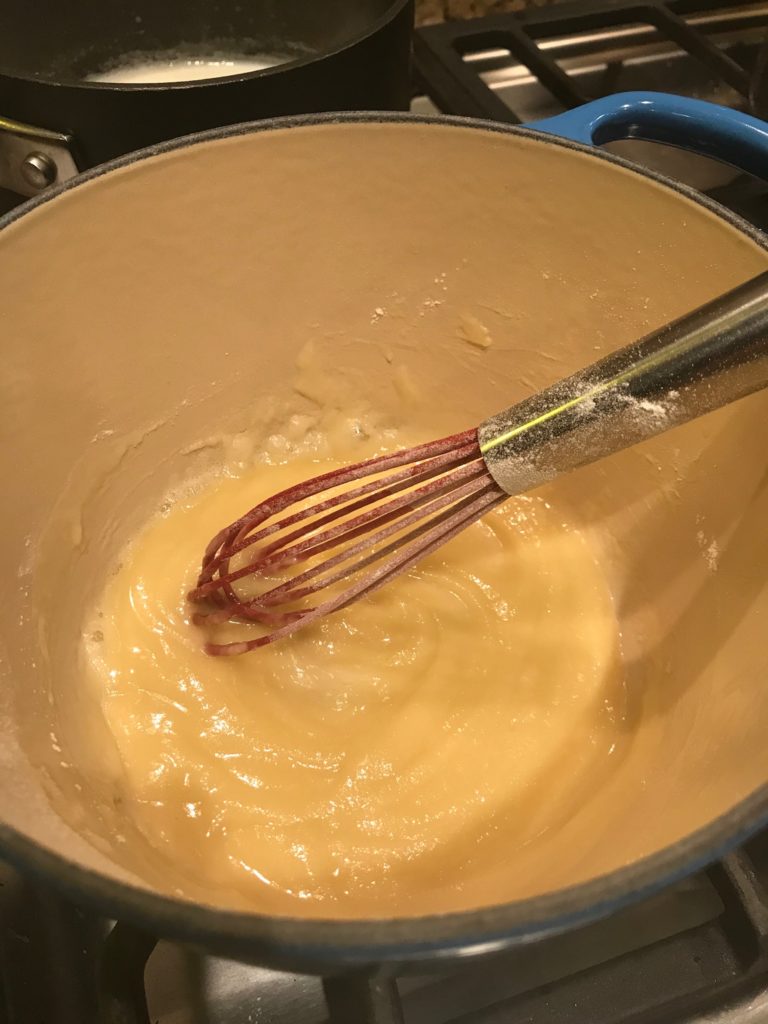
While this is going on, melt some butter that you’ve cubed into smaller squares so it melts quickly and more evenly than if you threw the whole stick in. Add the same amount of flour and whisk over low heat for about two minutes. Watch you go! You’re now making a roux, which is just a fancy way of saying you’ve combined some butter and flour that you can use to thicken a lot of stuff.
I depend on time to make sure the roux comes out right. After you’ve made a roux a few times, you’ll know what to look for, but for now, just stick to stirring for two minutes and note that it’s bubbly, no longer has that raw flour taste, and slightly darker than before. You can cook it longer to a more golden-brown if you want a darker, richer sauce, but I prefer mine fairly blond.
Add the hot milk and whisk the entire time for one to two minutes. The sauce will be thickened and smooth. Next comes the cheese. Throw that all in along with your seasonings and ham. When it’s well mixed and melty, it’ll look like fondue and it’ll be difficult not to dip cubes of sourdough bread into it. Resist the temptation. I mean, you should taste it to make sure it’s ok, but use some self-restraint.
Mix it with the cooked pasta, stir again until all the pasta is well coated. Plop it into a casserole pan.
Bake it until bubbly and slightly toasted on top.
That’s it.
The original recipe comes from Ina Garten, who makes a ton of amazing food. I completely trust all of her recipes. This recipe has been halved and macaroni has been substituted with shells. I also skipped the tomato and bread crumb topping.
Add the pasta to boiling, salted water and cook according to the directions on the package, 6 to 8 minutes. Drain well.
Meanwhile, heat the milk in a small saucepan, but don't boil it. Melt butter in a pot and add the flour. Cook over low heat for 2 minutes, stirring with a whisk. While whisking, add the hot milk and cook for a minute or two more, until thickened and smooth. Off the heat, add the Gruyere, Cheddar, 1 tablespoon salt, pepper, nutmeg, and ham. Add the cooked pasta and stir well. Pour into a baking dish.
Bake for 30 to 35 minutes, or until the sauce is bubbly and the macaroni is browned on the top.