Blog

Orzo Salad

Jump to Recipe

Every year, the extended family gets together for Christmas. We catch up on our lives, steal gifts during the no-so white elephant exchange (I ended up with olive oils…love it! My husband walked away with a Starbucks gift card, which I immediately stole.), and eat lots of yummy food. My nephew (my husband’s cousin’s son?) made these amazing appetizers with crostini, whipped cream cheese (I think), and smoked trout. Oh my god…they were awesome. I really want the recipe, but he probably just threw it all together because he’s that type of guy.

My dish wasn’t anywhere near as fancy, but I think it was respectable, reliable, and recommended. At least, I recommend it! The beauty of this recipe is that you can adjust it to suit your needs. If you want to add more goodies, don’t hold back. If you don’t like garbanzo beans, leave them out and use your favorite bean instead. Don’t like cucumber? Use zucchini. You get the idea.

Thank you to the Food Network for sharing this recipe. I followed the recipe closely, but next time, I’m going to try adding more goodies. The secret ingredient has to be the chopped walnuts. Completely unexpected, but memorable, giving the salad an extra crunch. In second place, the salty feta cheese closely followed by the fresh mint.

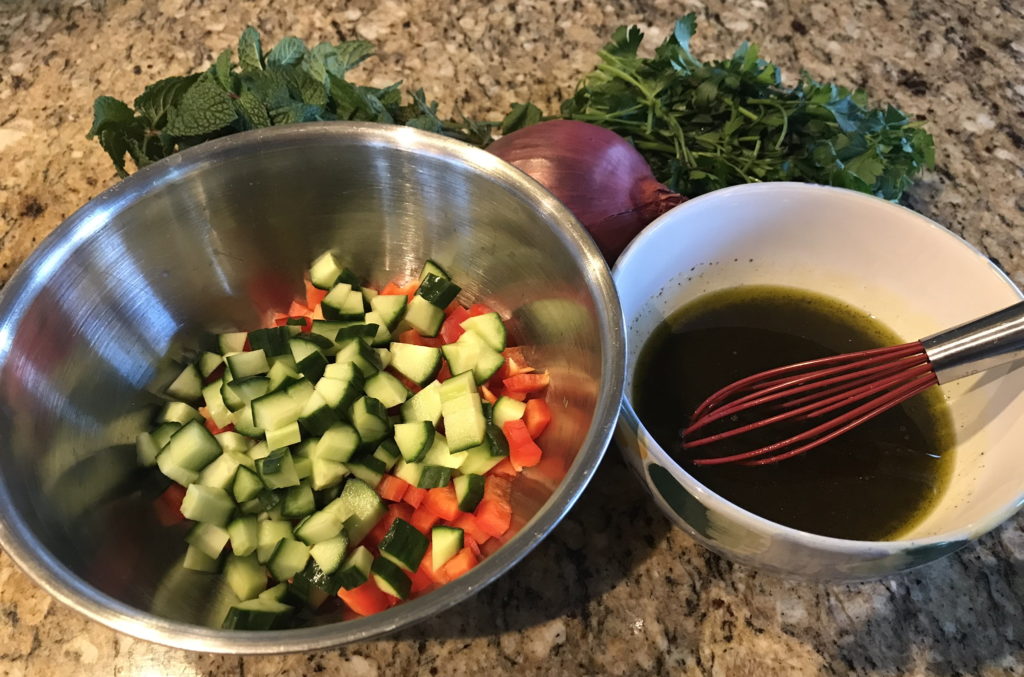
The dressing is pretty easy and is your basic vinaigrette. You can really use this dressing in any pasta or green salad. Instead of vinegar, you use lemon, which gives an extra boost of freshness.

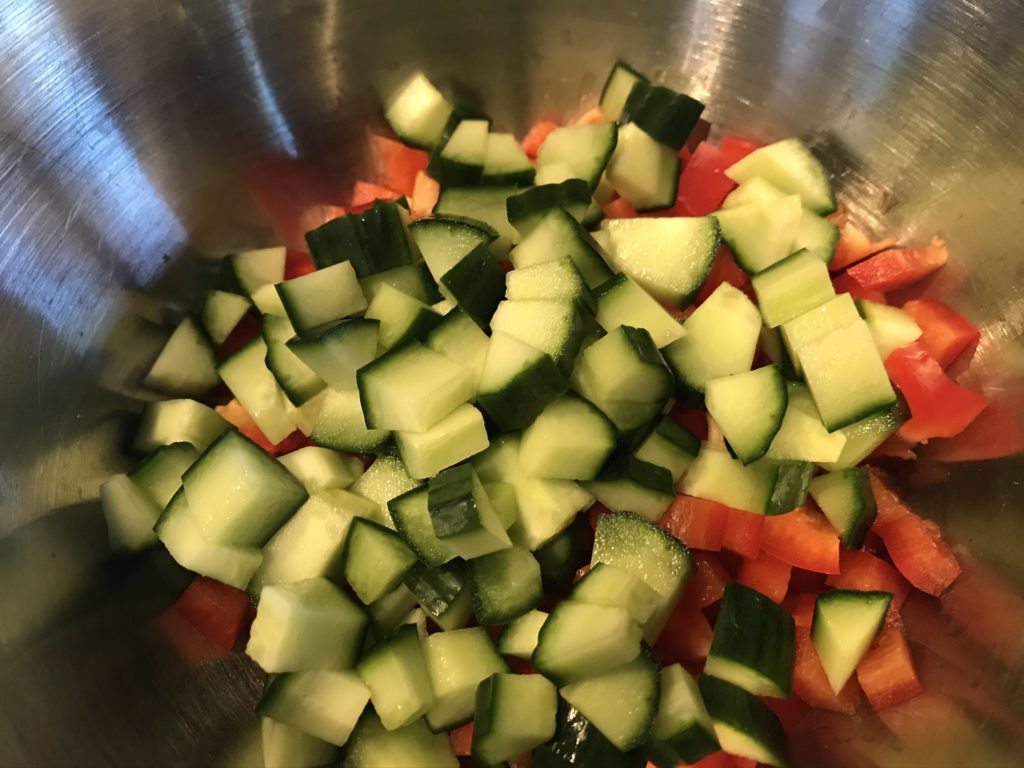
There’s a lot of chopping involved, but it’s a good excuse to nibble on some veggies. Dice up red pepper and English cucumber, taking care to make equal, bite-sized pieces.

Finely chop red onion. Combine with garbanzo beans (aka chickpeas), which really adds a good texture to the salad so if you don’t like them, please use another type of bean. Cut some Kalamata olives in half, which along with the feta that you’ll add at the end, gives a saltiness that balances out the tangy salad dressing. Add walnuts, fresh mint, and fresh parsley. I questioned the walnuts, but as I mentioned earlier, they are surprisingly magical. I would say that you could use dried parsley if you want, but don’t skip the fresh mint. Dried mint isn’t the same.

Except for the feta, mix everything together while the orzo is still hot so that it absorbs the dressing. Add a little more olive oil if it’s too dry for you, but I found the mixture to be perfect. Make sure to sample it and add salt to taste. I also added some freshly ground pepper although the recipe didn’t call for it. Chill and add the feta when you know it won’t melt, which would be a bad thing.

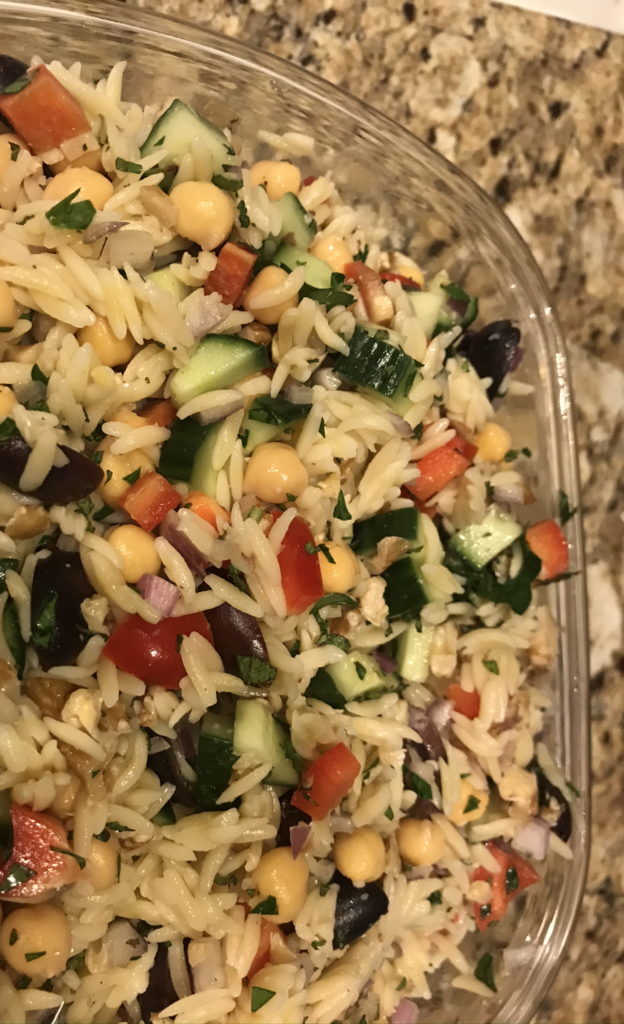
What I like about this salad is that it’s perfect for both a side dish for dinner and potlucks: makes a lot, travels well, is good at room temperature, and doesn’t go bad from sitting out. It’s also relatively easy to make while still being impressive. The colors make it look attractive and fresh. Even better…you can make this salad the day before and it will taste even better than the day of.

Orzo Salad

Orzo Salad

Servings 8 cups

Ingredients
  

For dressing:

  • 2 teaspoons lemon zest
  • 6 tablespoons lemon juice freshly squeezed
  • 1 clove garlic grated
  • 1/2 cup extra-virgin olive oil
  • 2 teaspoons kosher salt
  • 1 teaspoon black pepper

For salad:

  • 1 large red bell pepper diced
  • 1 1/2 cups English cucumber pulp scooped out and discarded, diced
  • 3/4 cup red onion finely chopped
  • 15.5 ounces garbanzo beans (chickpeas) drained and rinsed
  • 1 cup pitted Kalamata olives halved
  • 1 cup walnuts roughly chopped
  • 1/4 cup fresh mint finely chopped
  • 3 tablespoons fresh Italian flat-leaf parsley finely chopped
  • kosher salt and freshly ground black pepper to taste
  • 1 pound dried orzo
  • 6 ounces Greek feta crumbled

Instructions
 

  • In a small mixing bowl, whisk together the lemon zest and juice, garlic, olive oil, salt and pepper. Set the dressing aside.
  • Combine the red bell pepper, cucumber, onion, chickpeas, olives, walnuts, mint, and parsley in a large mixing bowl.
  • Meanwhile, bring a large pot of water to a boil. Stir in 3 tablespoons of salt and a small splash of olive oil. Add the orzo and cook for 7 to 9 minutes, or according to the directions on the package. Drain the orzo in a colander, then add it to the vegetable mixture while the orzo is still hot. Immediately pour the dressing onto the orzo and vegetables, and stir to combine. The hot orzo will readily absorb the dressing.
  • Season with salt and pepper to taste. Add a splash more olive oil if the salad seems too dry. Allow the salad to cool to room temperature, and then add the feta. Cover and refrigerate for 1 to 2 hours. You can also make this the day before.
Blog

Creamy Steak Fettuccine

Jump to Recipe

The method to my madness is to blog the recipes I’ve tried that have had relative success. Some do flop. I haven’t any of those lately, thank god. Some are loved by one, but not the other. But this one got two thumbs up. I suspect it’s because steak is always a welcomed favorite in this household, especially after soooo many chicken dishes. What can I say? I like chicken.

I didn’t change up the recipe too much so let’s give credit to Delish. They have reliable recipes and great videos so I like their recipes a lot.

First, boil a pot of water. Add salt like it’s the sea. Do not add oil to prevent the noodles from sticking. This also prevents your sauce from sticking, which is not a good thing. Throw your pasta in and let it do its thing.

While this is going on, work on your sirloin steak. Season it well with salt and pepper. Don’t be afraid to use plenty of salt. I know…between the pasta water and the steak, you would think you’re going to do some serious damage, but unless you’re on a salt-restrictive diet, you can handle this. Mine practically has a crust on it and you’ll notice the payoff. It takes steak up a notch. If you are really uncomfortable with this much salt, skip it.

Cook the steak for about 4 minutes on each side for medium rare. You can cook it longer if you want it completely dead, but I’m sort of opinionated about the doneness of my steak. It should be somewhere between mooing and pink. I would have sliced this to show you, but the steak was still resting (it was exhausted!), which is really important. Never slice into a steak for at least 5-10 minutes after you’re done cooking it. Some magical science happens here. Letting it sit allows it to continue to cook slightly and prevents the steak from oozing every where. Don’t I have a way with words? But that’s really the truth of it. If you complain of bloody steaks, it’s because it didn’t rest before you cut into it.

While the steak is resting, work on your sauce. The seasonings are pretty simple: Parmesan cheese, parsley, salt, and pepper. I used fresh parsley, but dried works too. The recipe calls for freshly grated cheese, which is always best, but you can use the pre-grated stuff form the store.

Half your cherry tomatoes. I used both red and yellow, but it’s up to you.

I have to be honest. I’m a little intimated by sauces. I’ve never made an alfredo sauce from scratch. I like my trusty friend, Rao’s alfredo sauce from a jar. But for purposes of this recipe, we’re going to be brave. Take charge. Melt your butter, add some garlic, whisk in some flour, pour in the milk, and tell it who’s boss. Simmer for about 5 minutes. It will thicken. Add your plate of seasonings, and then add the halved tomatoes.

It’s sort of hard to gauge by the picture, but I tried to show how thick your sauce should be. The tomatoes don’t sink to the bottom. There’s substance. Not to thin, not too thick.

Add your cooked pasta and then spinach. Toss until the spinach is wilted. To be honest, with the spinach and tomatoes, it’s practically a salad, right?

Don’t get too frustrated with the spinach. Four cups seems like a lot, but it’s just the right amount. It took longer to wilt than I liked so this was really testing my patience. Putting a lid on it will help a lot.

Pile it on a plate, top with sliced steak (note doneness), and drizzle a little balsamic vinegar if you have some. It makes for a colorful plate that will impress your family, causing them to think you are some sort of gourmet chef. I’m ok with that.

Creamy Steak Fettuccine

Creamy Steak Fettuccine

Servings 6

Ingredients
  

  • 12 ounces fettuccine
  • 1 pound sirloin steak
  • 2 tablespoons extra virgin olive oil
  • Kosher salt and pepper to season steak
  • 2 tablespoon butter
  • 2 cloves garlic minced
  • 2 tablespoon all-purpose flour
  • 2 cups milk
  • 1 tablespoon freshly chopped parsley
  • 1/2 cup freshly grated Parmesan cheese
  • 1 teaspoon Kosher salt
  • 1/2 teaspoon pepper
  • 1 1/2 cups cherry tomatoes halved
  • 4 cups baby spinach
  • Balsamic vinegar

Instructions
 

  • In a large pot of salted boiling water, cook pasta according to package directions until al dente. Drain and set aside.
  • Coat both sides of steak with oil and season generously with salt and pepper. In a large skillet over medium-high heat, cook steak until your desired doneness, 4 minutes per side for medium rare. Transfer to a plate to let rest, 10 minutes, and then thinly slice.
  • Meanwhile, make alfredo sauce: Add butter to skillet and let melt. Add garlic and cook until fragrant, 1 minute. Whisk in flour and cook 1 minute more. Add milk and simmer until thickened, 5 minutes. Add parsley, Parmesan, salt, and pepper. Add tomatoes and cook down 2 minutes.
  • Add cooked pasta to sauce and toss until coated. Then, add spinach and toss until wilted.
  • Top with sliced steak and drizzle with balsamic vinegar.
Blog

Beef Stroganoff

Jump to Recipe

This recipe is a favorite in the Deter household. Beef stroganoff is originally a Russian dish with beef sauteed in a sour cream sauce. It’s morphed into a dish that can contain any type of beef, sometimes has mushrooms, and is often served over egg noodles (although I have been known to serve it over cauliflower rice for myself). It’s incredibly retro and there’s absolutely nothing fancy about it.

My recipe has morphed a few times and probably resembles nothing like the traditional stroganoff of the 70s and 80s. First of all, no mushrooms. I happen to like them, but the boys don’t. So don’t even think adding them or using cream of mushroom soup. Mine doesn’t have any nutmeg, but you’ll find a ton of chopped rosemary. More than any normal person might like so feel free to use less. Finally, no beef tips. This one has ground beef.

I’m starting to wonder how this can even be called beef stroganoff, but let’s go with it because it’s tasty and filling and all that good stuff.

It starts out fresh rosemary, garlic, and red onions. It’s so much better with fresh rosemary, but you can use a teaspoon of chopped dried rosemary instead. Just don’t use that jarred minced garlic stuff. Always use fresh garlic. Never mind that it’s annoying to peel and chop.

Chopped these up and add them to your crumbled ground beef that’s been browning. I like to use the leanest beef possible to avoid a pool of grease.

Warning…the following photos you are about to see might seem scary and disgusting. Apparently beef stroganoff is not the supermodel of foods and looks rather unattractive. I swear it tastes better than it looks.

Add cream of chicken soup and some seasonings. Told you that no mushrooms would be harmed in the making of this dish.

Add sour cream and parsley. I use dried parsley, but fresh parsley works really well too.

Cook a little longer, toss with egg noodles, and this is what you end up with.

This recipe makes plenty for six people. Because there’s only three of us, I usually boil half of a bag (8 ounces) of noodles instead of a full bag, and use half of the sauce. Keep the leftover sauce and boil fresh noodles when it’s time for leftovers.

Beef Stroganoff

Beef Stroganoff

Servings 4

Ingredients
  

  • 2 cloves garlic minced
  • 1 tablespoon fresh rosemary chopped finely
  • 1 cup red onions diced
  • 2 teaspoon salt
  • 1/4 teaspoon pepper
  • 1/2 teaspoon paprika
  • 10.5 ounces condensed cream of chicken soup
  • 16 ounces egg noodles cooked
  • 16 ounces sour cream
  • 1 tablespoon dried parsley

Instructions
 

  • Crumble and brown ground beef with garlic, rosemary, and onion.
  • Add salt, pepper, paprika, and soup. Simmer for 5 minutes.
  • Add sour cream and parsley. Simmer until heated through.
  • Mix with cooked noodles and serve.
Blog

Greek Lemon Chicken and Orzo

Jump to Recipe

Sometimes a recipe comes along that you just don’t change because it’s perfect. This is that recipe. I’ve made it several times and each time, it’s amazing. Better yet, it’s super simple. I wish I could take credit, but alas, I can only provide advice. The prize goes to Jeff Mauro, the Sandwich King from The Food Network, who apparently makes a lot more stuff than sandwiches. His recipe combines dill and lemon along with coriander to make a delicious meal.

Start out with fresh dill and grated lemon for your orzo. The flavor meld together nicely and screams Greek. I should try to make a dip with this. And what is orzo, you may ask. It looks like rice, but it’s a pasta that’s often used in salads, but also in casseroles like this one.

For the chicken, you’ll be using different seasonings, but only three (see how simple this recipe is?). In addition to salt and pepper, you’ll use ground coriander. And what is coriander, you may ask. It’s actually the seeds from the cilantro plant. Who knew? They have a citrus flavor when crushed, which is why it pairs well with dill and lemon.

To cut down on the number of bowls you use, combine the orzo mixture directly in the baking dish. Then, rub the seasonings on chicken. It will be peppery so if that’s not your thing, use half the pepper the recipe states.

Choose chicken that with a consistent thickness, meaning not super thick in the middle and skimpy thin at the ends. If this is not possible, consider pounding the chicken with a mallet to thin out the middle. I have found that two breasts per pound works best for me and doesn’t require any pounding. Just be sure to avoid using large breasts or they won’t cook through.

Place the chicken in the orzo mixture. Don’t freak out. The chicken broth will not wash off the chicken seasonings and make the chicken bland. It’ll all turn out in the end. Make sure your chicken is submerged so you don’t end up with dry chicken. Top with lemon.

And let me take a moment to tell you to use chicken stock, not broth. There’s a difference, they are not interchangeable, and you’ll thank yourself for using the right ingredient.

When baked, you’ll end up with this…

And this…

Did I mention how fancy it looks? You probably could pull this dish off when you have guests to impress.

One of these days, I’m going to try making this dish with other seasoning combinations. I’m thinking that tomato sauce, oregano, and cumin with a little chopped green olives might create a Spanish twist while experimenting with orange and parsley will produce an Italian dish. I encourage you to use your favorite seasonings in the orzo and chicken. Let me know what you discover!

Greek Lemon Chicken and Orzo

Greek Lemon Chicken and Orzo

Servings 6

Ingredients
  

Orzo

  • 3 cups chicken stock
  • 3 tablespoons butter melted
  • 2 teaspoons kosher salt
  • 1 teaspoon cornstarch
  • 2 sprigs fresh dill chopped
  • 2 lemons zested and juiced
  • 1 clove garlic minced
  • 2 cups orzo

Chicken

  • 2 teaspoons ground coriander
  • 2 teaspoons kosher salt
  • 2 teaspoons ground black pepper
  • 4 medium chicken breasts boneless, skinless
  • 1 lemon sliced

Instructions
 

  • Preheat the oven to 375 degrees F.
  • For the orzo: In a 9-by-13-inch baking dish, whisk together stock, butter, salt, cornstarch, dill, lemon zest and juice, and garlic. Mix in the orzo.
  • For the chicken: In a small bowl, mix together the coriander, salt and pepper. Coat the chicken all over with the seasoning.
  • Add the chicken breasts, laying them so most of the chicken is submerged. Top with lemon slices.
  • Bake, uncovered, until the chicken registers an internal temperature of 165 degrees F, 35 to 40 minutes. Let rest for 5 minutes.
Blog

Pork Udon Noodles

Jump to Recipe

I’m not good at making Asian food. There. I said it. Maybe it’s not that I’m terrible at it, but for example, take-out is so good. How can I compete? It’s tasty and inexpensive. But I’m determined to win and this time, I’m making a Japanese noodle dish. Here’s my attempt and while I still have a ways to go, this ended up being a really easy weeknight dinner with plenty of leftovers.

I found a promising recipe on Bon Appétit. In general, Bon Appétit has very good, reliable recipes so I trust them. I did change the recipe. I couldn’t find instant udon noodles and I ran out of fresh ginger so I had to adapt a little. I also made it less spicy because of the boys. I made a few other changes, like used more sesame oil and low-sodium soy sauce. If I had to do it over again, I would have used fresh ginger and your standard soy sauce.

I like to prep everything beforehand so I can easily dump ingredients into the pan. For this recipe, slice up some cabbage and green onions. Be sure to separate out the pale and dark parts of the green onion. Stage your white/pale-green onion, ginger, and red pepper flakes in one bowl. Dark green onion parts go in another bowl.

One reason why I like Bon Appétit is that they give you advice in the directions. In this recipe they remind you not to touch the pork so it browns. “The pork will never brown if you’re fussing with it the whole time, so when we say ‘undisturbed,’ that means keep your paws off it and let the heat of the pan and the pork do their thing.” You can’t tell here, but the underside is browned. I swear. I should have taken a picture. Ok, it could have browned a little longer.

While the meat is browning, I boiled 9.5 ounces of udon noodles according to the package. The original recipe calls for 14 ounces so in my version you end up with a higher meat to noodle ratio, which is fine by me. I have no idea where to buy instant udon noodles. I found a surplus of ramen noodles, but not udon. The ones I chose cook in 4 minutes and I was happy with them.

I used mirin, which is an ingredient that I’m not entirely familiar with, and is often used in Japanese cooking. It’s a slightly sweet Japanese cooking wine made from rice and is similar to sake with a lot less alcohol. Bon Appétit has an informative article about what it is and what to do if you can’t find it.

When you’re done, you end up with something like this. It was really simple to make and got two thumbs up.

Pork Udon Noodles

Pork Udon Noodles

Servings 4

Ingredients
  

  • 2 tablespoons vegetable oil divided
  • 4 cups green cabbage coarsely chopped
  • 9.5 ounces udon noodles
  • 3 teaspoons sesame oil
  • 10 ounces ground pork
  • 5 green onions green and pale parts separated
  • 1/2 teaspoon ground ginger
  • 1/2 teaspoon red pepper flakes
  • 1/3 cup mirin
  • 1/3 cup soy sauce low sodium

Instructions
 

  • Heat 1 tablespoon of vegetable oil in a large skillet over medium-high heat. Add cabbage and cook, tossing often, until edges are browned, about 4 minutes. Reduce heat to low and continue to cook, tossing often, until thickest parts of cabbage leaves are tender, about 4 minutes longer. Remove from pan and place on a separate plate. Set aside.
  • Heat remaining tablespoon of vegetable oil in same skillet over medium-high heat. Add pork, breaking up and spreading across surface of pan with a spatula or tongs. Cook pork, undisturbed, until underside is brown, about 3 minutes. When pork is browned, break up meat into small bits. Cook, tossing, just until there’s no more pink, about 1 minute.
  • While the meat is browning (and you're not touching it), boil udon noodles according to the package. Drain in a colander. Transfer noodles to a bowl and toss with sesame oil.
  • To your meat mixture, add the pale parts of the chopped green onions, ginger, and red pepper. Continue to cook, tossing often, until green onions are softened and the bottom of skillet is starting to brown, about 1 minute.
  • Add cabbage, udon noodles, mirin, and soy sauce. Cook, tossing constantly, until noodles are coated in sauce (be sure to scrape bottom of skillet to dissolve any browned bits), about 45 seconds.
  • Remove from heat. Top with dark-green parts of scallions and serve.
Blog

Instant Pot Spaghetti and Meatballs

Jump to Recipe

I love my Instant Pot. Seriously. Yes, I also love my KitchenAid mixer, my grill pan, my Crock-Pot, my apple peeler/slicer/corer, etc. but I REALLY love my Instant Pot. I would have never attempted pressure cooking without it. I wouldn’t say using it cuts cooking time in half, but between the way it tenderizes tough cuts of meat and that it’s such a cool gadget, what’s not to love? It’s sort of magical. In goes something and out comes something else. It just makes life easier in so many ways.

Like spaghetti and meatballs. I’ve seen Instant Pot pasta recipes and many swear by them, but I wasn’t all that impressed. Boiling over the stove is still faster. But throw in meatballs and that’s a game changer.

Meatballs are time consuming. Working with raw meat that is best mixed up with your hands, but not too much or your meatballs will end up hard like golf balls. Forming a few dozen of them into perfect shaped balls. I’d rather be making cookies, frankly. Frying them in batches in a pan…ok, I did find this awesome Roasted Italian Meatball recipe by The Barefoot Contessa that is out of this world and cuts out the frying part. But it’s still a lot of work and sometimes I wonder if it’s worth it. Making a beef sauce is so much easier.

But there’s something about spaghetti and meatballs that reminds me of a simpler time.

On top of spaghetti,
All covered with cheese,
I lost my poor meatball
When somebody sneezed.

It rolled off the table
And onto the floor,
And then my poor meatball
Rolled right out the door

But I digress. Back to the Instant Pot. I’ve made Instant Pot pasta. I’ve made Instant Pot meatballs. Now I make them together.

I couldn’t find a recipe so I made up my own.

First, peel and mince your garlic. Let’s talk about peeling garlic. I know there are a million and one garlic peelers on the market, but you only need one. Your knife. I swear it’s true. I like using a cleaver, but any wide knife will do. Just vent your frustrations of the day by pressing down hard on each clove of garlic to smash it to smithereens. They’ll look like this and you’ll be able to easily peel the papery thin skins off the garlic with no trouble at all.

Add your minced garlic, shallots, egg, cheese, breadcrumbs, milk, and seasonings to a large bowl.

Let’s take a moment to talk about the shallot. I like shallots. In my opinion, they are underused. When you don’t want the sharpness of onions, use shallots, which are milder, sweeter, and are reminiscent of garlic. And one can never have too much garlic so shallots are a perfect compliment to garlic.

Add your ground meats (you’ll be using both ground beef and sausage). Mix it all up with your hands. No, you can’t get around that. All power to you if you use a cooking spoon or fork, but I never get the right results. Next, form into balls until you have about about a dozen. They might seem a little sticky, but that’s ok.

Pour the water and sauce in. If you like a thicker sauce, use more than a jar of sauce. Gently place your meatballs in your Instant Pot, without stacking them, but they can touch a little. The point is to make sure the meatballs are covered with liquid. Next, disregard the cardinal rule of making spaghetti: break the strands in half. I don’t know who made up this rule, but professional chefs on those cooking shows seem to frown on that. Whatever. Just listen to me. This won’t work unless the pasta is flat in the pot.

Add more water. And whatever you do, resist the temptation to stir! Seal the lid and cook. When it’s done, open it up and now you can stir.

What I like best about this recipe is that the mess is contained to one pot and you don’t need to babysit sauce, meatballs, and pasta. Dinner is served!

Instant Pot Spaghetti and Meatballs

Instant Pot Spaghetti and Meatballs

Servings 4

Ingredients
  

  • 1/2 shallot finely diced
  • 1 large egg beaten
  • 2 cloves garlic minced
  • 1/2 pound lean ground beef
  • 4 ounces uncooked ground Italian sausage
  • 1/4 cup Parmesan cheese finely grated
  • 1/2 cup dry breadcrumbs
  • 1/4 cup milk
  • 1 teaspoon kosher salt
  • 1 teaspoon Italian seasonings
  • 2 cups water divided
  • 24 ounces marinara pasta sauce
  • 8 ounces dry spaghetti
  • grated Parmesan cheese for serving

Instructions
 

  • Lightly beat an egg in a large bowl. Mince garlic cloves and grate Parmesan cheese. Add both to the bowl. Add breadcrumbs, milk, kosher salt, and Italian seasoning. Add the ground beef and sausage to the bowl. 
  • Gently mix with your hands until well combined. Form and shape into 12 meatballs (about 2 tablespoons each). Set aside. 
  • Add 1/2 cup of water and sauce to the pot. Stir to combine. Add meatballs to the bottom without stacking them and with minimal touching.
  • Break the spaghetti in half and spread them in two layers over the meatballs. Do not stir.
  • Pour the remaining 1 1/2 cups of water over the pasta. Remember not to stir.
  • Seal the Instant Pot. Set to cook on HIGH pressure for 8 minutes.
  • Open the pressure release valve (quick release) as soon as the 8 minutes are up. Open the pressure cooker and stir the spaghetti into the sauce. Serve with grated Parmesan cheese.