Blog

Chicken Quesadillas

Jump to Recipe

My son just finished a home ec class at his middle school. He learned how to make quesadillas and said they tasted good. I was surprised because when he was 5, he suddenly declared he disliked cheese quesadillas and would only eat grilled cheese. On raisin bread. Without the crust. Sigh.

When I asked him why the sudden acceptance towards quesadillas, he said it was because I left out the chicken. Seriously? All this time, it was missing chicken. I was determined to make the best damn chicken quesadilla for my picky kid.

Making chicken quesadillas barely requires a recipe. It’s just meat and melted cheese, sandwiched between a couple tortillas, right? How hard can it be? The most difficult part is flipping it over without losing half of the filling, but there’s a trick to prevent that. Regardless, I wanted to get some inspiration, which I found in The Pioneer Woman’s recipe. And then completed changed it up.

I recommend making the pico de gallo first. The longer it sits, the better it’ll taste so feel free to make this the day before.

To make the pico de gallo, cut up six Roma tomatoes with a serrated knife. I usually cut off the stem end, and then use the flat stem end side to slice the tomato down the middle. Face the flat side down on the cutting board and cut lengthwise into strips, and then dice across. Don’t worry if the pieces are not perfect. People will just be impressed that you made fresh pico. Of course, you could buy it pre-made and pour it in a bowl. I won’t judge.

I know this is incredibly time consuming so trust me when I say it goes much faster (and safer) if you use a serrated knife, which cuts through the tomato skin easily. This prevents the knife from slipping around so you don’t accidentally cut yourself.

Chop up some onions and cilantro. It looks like a lot of cilantro, but it wilts easily (sort of like spinach). Then, finely dice a jalapeño with the white membrane for more heat. Scrape out out the membrane first if you want less heat.

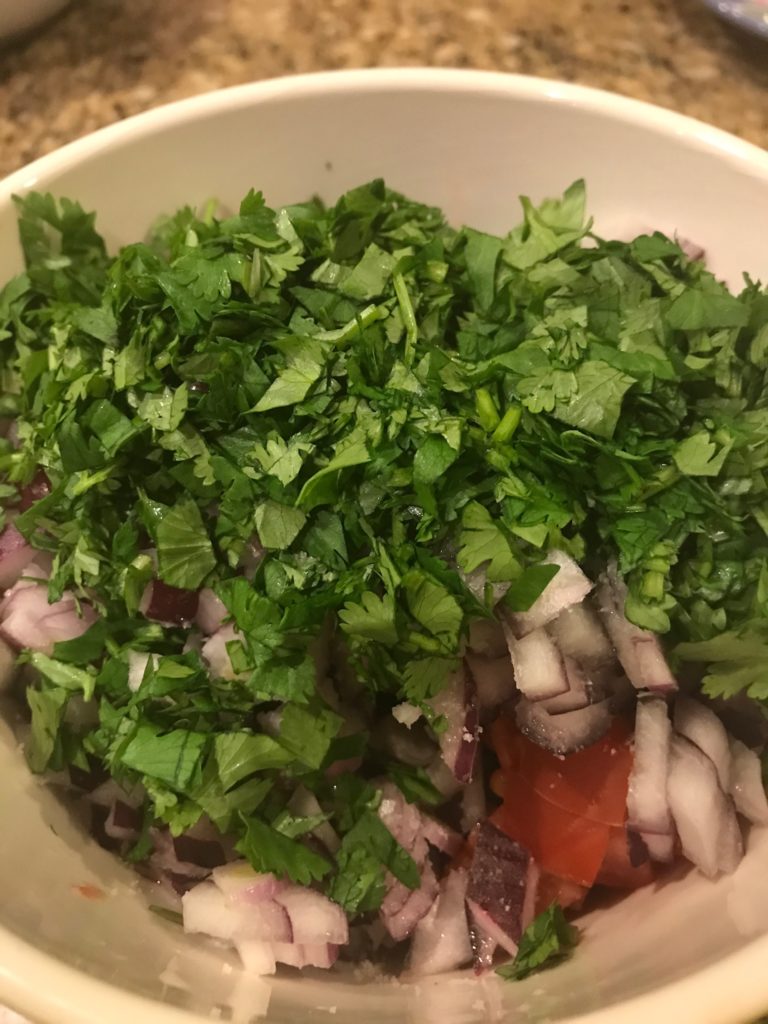
Squeeze a lime over it all and mix. Now you have pico de gallo. Yes, it’s that easy. This recipe makes a lot so you’ll have plenty for leftovers on chips or even a salad.

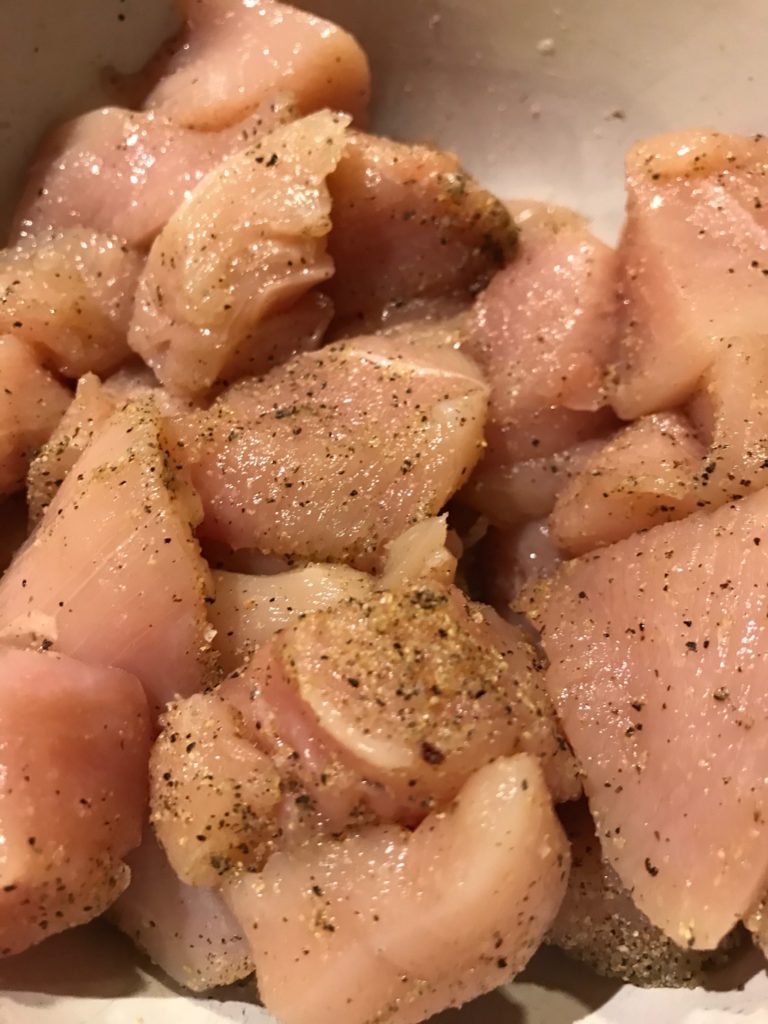
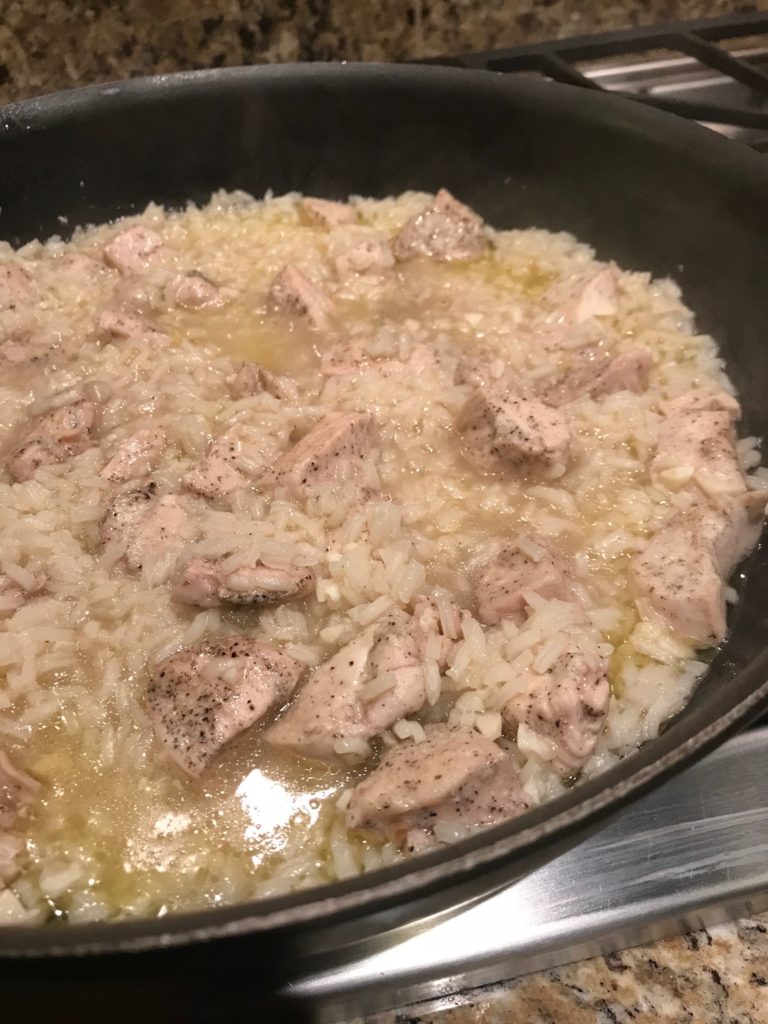
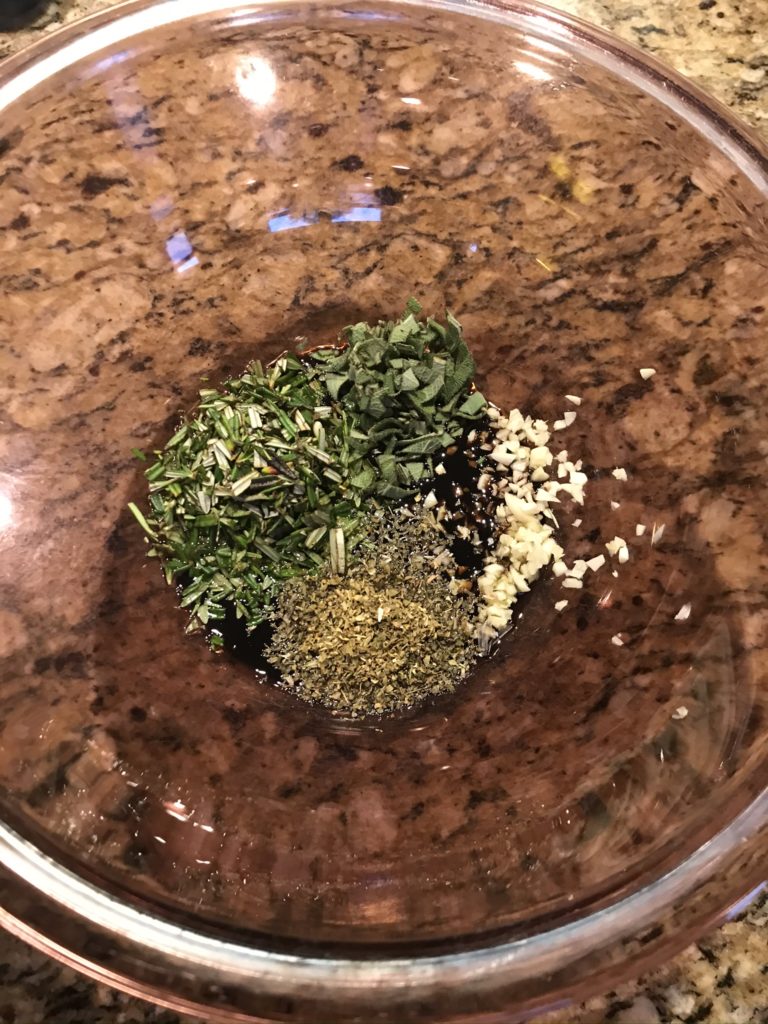
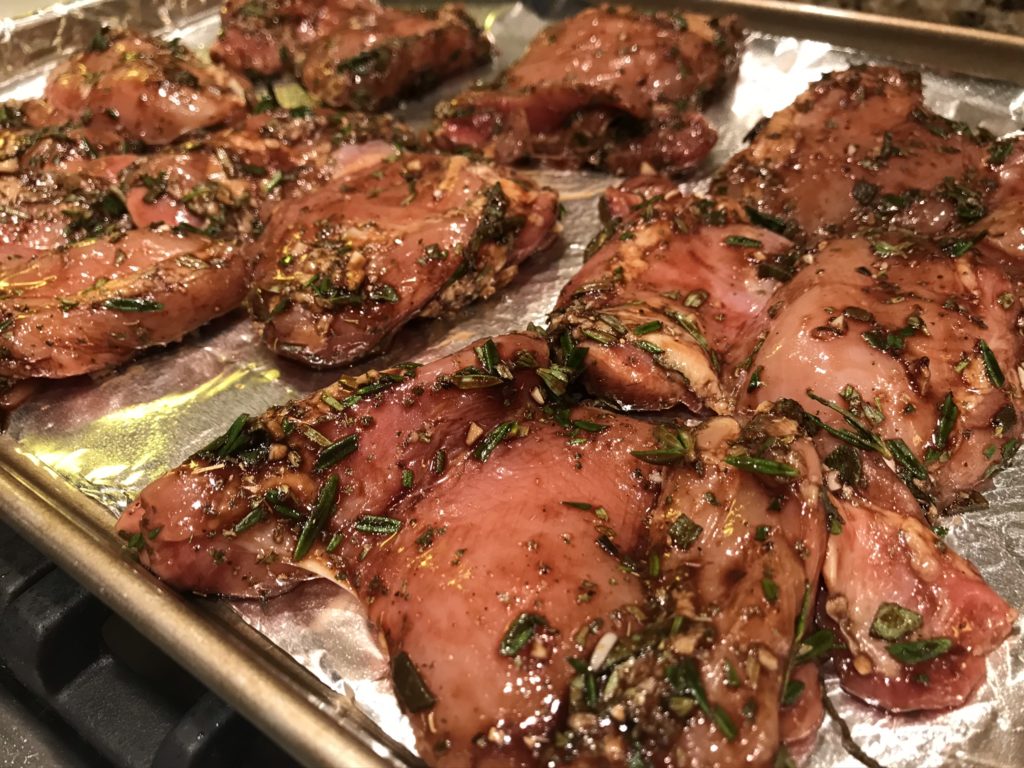
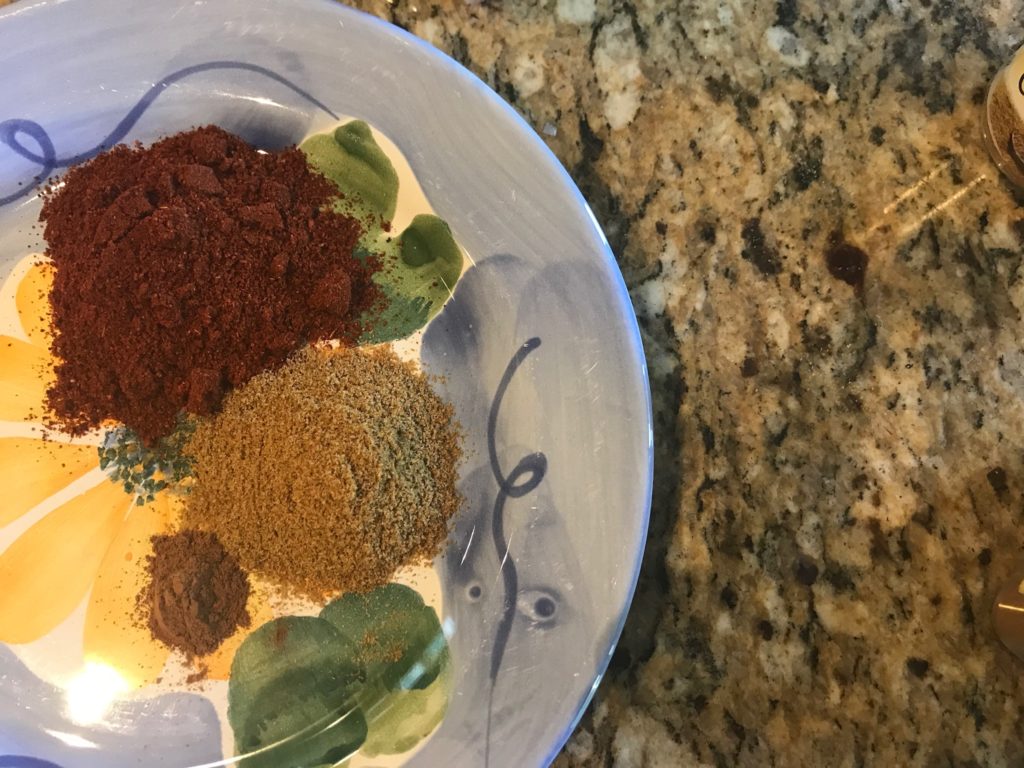
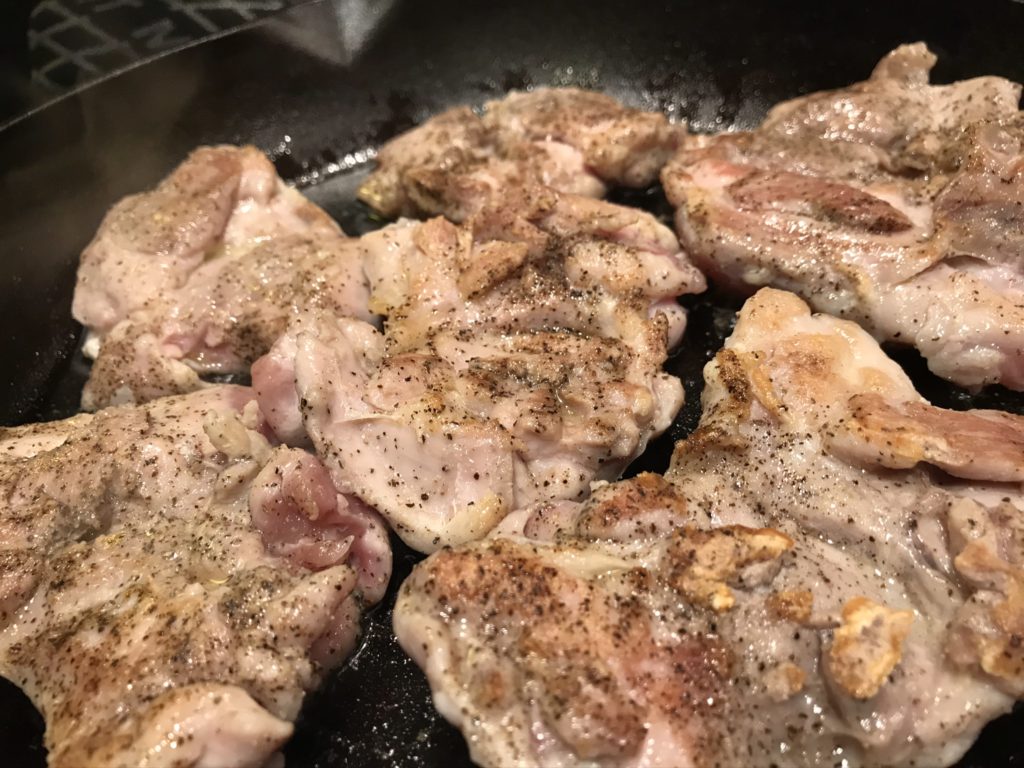
After that’s done, chop up your chicken and then in a bowl, season it with salt, pepper, and taco seasonings. Sauté it in a large skillet until it’s cooked through, but not overdone. Don’t forget you’ll be cooking it some more later. Remove the chicken.

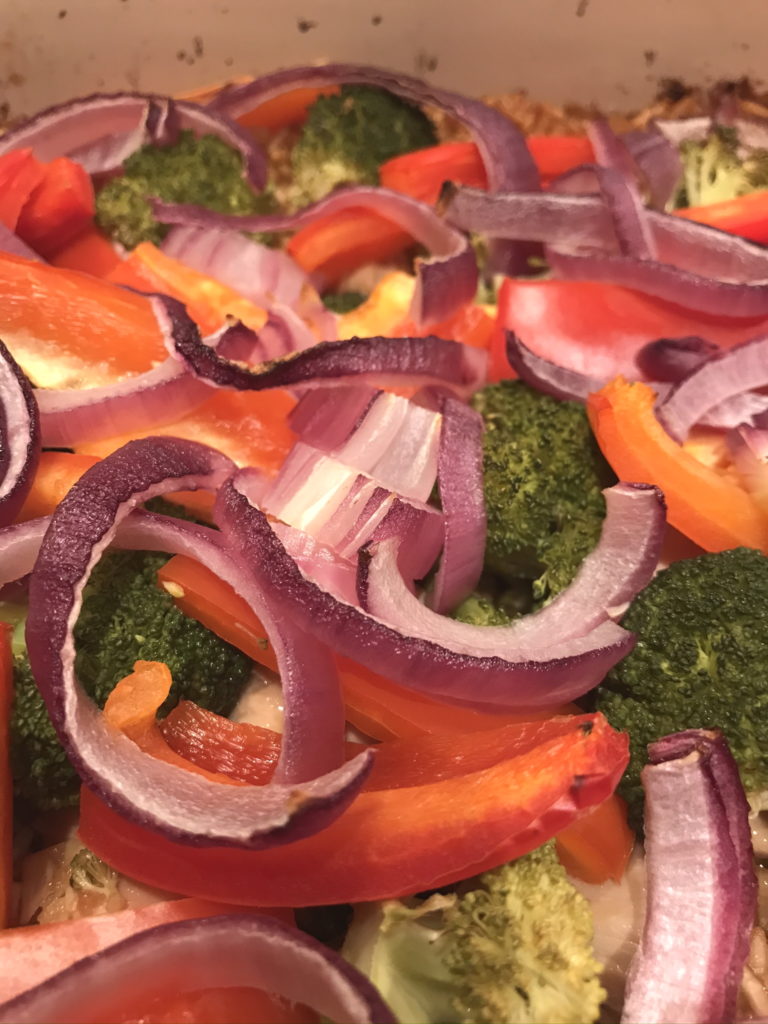
Slice up some veggies and throw them in the same pan that you cooked the chicken in. I like using colored peppers and red onion, but you can use any veggie you you like. Sauté them in the pan until the peppers are slightly tender. They might have a few char marks, which is fine.

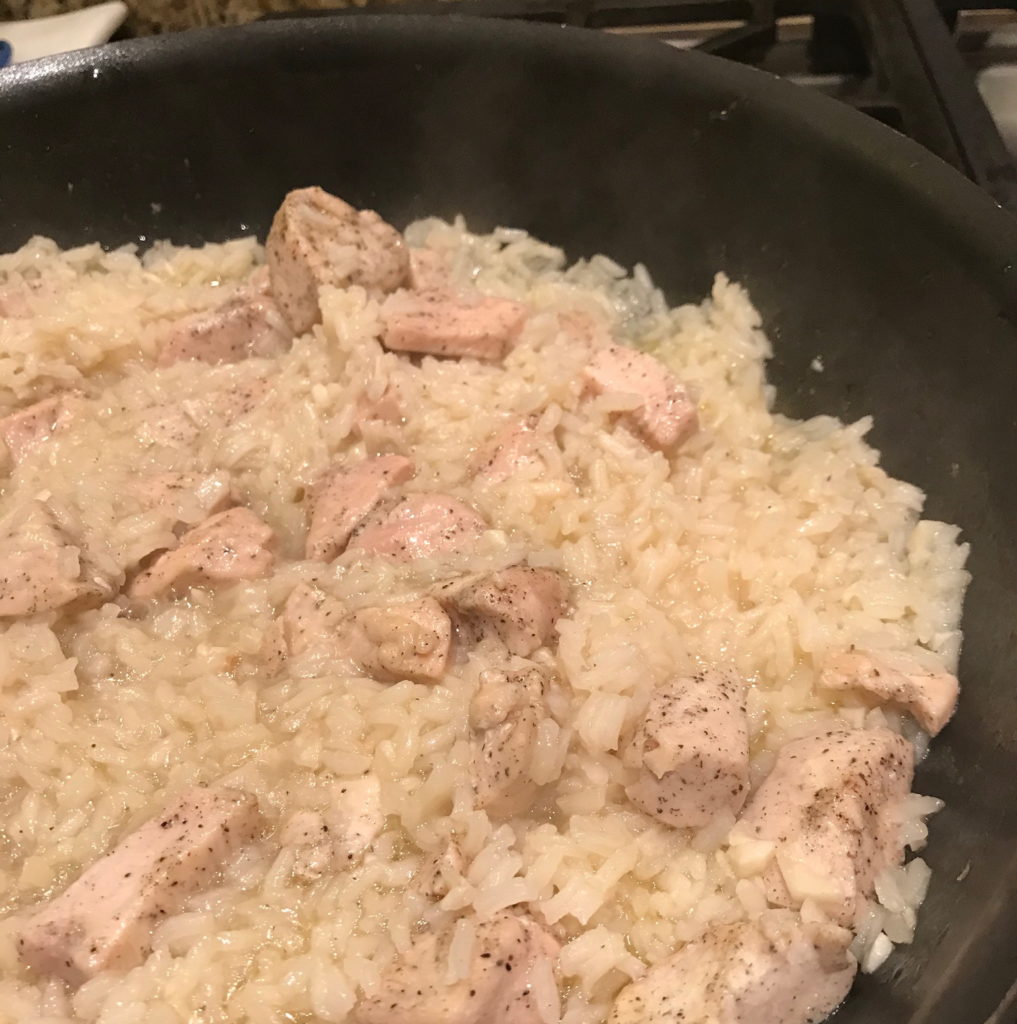
Confession time. This is when I should have taken another picture to show you what to look for, but I was busy nibbling on the chicken. Sorry. My bad.

Turn down the heat (or your tortillas will burn) and melt some butter on the skillet. You could use a separate griddle to make more at a time, but I like having only one pan to clean.

Lay down a tortilla and add a ton of cheese. Adding the cheese first acts like a glue and helps the chicken and veggies stay inside. Place the chicken and veggies on top and pile on more cheese. Cover with another tortilla. This makes a very large quesadilla so if you want to make a smaller one, feel free to place the cheese, chicken, and veggies on one half of the tortilla and fold it over like an omelet. I have to admit that this makes it easier to flip too.

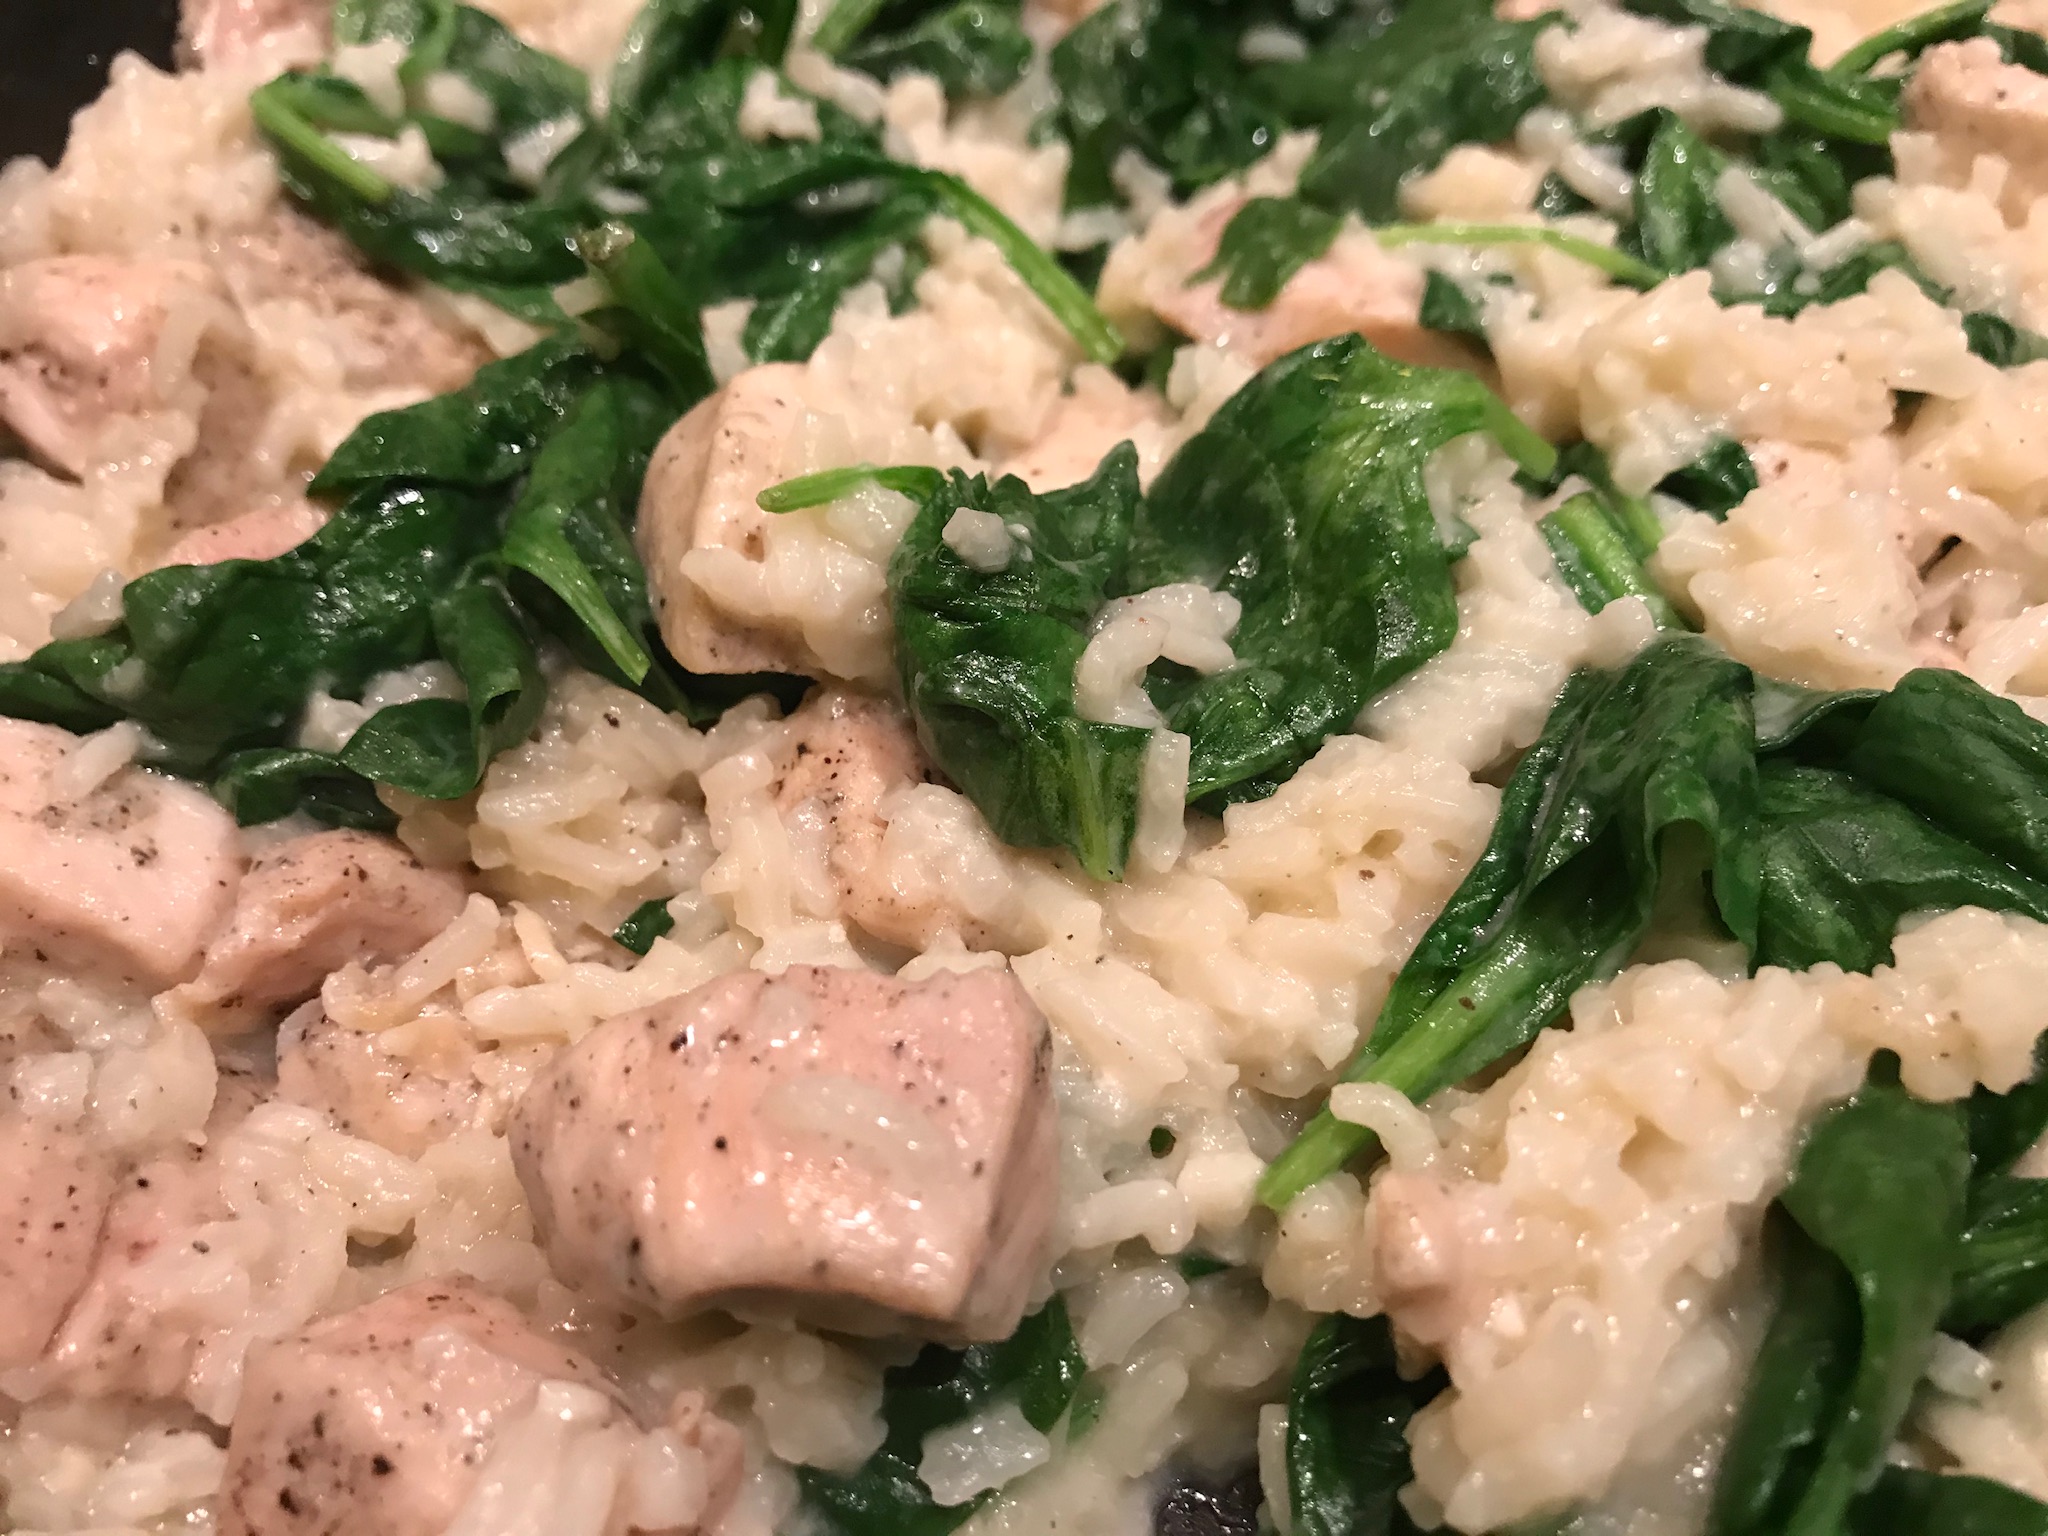
After a couple minutes, take a peek underneath to see if the tortilla is golden. When it is, using the biggest spatula you own, hold your hand over the center of the quesadilla and expertly flip that sucker in one single motion. Do not be hesitant or tentative. You want to be quick about it or you might lose some chicken, which isn’t the end of the world, but it’s nice when every stays in its proper place.

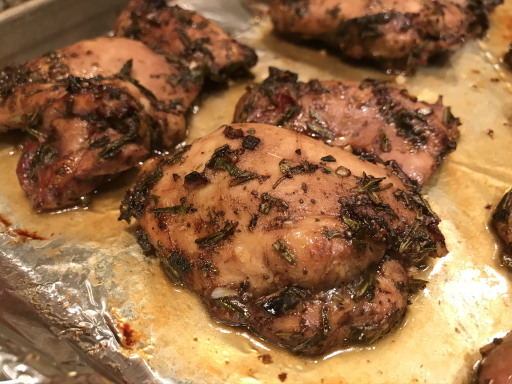
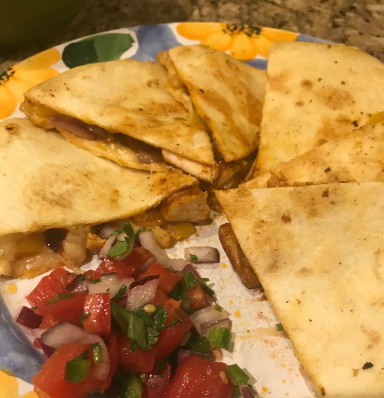
Cook for another couple of minutes until the other side is golden and the cheese is completely melted (it’s ok to lift the top to check). Slide the quesadilla onto a plate and scoop a pile of pico on the side.

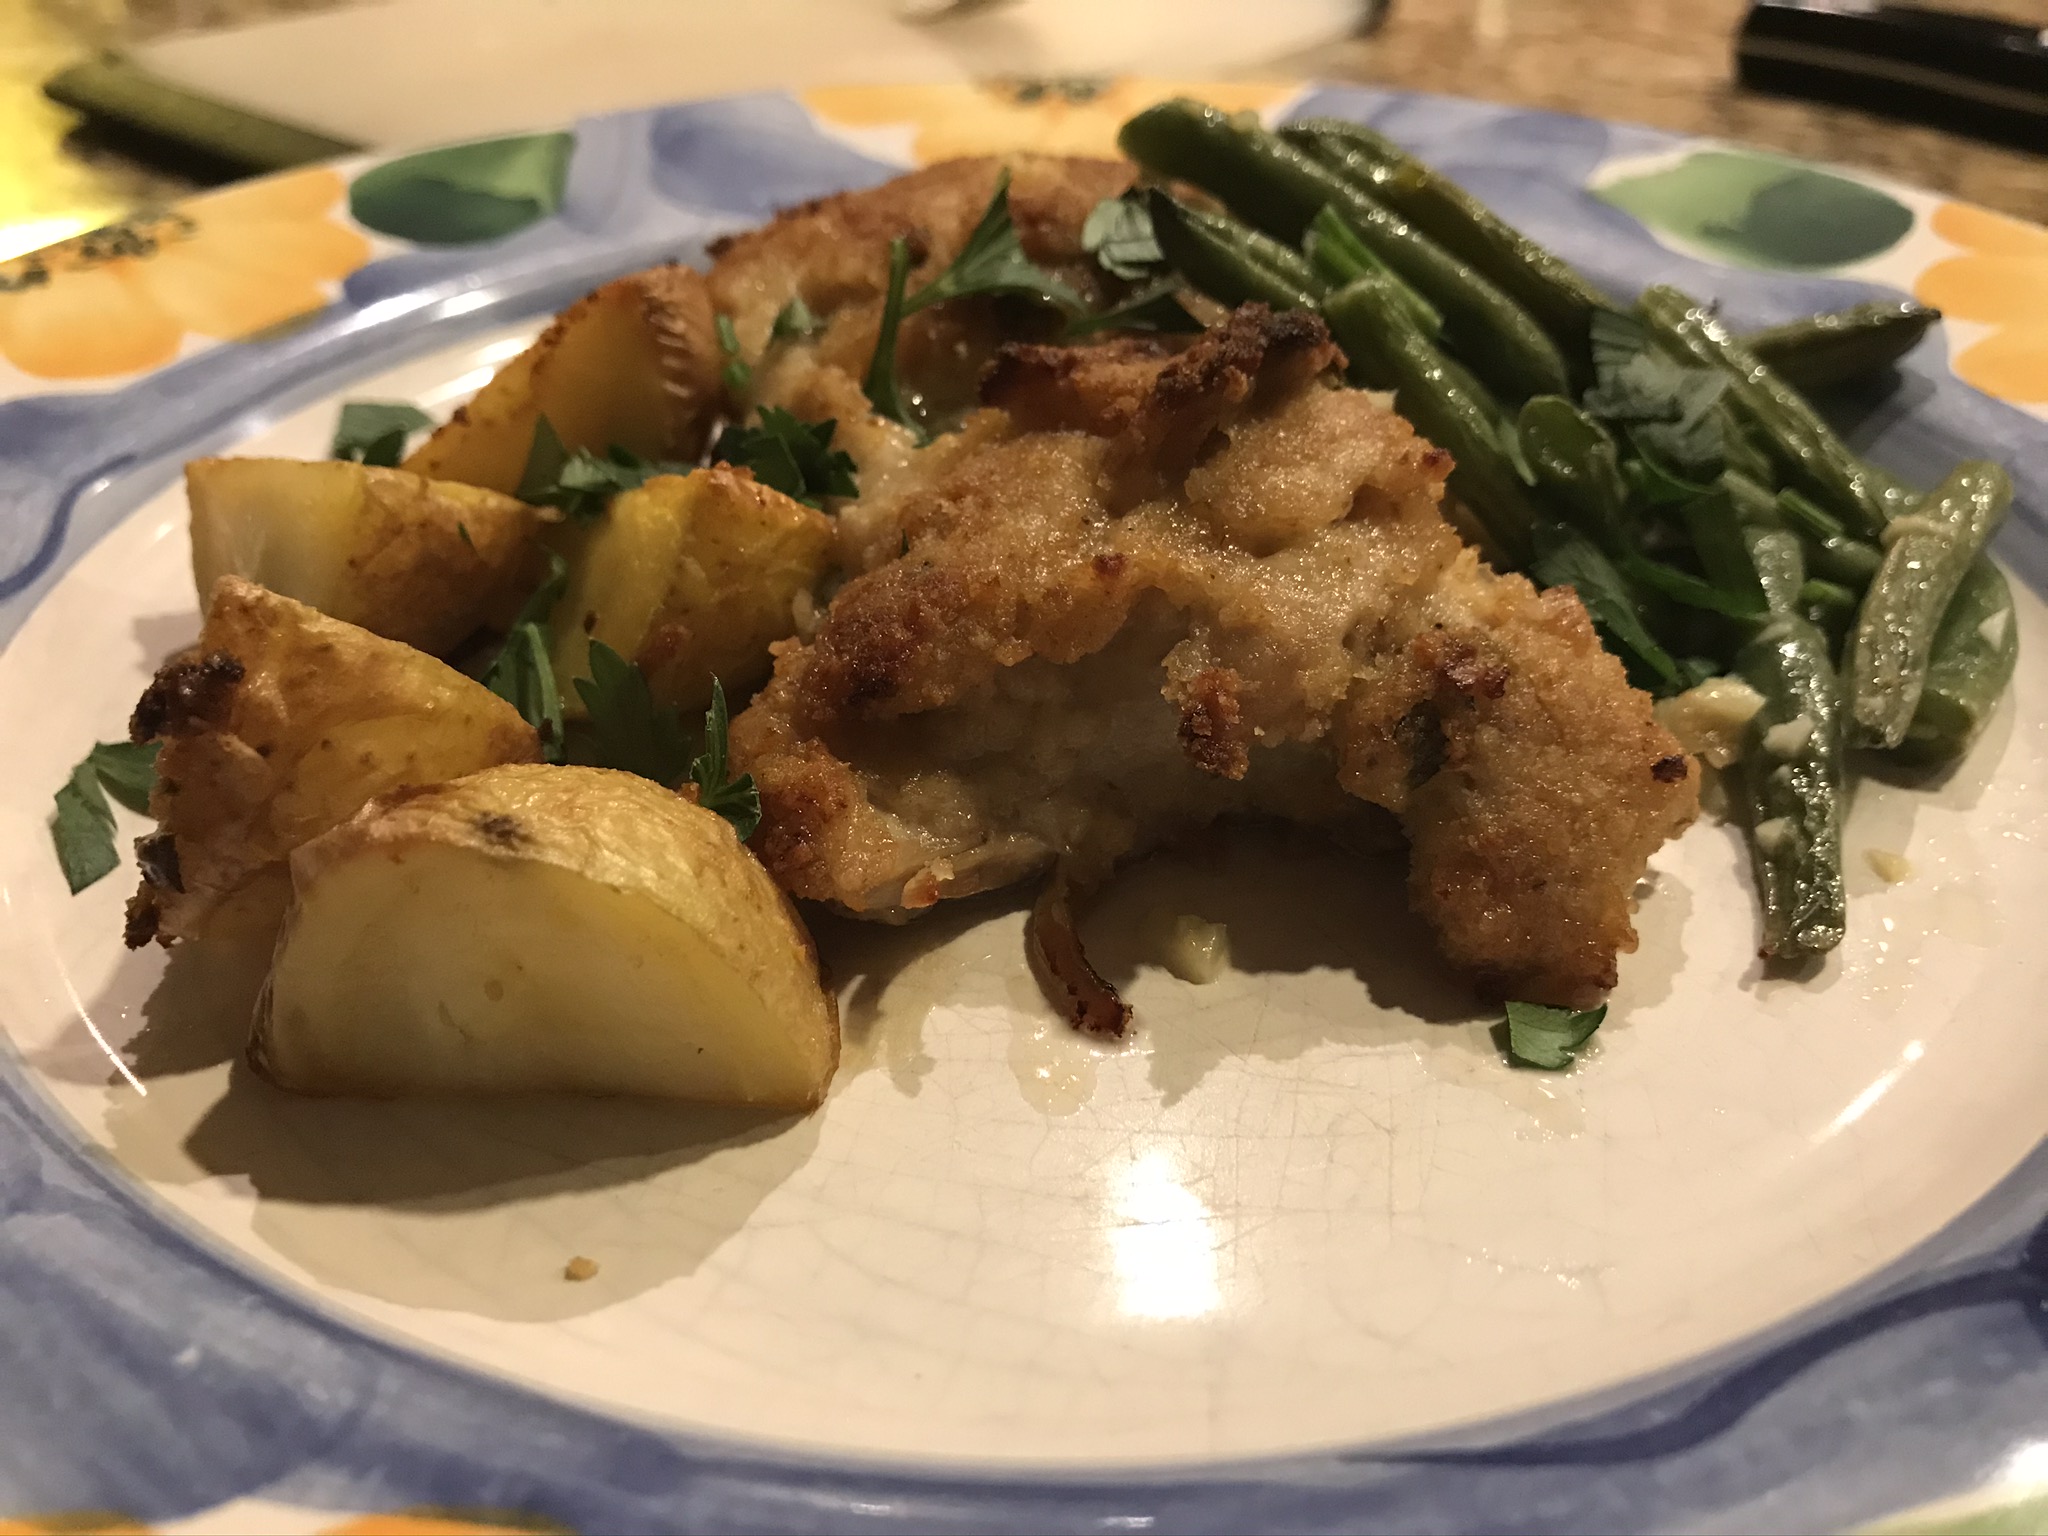
Yummy and fairly quick. It tastes better than it looks. Now off I go to work on my photography skills.

Chicken Quesadillas

Chicken Quesadillas

Servings 3

Ingredients
  

  • 6 large flour tortillas
  • 2 tablespoons olive oil
  • 1 pound skinless, boneless chicken breasts
  • salt and pepper
  • 1/2 package taco seasoning mix
  • 1/2 large red onion cut in half and then sliced
  • 1-2 bell peppers any color, seeded and sliced into strips
  • 2 1/2 cups grated Monterey jack cheese
  • butter for frying

Pico de Gallo

  • 6 Roma tomatoes diced
  • 1 1/2 red onions diced
  • 1 cup fresh cilantro leaves chopped
  • 1 jalapeño finely diced
  • juice of 1 lime
  • salt to taste

Instructions
 

  • Heat 1 tablespoon of the olive oil in a skillet over medium-high heat. Chop or dice the chicken into bite-sized pieces. Sprinkle the chicken with salt, pepper, and taco seasoning. Add the chicken to the skillet and sauté until browned. Because the pieces are small, the chicken will be cooked through. Set aside.
  • Add the remaining 1 tablespoon olive oil to the skillet over medium-high heat. Slice onions and peppers, and add them to the skillet. Cook until the peppers are tender, 3 to 4 minutes. Remove and set aside.
  • Turn down the heat slightly to medium-low and melt 1/2 tablespoon of the butter in the skillet or griddle. Lay a flour tortilla in the skillet. Add grated cheese on the bottom tortilla, and then add the chicken and cooked peppers/onion mixture. Top with more grated cheese and cover with another tortilla.
  • When the tortilla is golden on the first side, carefully flip the quesadilla to the other side, adding another 1/2 tablespoon butter to the skillet at the same time. Continue cooking until the second side is golden. Repeat to make additional quesadillas.
  • Cut each quesadilla into wedges and serve with pico de gallo.

Pico de Gallo:

  • Dice tomatoes (using a serrated knife) and onions. Chop the cilantro.
  • Cut a jalapeño in half. With a spoon, scrape out the insides. For more spice, leave some of the white membranes. Dice the jalapenos very finely. Add all four ingredients to a large bowl.
  • Slice a lime in half and squeeze the juice into the bowl. Sprinkle with salt, and stir together until combined. Taste the pico de gallo and add more salt if needed.
Blog

Instant Pot Honey Garlic Chicken

Jump to Recipe

Yes, another Instant Pot recipe. I can’t help it. It makes cooking so much easier. You really need to run out and buy one if you haven’t. Amazon has them for under $100. You don’t need to get the fancy WiFi version either. Just break down and get one already. You’ll use it more than you think. But I digress…I’ve promised myself that from now on, I’ll try to share more traditional recipes that don’t require fancy gadgets. Next time.

I’ve been on vacation for a couple of weeks and have been super lazy. After all the Christmas cooking, I needed a rest. We’ve all been living off leftovers like turkey and dressing. While this is all fine and good, it was starting to get a little old, even with the tri tip (and more leftovers) we made for New Year’s Eve.

To break the cycle, I decided to ease back into cooking by making this delicious pressure cooker dish from Delish. For those of you who are trying to stick to your New Year resolution of healthier eating, this recipe is very accommodating. If you are watching carbs, serve it with a salad instead of rice. If you’re watching your sugar, skip the glaze.

Season your chicken with salt and pepper. In general, you always want to season your meat, even if the recipe doesn’t call for it. It’ll make the meat taste better by adding the first layer of flavor. I’m usually generous with the ground pepper too.

I used boneless, skinless chicken because I like it better. I find it easier to work with, has a shorter cook time, and is just as tasty. I’m simply not a big fan of skin so when I remove the skin before eating the chicken, all those yummy seasonings disappear with it. Sadness. Granted bone-in, skin-on chicken might be juicer, it doesn’t matter for this recipe because the pressure cooker infuses so much liquid into the chicken.

Sauté the chicken in olive oil. In the meantime, make the marinade: olive oil, soy sauce, honey, sesame oil (don’t skip this ingredient!), garlic, lime juice, green onions, and red pepper flakes (don’t skip this either!). Be sure to whisk it completely so the honey is fully incorporated. The sesame oil provides that nuttiness reminiscent of Asian flavors that this dish needs while the red pepper enhances the dish. I’m always cautious with anything spicy because of the rest of my family (not big fans of red pepper), but trust me when I say you won’t be able to taste it. In fact, I usually add a pinch to spaghetti sauce because it takes the sauce over the top good in a subtle not-sure-what-that-secret-ingredient-is way. It’s the same here.

When the chicken is browned, add the marinade.

Lock it up and pressure cook on high for 10 minutes. Go make a salad or some rice.

When it’s done, make the glaze. Take out the chicken. Then, remove 1/4 cup of the sauce and whisk in some cornstarch. Add that back to the pot and simmer until thickened. Serve over the chicken and rice, garnished with green onions.

To be completely honest, everyone thought this glaze was completely unnecessary. Maybe we’re just not fancy people, but it’s just there to add a sauce to the rice. I ate the chicken without the glaze along with a salad, and found the chicken to be very flavorful and fall apart tender. My son wanted nothing to do with the glaze (and god forbid the chicken touched the rice, but that’s a different story for another day). My husband tried it with the glaze and said it wasn’t anything special. No glaze it is! Also, I found the glaze to be a bit oily. The sauce called for 1/4 cup of olive oil, which at the time I was blown away at the amount, but then again, it’s for a marinade so that’s a perfectly respectable amount. When converted over to a glaze, it’d hard to disguise. Regardless, this recipe got three thumbs up by all of us. Definitely a make again recipe.

Instant Pot Honey Garlic Chicken

Instant Pot Honey Garlic Chicken

Servings 4

Ingredients
  

  • 4 boneless, skinless chicken thighs
  • kosher salt
  • ground black pepper
  • 1/4 cup extra-virgin olive oil plus 2 tablespoons for browning the chicken
  • 1/4 cup low-sodium soy sauce
  • 2 tablespoons honey
  • 1 tablespoon sesame oil
  • 2 cloves garlic minced
  • 1 lime juiced
  • 2 green onions thinly sliced, plus more for garnish
  • pinch crushed red pepper flakes
  • 1 tablespoon cornstarch
  • cooked rice

Instructions
 

  • Season chicken with salt and pepper on both sides. Set Instant Pot to Sauté function and add 2 tablespoons olive oil. Add chicken and cook until golden, about 3 minutes. Then flip and cook for another 3 minutes more. Work in batches as necessary. Turn Instant Pot off of Sauté function.
  • In a medium bowl, whisk together remaining 1/4 cup olive oil, soy sauce, honey, sesame oil, garlic, lime juice, green onions, and pinch of red pepper flakes. Place chicken in Instant Pot and pour sauce over. Lock lid and set to Pressure Cook on High for 10 minutes.
  • Quick release, making sure to wait until cycle is completely before, unlocking and removing lid. Using tongs, remove chicken from Instant Pot and set on plate to keep warm.
  • Ladle out about 1/4 cup of sauce from Instant Pot and whisk in cornstarch. Pour liquid back into Instant Pot and set to Sauté function. Let sauce simmer until thickened slightly, about 5 minutes.
  • Pour sauce over chicken, and garnish with green onions, and serve over rice.
Blog

Sheet Pan Lemon Parmesan Chicken and Veggies

Jump to Recipe

I’ve been sharing a lot of recipes that use my favorite kitchen toys. I know not everyone has a slow cooker, pressure cooker, and air fryer so it’s time for something more conventional. Sit down for this one. The oven. I know. Scandalous.

I really like sheet pan recipes when they work, like those Sheet Pan Chicken Fajitas I posted. Here’s another one that you need to try. It’s a super easy week night meal with everything you need: chicken, potatoes, and green beans. It’s perfect. Its lemony, cheesy, garlicky goodness is sure to please everyone. Did I mention it’s easy to make?

If you don’t like potatoes or green beans, skip the one you don’t like. You can also try using other veggies, such as carrots, bell peppers, sweet potatoes, etc. Just be aware that the cooking times might vary.

In a bowl, mix an egg, lemon juice, garlic, parsley, and seasonings. This will be your marinade and the liquid to help your dredge stick to your chicken. Marinade the chicken for 30-60 minutes. Try not to skip this part, but don’t marinade longer than this (like overnight) or your chicken might end up tough.

By the way, I know I wasn’t going to talk about kitchen toys, but I really like this lemon squeezer so here’s a picture of it. It doesn’t take up a lot of space and it keeps the seeds out of your food. You should buy one. No pressure.

While you wait, it’s time for the veggies.

Let’s pause to express my opinion about dealing with green beans. Hate it. It takes soooooo long to string, trim, and cut them into thirds. But I love green beans. What’s a girl to do? You can reduce the prep time by buying bagged trimmed green beans. This is a good short-cut. Alas, I never find the beans to be as good as the fresh ones, but I will resort to trimmed green beans if the fresh ones are stringy. There’s no shame in this. This time I decided to use fresh beans and do all the work myself. Yes, sometimes I’m a show-off.

Toss your potatoes in half of the butter/garlic mixture and the green beans in the other half.

When your chicken is done marinading, combine breadcrumbs and Parmesan, and then dredge the chicken in the mixture.

Don’t be like me and forget to spray your foil-lined baking sheet with cooking spray. Generously spray the sheet. Then place your chicken on the sheet and surround them with potatoes. Bake!

After 15 minutes, flip your chicken and add your green beans. Be sure to embrace the amazing aroma of lemon and garlic wafting through your house. Also enjoy the fact that your entire dinner is in the oven and you don’t have to lift a finger to make a side dish.

Cook for another 10-15 minutes on broil until the chicken is golden and the veggies are cooked through.

Sit back and watch as your family is impressed with your ninja like cooking skills.

Sheet Pan Lemon Parmesan Chicken and Veggies

Sheet Pan Lemon Parmesan Chicken and Veggies

Servings 4

Ingredients
  

For the chicken

  • 1 large egg
  • 1 1/2 lemons juiced
  • 3 teaspoons minced garlic
  • 1/2 tablespoon fresh parsley chopped
  • 1/2 teaspoon salt
  • 1/2 teaspoon pepper
  • 1/2 cup breadcrumbs
  • 1/3 cup grated Parmesan cheese
  • 4 skinless, boneless chicken thighs

For the veggies

  • 1/2 pound potatoes quartered
  • 1/3 cup butter melted
  • 3 teaspoons minced garlic
  • salt to taste
  • 3/4 pound green beans trimmed and cut into thirds

Instructions
 

  • Preheat the oven to 400F. Grease a baking sheet with cooking spray and set aside.
  • In a bowl, whisk together an egg, lemon juice, garlic, and salt. Place the chicken in the egg mixture and marinade in the refrigerator for 30-60 minutes. You can skip this step, if necessary.
  • Wash and quarter the potatoes. Wash, trim, and cut fresh green beans into thirds. Pour half of the butter mixture over the potatoes and the other half over the green beans. Toss to coat.
  • In a bowl, mix breadcrumbs and Parmesan cheese. Dredge the marinaded chicken in the breadcrumb mixture, making sure the crumbs stick to the chicken, pressing if needed.
  • Place chicken and potatoes on a cooking sheet, arranging the potatoes around the chicken in a single layer.
  • Bake in the oven for 15 minutes.
  • Remove the baking sheet from the oven and flip chicken. Move the potatoes to one side and place the green beans around the chicken.
  • Turn the oven to broil. Return the baking sheet to the oven and broil for 10-15 minutes. The chicken should be cooked to 165F, golden, and crispy. The potatoes and green beans should be cooked though.
  • Sprinkle with fresh chopped parsley and serve.
Blog

Air Fryer Fried Chicken

Jump to Recipe

Welcome to the world of air frying! It seems to be very popular suddenly, which is good because I finally broke down and bought the small Ninja air fryer. It’s my latest fun toy and I love it. So far, I’ve made french fries and this fried chicken, which was pretty amazing. I plan to try out fried pickles, donuts, and plenty of other goodies in the near future.

What I like about this recipe: No greasy mess. Healthier than fried chicken. Crispy on the inside, juicy on the inside. Better than oven-baked fried chicken. Period. I don’t see why to make fried chicken any other way.

Kudos to the Kitchn for this recipe! You can really use any of your favorite seasonings, but because this was my first attempt, I decided to follow a recipe…mostly. I did stray a little. Sorry people, but I’m not buying a whole chicken and cutting it up into 10 pieces. I took a knife skills class and learned how to do it, but frankly, I suck at it. My hacked up chicken looked pretty pitiful and my revolted stomach wanted nothing to do with it. I’m sure I’d get better with practice (and kudos to you if you rock the whole carving thing), but it’s not for me. Furthermore, I only wanted to use thighs and legs. Sort of wasteful to use a whole chicken.

First, you want to marinate your chicken in buttermilk for an hour or more. Don’t skip this part. Marinating in buttermilk makes the chicken super tender. I’m not sure about you, but I don’t like buying buttermilk because I never use it all so if you’re like me, make your own buttermilk with milk and vinegar. It’s a no brainer.

While the chicken is soaking up all that buttermilk, measure out a zillion seasonings and flour. This is the hardest part. 🙂

Mix it all up and when your chicken is ready, dredge it using a pair of tongs to avoid a sticky floury mess on your fingers.

Be sure to shake off any excess flour. Like I mentioned earlier, the recipe calls for a 3-4 pound whole chicken, but I used about 2 pounds of thighs and legs. I have PLENTY of flour leftover. Feel free to use more chicken if you want.

(Air) fry it up! I sprayed the racks with cooking spray, but I also sprayed the chicken so the coating would cook through. Twenty minutes later, you have fried chicken!

Air Fryer Fried Chicken

Air Fryer Fried Chicken

Servings 6

Ingredients
  

  • 3-4 pounds chicken cut-up into pieces
  • 1 teaspoon kosher salt
  • 1 teaspoon black pepper divided
  • 2 cups buttermilk
  • 1 tablespoon kosher salt
  • 2 cups all-purpose flour
  • 1 tablespoon garlic powder
  • 2 tablespoons paprika
  • 1 teaspoon cayenne pepper
  • 1 tablespoon onion powder
  • 1 tablespoon ground mustard
  • cooking spray

Instructions
 

  • Place chicken in a large bowl and season with 1 teaspoon of kosher salt and 1/2 teaspoon of black pepper. Add 2 cups buttermilk and marinate for at least 1 hour in the refrigerator. Overnight is better.
  • Meanwhile, whisk 1 tablespoon kosher salt, remaining 1/2 teaspoon black pepper, all-purpose flour, garlic powder, paprika, cayenne pepper, onion powder, and ground mustard together in a large bowl.
  • Preheat an air fryer to 390F. Coat the air fryer racks with cooking spray.
  • Remove the chicken from the buttermilk, allowing any excess to drip off. Dredge in the flour mixture, shaking any excess off. Place a single layer of chicken in the basket, with space in between the pieces.
  • Air fry, flipping the chicken hallway through, until crispy and an instant-read thermometer registers 165F in the thickest piece, 15 to 20 minutes total. Repeat with the remaining chicken.
Blog

Chicken and Wild Rice Soup

Jump to Recipe

After reading an article about wild rice, my husband asked me if I could cook some wild rice for dinner. I completely jumped on the opportunity. You see, as much as I adore my husband, he’s not a foodie. He likes his steak. He likes tasty food. But he would be just as satisfied if he could skip the whole eating process. It takes away from his (gaming) hobbies whereas eating and making food is my hobby. So when he asked for wild rice, I was pretty excited.

I searched high and low for a tasty wild rice recipe. I was inspired by the weather. It’s been rainy and cold so therefore, soup weather. I decided on a soup recipe from Food and Wine. I stuck to the recipe, but if I had to do it over again, I’d leave out the cream. Don’t get me wrong, the cream makes it…creamy (duh). But apparently some of us do not like creamy soups except for clam chowder. And maybe potato and leek. Whatever. Let’s just leave it at that.

First, let’s talk about wild rice. What the heck is it exactly? Wild rice is a grain and distant cousin to white and brown rice. Like other rices, wild rice is the seed from a type of grass grown in Asian and the US, but not the same grass of other rices. It’s more common in the US and pretty healthy for you. High in fiber and protein. Full of antioxidants. That sort of thing. It’s nutty and chewy so seriously, it does feel like you’re eating a superfood.

To make this recipe, I needed 4 cups of cooked chicken. You can use a rotisserie chicken or any leftover chicken, but I didn’t have any so I cubed two large chicken breasts, seasoned them with salt and pepper, and cooked them until they were no longer opaque. I didn’t want to cook it beyond that because I knew they’d continue to cook in the soup and my family is adverse to dried out chicken. So picky.

While the chicken is cooking, I chopped my veggies. It’s important that your carrots and celery are the same thickness, about a 1/2 inch.

In a dutch oven, I melted butter and then added the veggies and seasonings.

Stir it until everything’s starting to soften, but not too much. You want the carrots to be barely tender or they’ll end up mushy at the end. Note that you will be cooking this soup for another 45 minutes. Add flour and cook for another 3 minutes. Add rice and stock. After boiling, bring it down to a simmer and let it do its thing for 30 minutes.

Your veggies will continue to soften and your rice will begin to cook. Add chicken and let it simmer for 15 minutes until the wild rice is tender. If you’ve never had wild rice before, here’s a tip. It won’t be as tender as other rice, but chewy and you can bite through it. At the very end (or not), stir in the cream. Add some salt and pepper, and then serve. This is a really hearty soup that will fill you up and not leave you hungry.

Chicken and Wild Rice Soup

Chicken and Wild Rice Soup

Servings 8

Ingredients
  

  • 4 tablespoons butter
  • 3 celery stalks cut into 1/2-inch pieces
  • 2 carrots cut into 1/2-inch pieces
  • 1 medium onion chopped
  • 2 cloves garlic minced
  • 1 1/2 teaspoons thyme finely chopped
  • salt and pepper
  • 1/4 cup all-purpose flour
  • 5 ounces wild rice about 1 cup
  • 2 quarts chicken stock
  • 2 cups water
  • 4 cups cooked chicken cut into bite-size pieces
  • 1 cup heavy cream optional

Instructions
 

  • In a dutch oven (or large saucepan), melt the butter. Add the celery, carrots, onion, garlic, thyme and a generous pinch of salt and pepper. Cook over moderate heat, stirring occasionally, until the vegetables just start to soften, about 10 minutes. Sprinkle the flour over the vegetables and cook, stirring, until evenly coated and lightly browned, about 3 minutes.
  • Add the wild rice to the saucepan and gradually stir in the stock and water. Bring to a boil, and then simmer over moderately low heat, stirring occasionally, until the vegetables are tender, about 30 minutes.
  • Add the chicken and simmer, stirring occasionally, until the wild rice is tender, 10 to 15 minutes longer. Stir in the cream (optional – if you want a creamy soup) and season with salt and pepper. Ladle the soup into bowls and serve.
Blog

Creamy Garlic Chicken and Rice

Jump to Recipe

If you are looking for a one-pan, easy weeknight dinner, look no further. This is the one. It comes from Tbps., but with a couple minor adjustments.

So first off, I was skeptical. How would the rice cook in time without overcooking the chicken? It all works, but I would try a few things differently in the future. Keep reading.

The recipe calls for chicken breasts. While this works fine, 33% of this household (1 out of 3 people…ha ha!) thought the chicken was dried out. 66% disagreed. Just to test the difference, I’d like to make this again using skinless, boneless chicken thighs, my current favorite cut of chicken. Regardless of what you use, you need a pound of chicken cut into chunks seasoned well with garlic powder, salt, and pepper.

The recipe calls for cooking it until browned. I cooked it just under that in the hopes the chicken would not be overcooked in the end.

Throw in your rice and broth. After reaching to a boil, simmer for 20 minutes. Mine wasn’t ready. Too much liquid.

So I cooked it for another 5 minutes. The liquid should be mostly gone and the rice should be tender. The rice will continue to absorb the liquid so aim for what’s shown below.

Next, add the spinach. Make sure you’ve turned off the heat and removed the pan from the burner. You just want the spinach to wilt slightly. Don’t worry if you barely have enough room. In fact, I think it could use more spinach!

Mix it all up and stir in some cream. If you’re like me and never have cream around, milk works fine too. Dinner is served!

Creamy Garlic Chicken and Rice

Creamy Garlic Chicken and Rice

Servings 4

Ingredients
  

  • 1 pound boneless, skinless chicken breasts or thighs cut into chunks
  • 1 teaspoon garlic powder
  • 1/2 teaspoon salt
  • 1/2 teaspoon black pepper
  • 1 tablespoon olive oil
  • 1 clove garlic minced
  • 3/4 cup white rice
  • 2 1/2 cups chicken broth
  • 2 cups baby spinach
  • 2 tablespoons heavy cream or milk

Instructions
 

  • Toss the chicken with garlic powder, salt, and pepper. Heat olive oil in a 10-inch skillet over medium heat. Add chicken breast and cook for about 3 minutes until it's no longer pink on all sides. Add garlic to skillet and cook for 30 seconds more.
  • Stir in rice and chicken broth. Bring to a boil, reduce to a simmer, and cover. Cook for 20-25 minutes, stirring occasionally, until liquid is absorbed.
  • Remove pan from heat and place baby spinach on top of the rice. Cover and let sit for 5 minutes.
  • Remove lid and stir well. Stir in cream or milk, and serve.
Blog

Balsamic Chicken

Jump to Recipe

Anything balsamic is one of my favorite things. I used to think balsamic was this watery vinegar stuff, but I’ve since learned that it should be syrupy and packed with flavor. Because it’s so flavorful, it makes an awesome marinade for practically everything from chicken and beef to vegetables and potatoes. It’s this wonderful sweet, tangy glaze that comes in a bottle that makes food magically tasty. Win win.

Balsamic chicken also reminds me of Thanksgiving so it’s a great recipe to share the week before. The secret ingredient is sage, which I’m a big fan of when it comes to turkey day. Sage should have a big presence on Thanksgiving and it certainly does with this chicken recipe.

Start with fresh garlic and herbs, like rosemary and sage (of course). I used dried oregano because I was out of fresh.

In a large bowl, mix your garlic and seasonings with balsamic vinegar, olive oil, and a little sugar. Drop your chicken in. Combine it around with your hands until the chicken is well coated. Throw it on a foil-lined baking sheet. That’s it. You don’t have to even wait to marinade.

Bake for about 25 minutes and out comes dinner. Serve with your favorite sides. Now everyone lives happily ever after, or until the next meal.

Balsamic Chicken

Balsamic Chicken

Servings 8

Ingredients
  

  • 8 4 oz pieces boneless, skinless chicken thighs
  • kosher salt
  • black pepper
  • cooking spray
  • 3 tablespoons balsamic vinegar
  • 1 tablespoon olive oil
  • 2 cloves garlic minced
  • 1/2 teaspoon sugar
  • 1 tablespoon fresh rosemary chopped
  • 1/2 teaspoon dried oregano
  • 1/2 tablespoon fresh sage chopped

Instructions
 

  • Preheat oven to 425F.
  • Season chicken with salt and pepper. Line a large baking sheet with foil. Spray foil with cooking spray.
  • Combine balsamic vinegar, olive oil, garlic, sugar, rosemary, oregano, and sage in a large bowl.
  • Add chicken and mix well until chicken is coated. Using your hands is the easiest.
  • Arrange chicken onto the prepared baking sheet in a single layer.
  • Bake for about 25 minutes or until the chicken is cooked through.
Blog

Slow Cooker Chicken Chili

Jump to Recipe

It’s slow cooker season! Then again, when is it not slow cooker season? It’s great on those hot summer days when you don’t want to heat the house up with your oven, and it’s wonderful during those chilly fall days when you want something warm and comforting for dinner.

Instead of soup, I decided to make chili, but I didn’t want anything too heavy. Chicken chili is the perfect balance of filling, but not as rich as a beef chili. This particular chili is not very thick so it’s almost like a hearty soup.

Warning! This chili has beans. I’m not going to engage in a beans versus no beans debate. I’m from California. We do whatever we want out here.

Measure out your spices.

There’s a little prep work. If you have a slow cooker with a saute setting, even better, but you can do all of this in a skillet and it works just as well.

Brown ground chicken and set aside.

Chop up your garlic and onions, and saute them .

Add your spices and stir. Your kitchen will smell really good about now.

Add the browned chicken and rest of your ingredients, including those ever so controversial beans.

Cook for 6 hours on low. Dinner is served!

Slow Cooker Chicken Chili

Slow Cooker Chicken Chili

Servings 8

Ingredients
  

  • 2 teaspoons vegetable oil
  • 2 pounds ground chicken
  • 1 teaspoon kosher salt
  • 1 teaspoon vegetable oil
  • 4 cloves garlic
  • 1 medium onion finely diced
  • 1/8 cup chili powder
  • 2 teaspoons cumin
  • 1/4 teaspoon cinnamon
  • 1 cup chicken stock
  • 15 ounces canned pinto beans undrained
  • 15 ounces canned cannellini beans undrained
  • 28 ounces canned diced tomatoes
  • 6 sun-dried tomatoes finely chopped
  • 2 teaspoons molasses
  • 2 teaspoons Worcestershire sauce
  • 2 teaspoons kosher salt
  • freshly ground black pepper to taste
  • cheese, onions, etc. for garnish

Instructions
 

  • Heat 2 teaspoon of the oil in a slow cooker on the saute setting (or complete the following 3 steps in a large nonstick skillet over high heat). Add ground chicken and 1 teaspoon salt, cook, breaking the meat apart with a wooden spoon, until browned, about 4 minutes. Set aside.
  • In the slow cooker, add 1 teaspoon of oil, and then add garlic and onions, stirring and scraping up any browned bits, until the onions soften, about 5 minutes.
  • Add the chili powder, cumin, and cinnamon. Stir constantly for 1 minute to cook the spices. Pour in the chicken broth and scrape the bottom of the pan.
  • Add browned chicken to the slow cooker along with beans and liquid, canned tomatoes, sun-dried tomatoes, molasses, Worcestershire sauce, 2 teaspoons salt, and black pepper (to taste).
  • Cover and cook on the low setting for 6 hours. Garnish with cheese, onions, or your favorite chili toppings.

Blog

Oven-Baked Teriyaki Chicken

Jump to Recipe

This easy dish lets you throw a bunch of things together and presto! Out comes a meal! What’s not to love? Plus it’s something you wouldn’t expect: teriyaki chicken. Most teriyaki chicken recipes require you to cook the chicken, then the veggies, and then the rice, usually separately. Although that’s not hard, sometimes you don’t feel like standing over the stove. This recipe doesn’t require you to. Instead, you can prop your feet up and relax while it bakes in the oven. It’s also healthy and a good way to eat your veggies.

There’s a little prep required. In addition to chopping up some veggies, you’ll need to grate some ginger.

I know what you’re thinking. How do I peel this darn this before I grate it? OK, maybe you weren’t thinking that, but you could have been. Let’s go with it.

There are a couple easy tricks. If you want to mince ginger, scrap a spoon along the skin and it peels right off. For this recipe, you need grated ginger so just grate it using a fine shredder. It’ll remove the skin and fibers, leaving you with a pile of pure ginger. Super easy. No peeling required.

You’ll also need to chop up chicken into cubes. Using boneless, skinless chicken is the easiest.

Whisk together your sauce and add the chicken. Throw your raw rice into a 9×13 casserole pan and pour the chicken mixture on top. All the ingredients will end up where they should, but it’s a good idea to spread out your chicken evenly.

Pile your veggies on top. I love veggies. Yes, I’m weird. The more veggies, the better. I used a lot so that it covers the entire casserole dish. Don’t feel like you have to do this. I used red onions, broccoli, and red peppers, but you can use any veggie you prefer.

Cover it with foil, pop it into the oven, and kick back. Play a word game. Chat with a friend. Watch Queer Eye. You’ll need to pause after 25 minutes to briefly remove the foil, but then go back to your “me” time. Assuming you don’t have a kid chanting “Mom…Mom…Mom….”

After another 20-25 minutes, pull out the dish. You shouldn’t see any liquid and the rice will be tender. The veggies should still retain most of their color. You don’t want mushy, overcooked veggies. If that’s what you’re used to, no wonder you don’t like vegetables.

I like to mix it all up and then serve it in a bowl, topped with green onions. Pardon my bowl choice. My pasta bowls were clean. My pretty white bowls were not. Oh well. Life goes on. It all tastes good regardless. 🙂

Oven-Baked Teriyaki Chicken

Oven-Baked Teriyaki Chicken

Servings 6

Ingredients
  

  • nonstick cooking spray
  • 2 cups low-sodium chicken broth
  • 3/4 cup teriyaki sauce
  • 1/4 cup water
  • 2 tablespoons sesame oil
  • 2 teaspoons ginger grated
  • 3 cloves garlic minced
  • 1 pound boneless, skinless chicken breast cubed
  • 1 1/2 cups raw jasmine rice or any other white rice
  • 1 red onion sliced
  • 3 cups broccoli cut into florets
  • 2 red bell peppers sliced
  • 3 green onions white parts, sliced

Instructions
 

  • Preheat the oven to 425F. Spray a 9×13 inch casserole pan with nonstick spray.
  • In a medium bowl, whisk together the chicken broth, teriyaki sauce, water, sesame oil, ginger, and garlic. Add the chicken and stir to coat.
  • Spread the rice evenly in the bottom of the pan. Pour the chicken mixture over the rice, making sure the chicken is evenly distributed. Top with onion, broccoli, and peppers evenly.
  • Cover with foil and bake for 25 minutes. Remove the foil and bake until the sauce has thickened, the rice is tender, and the chicken is cooked through, about 20-25 minutes.
  • Let it sit for another 5 minutes before serving to allow for the rice to absorb any additional moisture.
  • Mix and serve topped with sliced green onions.
Blog

Maple Chicken and Carrots

Jump to Recipe

I subscribe to way too many cooking email lists. As a result, I read through a lot of recipes. For this weekend’s recipes, I looked for something to make that reminded me of fall.

No, not pumpkin spice fall.

Leaves falling from the trees, chilly mornings, warm fuzzy socks fall. So when I came across this recipe on Delish, I hit perfection. I imagined maple buckets hanging from trees as the leaves gently fall off the branches. Or at least that’s what’s going on in my Californian mind. Carrots are available year round, but they are still a root vegetable and more common when it’s harder to grow anything above ground. It had fall written all over it.

This main dish is fairly straight-forward and easy to make during the week. I prepped all my ingredients, including chopping the carrots into 1/4-inch round circles.

I chose to use my trusty cast-iron pan to sear the seasoned chicken. Set aside.

In the same skillet you combine the sauce ingredients, including apple cider vinegar, garlic, maple syrup (use the real stuff, not the fake maple-colored corn syrup or whatever that stuff is made of), Dijon mustard, lemon, and thyme.

Add the chicken back in and spoon some sauce over each piece. Add your carrots.

Stick the entire pan in the oven. Twenty minutes later, you end up with chicken that has a sweet, tart blend of maple, apple, and mustard flavors. It was sweet without being cloying. Tart without being too acidic. Spicy without being overwhelming. Perfection. To be eaten in fuzzy socks, next to a warm fire.

Maple Chicken and Carrots

Maple Chicken and Carrots

Servings 4

Ingredients
  

  • 5 carrots peeled and sliced into 1/4-inch thick rounds
  • 2 tablespoons extra-virgin olive oil divided
  • kosher salt and black pepper
  • 6 skinless, boneless chicken thighs
  • 1/4 cup apple cider vinegar
  • 3 cloves garlic minced
  • 1/4 cup real maple syrup
  • 2 tablespoons Dijon mustard
  • 1 tablespoon fresh thyme leaves
  • 1/2 lemon juiced

Instructions
 

  • Preheat oven to 425F.
  • In a medium bowl, toss carrots with 1 tablespoon of olive oil and season with salt and pepper. Season chicken thighs with salt and pepper. Prep the rest of your ingredients.
  • In a cast-iron pan or other oven-safe skillet, heat 1 tablespoon of olive oil over medium-high heat. Add chicken thighs and sear 2 minutes per side. Remove chicken and transfer to a plate. Do not discard pan drippings.
  • Add vinegar to pan and scrape up bottom bits from pan with a wooden spoon. Add garlic, maple syrup, mustard, thyme, and lemon juice. Bring to a simmer.
  • Return chicken to skillet and spoon sauce over thighs.
  • Nestle carrots into skillet. Bake until chicken is cooked through and carrots are tender, 20 minutes. Serve with sauce.